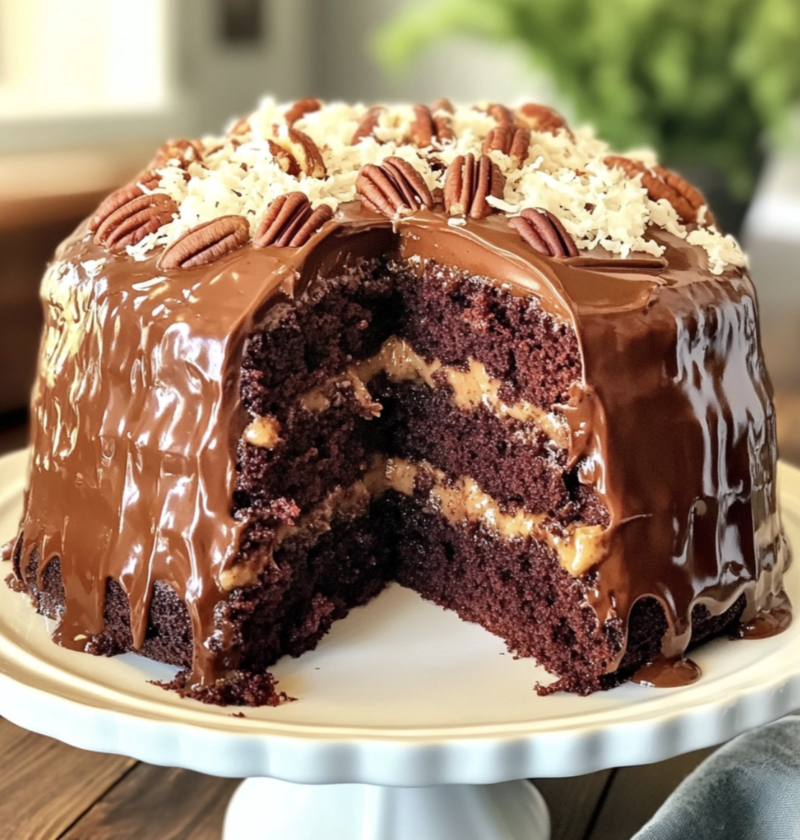
Cinnamon Roll French Toast Bites

Introduction

Imagine waking up to the sweet aroma of warm cinnamon rolls wafting through your kitchen. The delightful combination of cinnamon, sugar, and butter is enough to make anyone’s mouth water. Now, imagine taking those cinnamon rolls and transforming them into bite-sized pieces of heaven. That’s exactly what we have in store for you today – Cinnamon Roll French Toast Bites!

These delectable treats are the perfect marriage of two breakfast classics – cinnamon rolls and French toast. With their soft, pillowy centers and crispy, caramelized edges, these bites are sure to become a family favorite. Whether you’re hosting a brunch, treating yourself to a special weekend breakfast, or simply craving something sweet, these Cinnamon Roll French Toast Bites are the answer.

Why You’ll Love This Recipe

Cinnamon Roll French Toast Bites

There are so many reasons to fall in love with these Cinnamon Roll French Toast Bites. First and foremost, they are incredibly easy to make. With just a few simple ingredients and minimal prep time, you can have a batch of these mouthwatering bites ready to devour in no time.

Another reason to love this recipe is its versatility. You can customize these bites to suit your taste preferences by adding your favorite toppings or fillings. From fresh berries and whipped cream to gooey chocolate chips, the possibilities are endless.

Not only are these Cinnamon Roll French Toast Bites a delight for your taste buds, but they also offer some nutritional benefits. Cinnamon is known for its antioxidant properties and potential health benefits, while French toast provides a good source of energy to start your day off right.

Ingredients

To create these scrumptious Cinnamon Roll French Toast Bites, you’ll need the following ingredients:

– 1 can (8 count) refrigerated cinnamon rolls

– 2 large eggs

– 1/4 cup milk

– 1 teaspoon vanilla extract

– 1/2 teaspoon ground cinnamon

– 2 tablespoons butter, melted

– Maple syrup, for serving

Step-by-Step Instructions

Now that you have all the ingredients ready, let’s dive into the step-by-step process of making these heavenly Cinnamon Roll French Toast Bites:

  1. Preheat your oven to 375°F (190°C) and grease a baking dish with non-stick spray.
  2. Open the can of refrigerated cinnamon rolls and separate them into individual rolls.
  3. Cut each cinnamon roll into four equal-sized pieces.
  4. In a shallow bowl, whisk together the eggs, milk, vanilla extract, and ground cinnamon.
  5. Dip each cinnamon roll bite into the egg mixture, making sure it is fully coated.
  6. Place the coated bites in the greased baking dish, arranging them in a single layer.
  7. Drizzle the melted butter over the bites, ensuring that each piece is coated.
  8. Bake the Cinnamon Roll French Toast Bites in the preheated oven for 15-18 minutes or until golden brown.
  9. Remove from the oven and let them cool for a few minutes.
  10. Serve the bites warm and drizzle with maple syrup for a sweet finish.

Pro Tip: For an extra indulgent touch, you can prepare a simple glaze by mixing powdered sugar and a splash of milk. Drizzle the glaze over the warm Cinnamon Roll French Toast Bites before serving.

Expert Tips for Success

To ensure that your Cinnamon Roll French Toast Bites turn out perfectly every time, here are some expert tips to keep in mind:

– Use day-old cinnamon rolls for a slightly firmer texture that holds its shape well during baking.

– Allow the bites to cool for a few minutes before serving to prevent burning your mouth.

– Feel free to experiment with different fillings, such as cream cheese, chopped nuts, or even a swirl of Nutella.

– If you prefer a softer texture, you can reduce the baking time slightly.

Variations and Substitutions

While these Cinnamon Roll French Toast Bites are already incredibly delicious on their own, you can always get creative and customize them to suit your preferences. Here are a few ideas:

– Add a sprinkle of powdered sugar or a dollop of whipped cream for an extra touch of sweetness.

– For a fruity twist, top the bites with fresh berries or a drizzle of fruit compote.

– Swap out the traditional cinnamon rolls for a different flavor, such as pumpkin spice or caramel.

– If you’re following a dairy-free or vegan diet, you can use a non-dairy milk alternative and vegan cinnamon rolls.

Serving Suggestions

These Cinnamon Roll French Toast Bites are delicious on their own, but you can take them to the next level by serving them with some complementary sides. Here are a few suggestions:

– Fresh berries and a dollop of whipped cream

– A side of crispy bacon or sausage links

– A refreshing glass of orange juice or a hot cup of coffee

FAQs

Q: Can I make these Cinnamon Roll French Toast Bites ahead of time?

A: While these bites are best enjoyed fresh from the oven, you can prepare them in advance and store them in an airtight container in the refrigerator. When ready to serve, simply reheat them in the oven or microwave until warmed through.

Q: Can I freeze the Cinnamon Roll French Toast Bites?

A: Yes, you can freeze these bites. After baking and cooling them, place them in a freezer-safe container or bag. When you’re ready to enjoy them, thaw them overnight in the refrigerator and reheat in the oven or microwave.

Q: Can I use homemade cinnamon rolls for this recipe?

A: Absolutely! If you have a favorite homemade cinnamon roll recipe, feel free to use it instead of the refrigerated ones. Just make sure the rolls are fully baked before cutting them into bite-sized pieces and proceeding with the recipe as directed.

Final Thoughts

Cinnamon Roll French Toast Bites are a delightful twist on two breakfast classics. With their irresistible blend of flavors and textures, these bites are sure to become a breakfast favorite in your household. Whether you’re enjoying them on a lazy Sunday morning or serving them at a special brunch gathering, these Cinnamon Roll French Toast Bites are guaranteed to bring smiles to everyone’s faces. So go ahead, give this recipe a try, and indulge in a little slice of breakfast heaven!

Flavorful Indian Fry Bread Tacos:

Flavorful Indian Fry Bread Tacos

Introduction

Imagine sinking your teeth into a delicious combination of crispy fry bread topped with flavorful fillings. Indian Fry Bread Tacos are a Native American dish that has gained popularity for its unique and satisfying flavors. This recipe brings together the rich cultural heritage of Native American cuisine with the convenience and versatility of tacos. Whether you’re a fan of Mexican food or are looking to try something new, these flavorful Indian Fry Bread Tacos are sure to delight your taste buds.

Flavorful Indian Fry Bread Tacos:

Why You’ll Love This Recipe

There are several reasons why Indian Fry Bread Tacos have become a favorite among food enthusiasts:

  • The fry bread is incredibly easy to make, requiring just a few basic ingredients.
  • It has a delightful crispy texture on the outside, while remaining soft and fluffy on the inside.
  • The toppings and fillings can be customized to suit your preferences, making it a versatile dish.
  • Indian Fry Bread Tacos can be enjoyed by people with various dietary requirements, as they can easily be made gluten-free or vegan.

Ingredients

To make Indian Fry Bread Tacos, you will need the following ingredients:

  • 2 cups all-purpose flour
  • 2 teaspoons baking powder
  • 1/2 teaspoon salt
  • 1 cup warm water
  • Vegetable oil for frying
  • 1 pound ground beef or chicken
  • 1 onion, diced
  • 1 bell pepper, diced
  • 1 tablespoon taco seasoning
  • Toppings of your choice: shredded lettuce, diced tomatoes, grated cheese, sour cream, salsa, guacamole, etc.

Step-by-Step Instructions

Follow these simple steps to create your own delicious Indian Fry Bread Tacos:

  1. In a large mixing bowl, combine the flour, baking powder, and salt. Gradually add the warm water while stirring until a soft dough forms.
  2. Knead the dough for a few minutes until it becomes smooth. Cover the dough with a clean cloth and let it rest for 30 minutes.
  3. Meanwhile, heat vegetable oil in a deep frying pan or pot over medium-high heat.
  4. Divide the dough into small balls and flatten each ball into a round disk using your hands or a rolling pin.
  5. Carefully place a few dough disks into the hot oil and fry until golden brown and puffed up. Flip and fry the other side as well. Remove the fry bread from the oil and drain on a paper towel-lined plate.
  6. In a separate pan, cook the ground beef or chicken with diced onion, bell pepper, and taco seasoning until fully cooked and well combined.
  7. To assemble the tacos, place a generous amount of the meat mixture on top of a fry bread. Add your desired toppings, such as shredded lettuce, diced tomatoes, grated cheese, sour cream, and salsa.
  8. Repeat the process with the remaining fry bread and fillings.
  9. Serve the Indian Fry Bread Tacos immediately and enjoy!

Expert Tips for Success

To ensure the best results when making Indian Fry Bread Tacos, keep the following tips in mind:

  • Make sure the oil is hot enough before frying the dough disks to achieve that perfect crispy texture.
  • Allow the dough to rest before rolling it out to improve its elasticity and prevent shrinking.
  • Feel free to experiment with the toppings and fillings to create your own unique flavor combinations.
  • If you prefer a healthier alternative, you can bake the fry bread instead of frying it. Simply brush the dough disks with olive oil and bake them in a preheated oven at 400°F (200°C) for about 10-12 minutes or until golden brown.

Variations and Substitutions

While Indian Fry Bread Tacos are traditionally made with ground beef or chicken, there are numerous ways to customize this dish:

  • Vegetarian Option: Substitute the meat with seasoned black beans, grilled vegetables, or vegetarian meat alternatives.
  • Seafood Twist: Use grilled shrimp or fish as the filling for a delightful seafood taco experience.
  • Spicy Kick: Add some heat to your tacos by incorporating jalapeños or hot sauce into the meat mixture.
  • Healthier Choices: Opt for lean ground turkey or chicken breast to reduce the fat content.

Serving Suggestions

Indian Fry Bread Tacos are a complete meal on their own, but you can enhance the dining experience with some additional accompaniments:

  • Side Dishes: Serve the tacos with classic Mexican rice, refried beans, or a fresh salad.
  • Beverages: Pair the flavorful tacos with refreshing beverages like agua fresca, horchata, or a cold soda.
  • Dessert: Conclude your meal with a sweet treat like churros or flan to satisfy your sweet tooth.

FAQs

Here are some common questions readers have about Indian Fry Bread Tacos:

Q: Can I make the fry bread dough in advance?

A: Yes, you can prepare the fry bread dough ahead of time and store it in the refrigerator. Just make sure to bring it to room temperature before frying.

Q: Can I freeze the fry bread?

A: Yes, you can freeze the fry bread once it has cooled down. Place the cooled fry bread in a freezer-safe bag or container and freeze for up to 3 months. To reheat, simply thaw the fry bread and warm it in a preheated oven or microwave.

Q: Can I use a different type of meat?

A: Absolutely! Feel free to use ground pork, lamb, or even shredded beef as a delicious alternative.

Final Thoughts

Indian Fry Bread Tacos are a delightful fusion of Native American and Mexican cuisines, bringing together the best of both worlds. The crispy fry bread serves as the perfect vessel for the flavorful fillings and toppings. Whether you’re hosting a casual gathering or simply craving a unique and satisfying meal, these Indian Fry Bread Tacos are sure to impress. So gather your ingredients, follow the simple steps, and enjoy a taste of this delicious cultural fusion. Don’t forget to share your cooking adventures and let us know how your Indian Fry Bread Tacos turned out!

Flaky Puff Pastry Delights

Introduction

Welcome to the world of flaky puff pastry delights! In this article, we will explore the magic of creating delicious pastries that are both crispy and tender. Whether you’re a seasoned baker or a novice in the kitchen, these puff pastry treats are sure to impress your friends and family.

There’s something truly special about the delicate layers of buttery pastry that melt in your mouth with every bite. Puff pastry has a rich history that dates back centuries, where it was first perfected by French pastry chefs. Today, it has become a staple in many cuisines around the world and is loved for its versatility and incredible taste.

Why You’ll Love This Recipe

Flaky Puff Pastry Delights

There are countless reasons why you’ll fall in love with these flaky puff pastry delights. First and foremost, they are incredibly easy to make. With just a few simple ingredients and some patience, you can create bakery-quality pastries in the comfort of your own home.

Another reason to adore this recipe is the heavenly texture. The puff pastry dough bakes into layers upon layers of flaky goodness. Each bite is a symphony of crispy exterior and tender interior, creating a truly delightful eating experience. Whether you’re making sweet or savory pastries, the texture will always be a crowd-pleaser.

Furthermore, these puff pastry delights can be customized to suit your taste preferences. From sweet fruit-filled turnovers to savory cheese and herb pinwheels, the possibilities are endless. You can let your creativity run wild and experiment with various fillings and flavors to create your own signature pastries.

Ingredients

To make these flaky puff pastry delights, you’ll need the following ingredients:

  • 2 sheets of store-bought puff pastry
  • 1 egg, beaten (for egg wash)
  • For sweet pastries:
  • – Your choice of fruit filling (e.g., apples, berries, or peaches)
  • – Sugar for sprinkling
  • For savory pastries:
  • – Your choice of cheese (e.g., cheddar, feta, or goat cheese)
  • – Fresh herbs (e.g., parsley, thyme, or rosemary)

Feel free to get creative with the fillings and toppings. You can add nuts, chocolate, or even vegetables to your pastries, depending on your taste preferences.

Step-by-Step Instructions

  1. Preheat your oven to 400°F (200°C) and line a baking sheet with parchment paper.
  2. If using frozen puff pastry, allow it to thaw according to the package instructions. If using homemade puff pastry, roll it out into a large rectangle on a lightly floured surface.
  3. Cut the puff pastry into smaller rectangles or squares, depending on the desired size of your pastries.
  4. For sweet pastries:
  5. – Place a spoonful of your chosen fruit filling in the center of each pastry square.
  6. – Fold the pastry over the filling to create a triangle or rectangle shape.
  7. – Use a fork to gently press the edges together to seal the pastries.
  8. – Brush the tops of the pastries with the beaten egg and sprinkle with sugar.
  9. For savory pastries:
  10. – Spread a thin layer of your chosen cheese on each pastry square.
  11. – Sprinkle fresh herbs on top of the cheese.
  12. – Fold the pastry over the cheese and herbs, creating a triangle or rectangle shape.
  13. – Press the edges together with a fork to seal the pastries.
  14. – Brush the tops with the beaten egg for a golden finish.
  15. Place the pastries on the prepared baking sheet and bake for 15-20 minutes, or until golden brown and puffed.
  16. Remove from the oven and let cool for a few minutes before serving.

These step-by-step instructions will guide you through the process of making delicious pastries that are sure to impress your guests. Don’t be afraid to experiment and try different fillings and shapes to create a variety of puff pastry delights.

Expert Tips for Success

Here are some expert tips to ensure your puff pastry delights turn out perfectly:

  • Keep the puff pastry dough and fillings cold. This will help create those beautiful flaky layers.
  • Don’t overfill the pastries. Leave some space around the edges to prevent the filling from leaking out during baking.
  • If using fruit fillings, make sure to drain any excess liquid to avoid a soggy pastry.
  • If your pastries are browning too quickly, cover them loosely with aluminum foil to prevent burning.
  • Feel free to get creative with the shapes. Try making pinwheels, turnovers, or even braided pastries for an impressive presentation.

Variations and Substitutions

While the basic recipe is delicious on its own, you can easily customize these puff pastry delights to suit your preferences. Here are some variations and substitutions you can try:

For sweet pastries:

  • Instead of fruit fillings, use a combination of chocolate and nuts for a decadent treat.
  • Add a sprinkle of cinnamon or a dash of vanilla extract to enhance the flavor of the fillings.
  • Top the pastries with a simple glaze made of powdered sugar and milk for an extra touch of sweetness.

For savory pastries:

  • Experiment with different cheese combinations, such as brie and cranberry or blue cheese and caramelized onions.
  • Add cooked bacon or sautéed vegetables to the filling for an extra burst of flavor.
  • Try brushing the tops of the pastries with a mixture of melted butter and garlic for a savory twist.

Serving Suggestions

These flaky puff pastry delights are incredibly versatile and can be enjoyed in various ways. Here are some serving suggestions to inspire you:

  • Serve the sweet pastries as a delicious dessert alongside a scoop of vanilla ice cream.
  • Pair the savory pastries with a fresh salad for a light lunch or dinner.
  • Arrange a platter of assorted pastries for a delightful party appetizer.
  • Enjoy them with a cup of hot tea or coffee for a cozy afternoon treat.

FAQs

Q: Can I make the puff pastry dough from scratch?

A: Absolutely! While store-bought puff pastry is convenient, making it from scratch can be a rewarding experience. There are many recipes available online that will guide you through the process of making homemade puff pastry.

Q: Can I freeze the unbaked pastries?

A: Yes! You can assemble the pastries and freeze them before baking. When you’re ready to enjoy them, simply bake them directly from the freezer, adding a few extra minutes to the baking time.

Q: How long do the pastries stay fresh?

A: These pastries are best enjoyed fresh on the day they are baked. However, you can store any leftovers in an airtight container at room temperature for up to 2 days. To refresh the pastries, simply warm them in a preheated oven for a few minutes before serving.

Final Thoughts

Flaky puff pastry delights are a true indulgence that brings joy to any occasion. Whether you’re serving them at a party or enjoying them as a cozy treat at home, these pastries are sure to impress. With their golden, flaky layers and delicious fillings, they are a delight for both the eyes and the taste buds.

So, what are you waiting for? Grab some puff pastry, choose your favorite fillings, and let your creativity run wild. These puff pastry delights are just a few steps away from becoming a reality in your kitchen. Enjoy the process, savor the aroma, and share the joy of these delectable treats with your loved ones.

Cheesy Sausage and Egg Breakfast Roll-Ups

Introduction

Imagine waking up to the heavenly aroma of sizzling sausages, melted cheese, and fluffy eggs. The Cheesy Sausage and Egg Breakfast Roll-Ups are a breakfast delight that will make your taste buds dance with joy. This mouthwatering recipe combines the richness of cheese, the savoriness of sausage, and the creaminess of eggs, all wrapped up in a warm tortilla. Whether you’re hosting a brunch gathering or simply treating yourself to a special morning meal, these roll-ups are guaranteed to satisfy your cravings and kickstart your day with a burst of flavor.

Why You’ll Love This Recipe

Cheesy Sausage and Egg Breakfast Roll-Ups

There are countless reasons to fall head over heels for these Cheesy Sausage and Egg Breakfast Roll-Ups. First and foremost, they are incredibly easy to make, requiring just a handful of ingredients and minimal effort. Whether you’re a seasoned chef or a beginner in the kitchen, you can whip up these roll-ups in no time. Additionally, their versatility allows you to customize them according to your preferences. Feel free to experiment with different types of sausages, cheeses, and tortillas to create your own signature breakfast masterpiece.

Ingredients

To create these delectable Cheesy Sausage and Egg Breakfast Roll-Ups, gather the following ingredients:

  • 4 large tortillas (flour or whole wheat)
  • 8 cooked breakfast sausages, sliced in half lengthwise
  • 8 large eggs, beaten
  • 1 cup shredded cheddar cheese
  • Salt and pepper to taste
  • Optional: chopped fresh herbs (such as chives or parsley) for garnish

Step-by-Step Instructions

Follow these simple steps to create your Cheesy Sausage and Egg Breakfast Roll-Ups:

  1. Preheat your oven to 350°F (175°C) and line a baking sheet with parchment paper.
  2. Warm the tortillas for a few seconds in the microwave or on a skillet to make them pliable.
  3. Place two sausage halves on each tortilla, leaving some space at the edges.
  4. In a bowl, whisk the beaten eggs together with salt and pepper.
  5. Pour the beaten eggs evenly over the sausage halves on each tortilla.
  6. Sprinkle the shredded cheddar cheese over the eggs.
  7. Roll up each tortilla tightly, folding in the edges as you go.
  8. Place the roll-ups seam side down on the prepared baking sheet.
  9. Bake for about 15-20 minutes, or until the eggs are set and the cheese is melted and slightly golden.
  10. Remove from the oven and let them cool for a few minutes before serving.

Pro Tip: To add an extra burst of flavor, you can brush the tops of the roll-ups with melted butter or whisk an egg with a splash of milk and brush it over the tortillas before baking.

Expert Tips for Success

Here are a few expert tips to ensure your Cheesy Sausage and Egg Breakfast Roll-Ups turn out perfectly:

  • Use a non-stick skillet to cook the sausages for easy cleanup.
  • Make sure the beaten eggs are well-seasoned with salt and pepper for maximum flavor.
  • Feel free to add in your favorite veggies, such as sautéed bell peppers or onions, for added texture and taste.
  • If you prefer a spicier kick, use spicy breakfast sausages or add a dash of hot sauce to the beaten eggs.
  • For a fluffier texture, whisk a tablespoon of milk or cream into the beaten eggs before pouring them over the sausages.

Variations and Substitutions

The Cheesy Sausage and Egg Breakfast Roll-Ups are incredibly versatile and can be customized to suit your taste preferences. Here are a few ideas to spark your creativity:

  • Swap the cheddar cheese for mozzarella, Swiss, or pepper jack cheese.
  • Experiment with different types of sausages, such as chicken sausage, turkey sausage, or even vegetarian sausage.
  • If you’re watching your carb intake, use lettuce leaves or collard green wraps instead of tortillas for a low-carb option.
  • Add a smear of creamy avocado or a dollop of salsa to each roll-up for an extra burst of flavor.

Serving Suggestions

The Cheesy Sausage and Egg Breakfast Roll-Ups are incredibly satisfying on their own, but you can elevate your breakfast experience by serving them with some complementary sides. Here are a few ideas:

  • Pair them with a side of crispy hash browns or roasted breakfast potatoes for a hearty meal.
  • Add a fresh fruit salad bursting with vibrant colors and flavors to balance out the richness of the roll-ups.
  • Serve with a refreshing glass of orange juice or a piping hot cup of coffee to complete your breakfast spread.

FAQs

Q: Can I make these roll-ups ahead of time?

A: Absolutely! You can assemble the roll-ups the night before, cover them tightly with plastic wrap, and refrigerate them. In the morning, simply pop them in the oven to bake.

Q: Can I freeze the roll-ups?

A: Yes, these roll-ups freeze beautifully. After baking, let them cool completely, then wrap each roll-up tightly in plastic wrap and place them in a freezer-safe bag or container. They can be stored in the freezer for up to 3 months. To reheat, simply thaw them overnight in the refrigerator and warm them in the oven or microwave.

Q: Can I use different types of tortillas?

A: Absolutely! Feel free to use your favorite type of tortilla, whether it’s classic flour tortillas, whole wheat tortillas, or even gluten-free tortillas.

Final Thoughts

The Cheesy Sausage and Egg Breakfast Roll-Ups are a delightful way to start your day with a satisfying and delicious meal. Whether you’re enjoying them on a lazy Sunday morning or preparing them for a crowd, these roll-ups are sure to impress with their irresistible combination of flavors. So go ahead, give this recipe a try, and let your taste buds experience breakfast bliss!