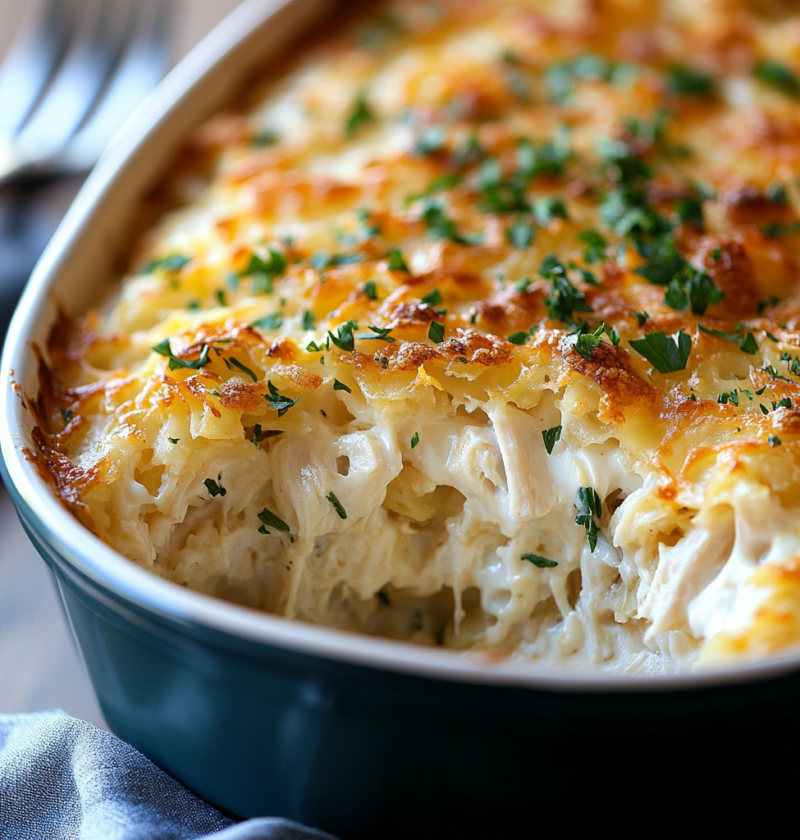
Breakfast Skillet

Introduction

Imagine waking up to the aroma of sizzling bacon, hearty potatoes, and perfectly cooked eggs. The breakfast skillet is a classic morning dish that brings together all your favorite breakfast ingredients in one delicious pan. Whether you’re a fan of savory or prefer a touch of sweetness, this versatile recipe can be customized to suit your taste buds. In this article, we’ll explore the art of creating the perfect breakfast skillet, from selecting the freshest ingredients to mastering the cooking techniques. Get ready to kickstart your day with a mouthwatering meal that will leave you energized and satisfied.

Why You’ll Love This Recipe

Breakfast Skillet

There are plenty of reasons why the breakfast skillet has become a staple in many households. First and foremost, it’s incredibly easy to make. With just a few simple steps, you can have a hearty and delicious meal on the table in no time. Additionally, the breakfast skillet is highly versatile, allowing you to experiment with different ingredients and flavors. Whether you prefer a classic combination or want to spice things up with some jalapenos, the possibilities are endless. Lastly, this recipe is a fantastic way to use up leftover ingredients. Got some leftover veggies or cheese? Throw them into the skillet and create a brand new dish that’s packed with flavor.

Ingredients

To create the ultimate breakfast skillet, you’ll need the following ingredients:

– 4 slices of bacon

– 2 cups of diced potatoes

– 1 small onion, diced

– 1 bell pepper, diced

– 4 eggs

– Salt and pepper to taste

– Optional: shredded cheese, chopped herbs

Step-by-Step Instructions

Follow these simple steps to create a mouthwatering breakfast skillet:

  1. Start by cooking the bacon in a large skillet over medium heat. Cook until crispy, then remove and set aside.
  2. In the same skillet, add the diced potatoes. Cook until golden brown and crispy, stirring occasionally to ensure even cooking.
  3. Add the diced onion and bell pepper to the skillet. Cook until the vegetables are tender and slightly caramelized.
  4. While the vegetables are cooking, crumble the cooked bacon.
  5. Push the vegetables to one side of the skillet and crack the eggs into the empty space. Cook until the whites are set but the yolks are still slightly runny.
  6. Season the vegetables, eggs, and bacon with salt and pepper to taste.
  7. Optional: sprinkle shredded cheese over the skillet and cover for a minute to melt the cheese.
  8. Garnish with chopped herbs and serve hot.

Expert Tips for Success

Here are some expert tips to ensure your breakfast skillet turns out perfectly every time:

– Use a cast-iron skillet for even heat distribution and a crispy crust on the potatoes.

– Precook the diced potatoes before adding them to the skillet for a faster cooking time.

– Don’t overcrowd the skillet. Cook the ingredients in batches if necessary to allow for proper browning.

– For extra flavor, add some chopped garlic or spices like paprika or cayenne pepper.

– If you prefer your eggs fully cooked, simply cover the skillet and cook for an additional 2-3 minutes.

Variations and Substitutions

The breakfast skillet is a versatile dish that can be customized to suit your preferences. Here are a few variations and substitutions you can try:

– Swap the bacon for sausage or ham for a different flavor profile.

– Add some diced tomatoes or mushrooms for an extra burst of freshness.

– For a vegetarian option, omit the meat and add more veggies like zucchini or spinach.

– If you’re following a keto or low-carb diet, replace the potatoes with cauliflower or broccoli.

– Experiment with different cheese varieties such as cheddar, mozzarella, or feta.

Serving Suggestions

The breakfast skillet is a complete meal on its own, but you can elevate the experience by pairing it with complementary side dishes. Here are some serving suggestions:

– Serve the skillet with a side of buttered toast or freshly baked biscuits.

– Add a side of fresh fruit or a simple green salad to lighten the meal.

– For a heartier option, serve the skillet alongside some crispy hash browns.

– Pour a cup of freshly brewed coffee or a glass of freshly squeezed orange juice to complete the breakfast spread.

FAQs

Q: Can I make a breakfast skillet ahead of time?

A: While the breakfast skillet is best enjoyed fresh, you can prepare some of the ingredients in advance to save time. Precook the bacon, potatoes, and vegetables, and store them separately in the refrigerator. When you’re ready to serve, simply reheat the ingredients and cook the eggs.

Q: Can I freeze leftovers?

A: Yes, you can freeze any leftover breakfast skillet. Allow it to cool completely, then transfer it to an airtight container or freezer bags. When you’re ready to enjoy it again, simply thaw it in the refrigerator overnight and reheat in a skillet or microwave.

Q: Can I make a vegetarian version of the breakfast skillet?

A: Absolutely! Simply omit the bacon or substitute it with vegetarian-friendly alternatives like tempeh or plant-based bacon.

Final Thoughts

The breakfast skillet is a delicious and versatile dish that can be enjoyed any time of the day. With its combination of crispy potatoes, savory bacon, and perfectly cooked eggs, it’s sure to become a family favorite. Don’t be afraid to get creative and customize the recipe to suit your preferences. Whether you’re cooking for yourself or hosting a brunch gathering, the breakfast skillet is a fantastic choice that will leave everyone satisfied. So grab your skillet and get ready to whip up a mouthwatering meal that will fuel you for the day ahead.

Crispy Baked Tacos

Introduction

Have you ever craved that perfect combination of crispy, cheesy, and flavorful in a single bite? Look no further than crispy baked tacos! This recipe takes the classic taco to a whole new level by adding a crunchy twist. Whether you’re a taco aficionado or just looking to try something new, these crispy baked tacos are sure to satisfy your taste buds. In this article, we’ll dive into the world of crispy baked tacos, exploring their unique qualities and providing a step-by-step guide on how to make them yourself.

Why You’ll Love This Recipe

Crispy Baked Tacos

There are countless reasons why you’ll fall in love with crispy baked tacos. First and foremost, they offer the perfect combination of textures. The outer shell becomes delightfully crispy while the inside remains tender and packed with flavorful fillings. Additionally, these tacos are incredibly versatile, allowing you to customize the fillings to suit your preferences. Whether you prefer a vegetarian option or want to load it up with meat and cheese, crispy baked tacos have got you covered. Plus, they’re baked instead of fried, making them a healthier alternative without sacrificing taste.

Ingredients

To make crispy baked tacos, you’ll need the following ingredients:

  • 10 taco shells
  • 1 lb ground beef or chicken
  • 1 onion, diced
  • 2 cloves of garlic, minced
  • 1 tablespoon olive oil
  • 1 tablespoon taco seasoning
  • 1 cup shredded cheese (cheddar or Mexican blend)
  • 1 cup lettuce, shredded
  • 1 tomato, diced
  • 1/2 cup sour cream
  • 1/4 cup salsa
  • Salt and pepper to taste

Feel free to add or substitute any other fillings you’d like, such as avocado, black beans, or jalapenos.

Step-by-Step Instructions

Follow these simple steps to make delicious crispy baked tacos:

  1. Preheat your oven to 375°F (190°C).
  2. In a large skillet, heat the olive oil over medium heat. Add the diced onion and minced garlic, and cook until the onion becomes translucent.
  3. Add the ground beef or chicken to the skillet and cook until browned. Season with taco seasoning, salt, and pepper to taste.
  4. Place the taco shells on a baking sheet and fill each one with the meat mixture. Top with shredded cheese.
  5. Bake the tacos in the preheated oven for about 10-12 minutes, or until the shells are crispy and the cheese has melted.
  6. Remove the tacos from the oven and let them cool slightly.
  7. Top each taco with shredded lettuce, diced tomatoes, sour cream, and salsa.
  8. Serve the crispy baked tacos immediately and enjoy!

Pro tip: For an extra crispy shell, brush the taco shells with a little olive oil before baking.

Expert Tips for Success

To ensure your crispy baked tacos turn out perfectly every time, keep the following tips in mind:

  • Choose taco shells that are sturdy and can hold up to the filling without breaking.
  • Precook any vegetables that release a lot of moisture, such as mushrooms or zucchini, to prevent the tacos from becoming soggy.
  • Experiment with different fillings and seasonings to find your favorite combination.
  • If you’re short on time, you can use store-bought taco seasoning instead of making your own.
  • Feel free to add a sprinkle of your favorite herbs or spices to elevate the flavors even more.

Variations and Substitutions

While the traditional crispy baked tacos are already delicious, you can get creative and try various substitutions and additions. Here are a few ideas:

1. Vegetarian Option: Replace the ground meat with sautéed vegetables like bell peppers, onions, and zucchini.

2. Seafood Twist: Use grilled shrimp or fish as the filling for a refreshing coastal twist.

3. Vegan Delight: Swap the cheese and sour cream for vegan alternatives, and load up the tacos with beans, guacamole, and salsa.

4. Gluten-Free: Choose gluten-free taco shells and ensure all the ingredients, including the taco seasoning, are gluten-free.

Feel free to mix and match ingredients based on your dietary preferences and taste.

Serving Suggestions

Crispy baked tacos are best served fresh out of the oven. You can serve them as they are or pair them with some delicious sides and beverages. Here are a few serving suggestions:

1. Guacamole and Salsa: Serve a side of freshly made guacamole and salsa for dipping the tacos.

2. Mexican Rice and Beans: Accompany the tacos with a side of Mexican rice and beans for a complete meal.

3. Margaritas or Mocktails: Sip on a refreshing margarita or mocktail to complement the flavors of the tacos.

Don’t be afraid to get creative with your sides and drinks to enhance the overall dining experience.

FAQs

Q: Can I prepare the filling in advance?

A: Absolutely! You can prepare the filling in advance and store it in an airtight container in the refrigerator for up to 3 days. When you’re ready to bake the tacos, simply fill the shells and proceed with the recipe.

Q: Can I use corn tortillas instead of taco shells?

A: While corn tortillas can be used, they may not become as crispy as taco shells. If you prefer a softer texture, go ahead and use corn tortillas. Just make sure to heat them slightly before filling to prevent them from cracking.

Q: How can I reheat leftovers?

A: To reheat leftover crispy baked tacos, place them on a baking sheet and bake them in a preheated oven at 350°F (175°C) for about 10 minutes, or until heated through. This will help restore the crispiness of the shells.

Q: Can I freeze the tacos?

A: While it’s best to enjoy crispy baked tacos fresh, you can freeze them for later consumption. After baking, let the tacos cool completely, then wrap them individually in plastic wrap and place them in a freezer-safe bag. To reheat, thaw them in the refrigerator overnight and follow the reheating instructions mentioned above.

Final Thoughts

Crispy baked tacos offer a delightful twist on the classic taco, elevating it to a whole new level of deliciousness. With their crispy shells, flavorful fillings, and endless customization options, they are sure to become a family favorite. Whether you’re hosting a dinner party or simply craving a tasty meal, these tacos are a crowd-pleaser. So why not give them a try and experience the magic of crispy baked tacos for yourself? Enjoy!

Baked Mac and Cheese

Introduction

Welcome to the world of comfort food! Baked mac and cheese is a classic dish that brings back memories of childhood and cozy family gatherings. With its creamy, cheesy goodness and golden crust, it’s no wonder this recipe has become a timeless favorite. Whether you’re cooking for a family dinner, potluck, or just craving some cheesy goodness, this recipe is sure to satisfy your taste buds. In this article, we’ll dive into the secrets of making the perfect baked mac and cheese that will leave everyone asking for seconds.

Why You’ll Love This Recipe

Baked Mac and Cheese

There are countless reasons why this baked mac and cheese recipe is a winner. First and foremost, it’s incredibly easy to make. With just a few simple ingredients and a little bit of time, you can whip up a delicious and comforting meal that will impress even the pickiest eaters. The combination of ooey-gooey cheese and al dente pasta creates a texture that is pure bliss. Plus, this recipe can be easily customized to suit your preferences. Whether you prefer a crispy breadcrumb topping or a touch of spice, you can easily make it your own. Lastly, this dish is perfect for feeding a crowd. It’s a guaranteed hit at potlucks, parties, and family gatherings. So, let’s gather our ingredients and get cooking!

Ingredients

To make this mouthwatering baked mac and cheese, you’ll need the following ingredients:

  • 8 ounces elbow macaroni
  • 4 cups shredded cheddar cheese
  • 2 cups milk
  • 1/4 cup unsalted butter
  • 1/4 cup all-purpose flour
  • 1/2 teaspoon salt
  • 1/4 teaspoon black pepper
  • 1/4 teaspoon paprika

Optional: You can also add your favorite mix-ins such as crispy bacon, sautéed onions, or diced tomatoes to take your mac and cheese to the next level.

Step-by-Step Instructions

Follow these simple steps to create a delicious baked mac and cheese:

  1. Preheat your oven to 375°F (190°C). Grease a 9×13-inch baking dish and set aside.
  2. Cook the macaroni according to the package instructions until al dente. Drain and set aside.
  3. In a large saucepan, melt the butter over medium heat. Add the flour and whisk continuously for 1-2 minutes until smooth and bubbly.
  4. Gradually pour in the milk while whisking constantly to avoid lumps. Continue cooking and whisking until the mixture thickens, about 5 minutes.
  5. Remove the saucepan from the heat and stir in 3 cups of shredded cheddar cheese until melted and smooth. Season with salt, black pepper, and paprika.
  6. Add the cooked macaroni to the cheese sauce and stir until well coated.
  7. Pour the mac and cheese mixture into the prepared baking dish and spread it evenly.
  8. Sprinkle the remaining 1 cup of shredded cheddar cheese over the top.
  9. Bake in the preheated oven for 20-25 minutes, or until the cheese is melted and bubbly, and the top is golden brown.
  10. Remove from the oven and let it cool for a few minutes before serving.

Now, it’s time to dig in and enjoy the cheesy goodness of your homemade baked mac and cheese!

Expert Tips for Success

Here are some expert tips to help you achieve mac and cheese perfection:

  • Use a combination of cheeses for a more complex flavor. Gruyere, Monterey Jack, or fontina can be great additions.
  • For a crispier topping, mix breadcrumbs with melted butter and sprinkle it over the mac and cheese before baking.
  • Don’t overcook the pasta. Remember, it will continue cooking in the oven, so slightly undercooking it will yield the perfect texture.
  • Feel free to experiment with different seasonings. Add a pinch of cayenne pepper for a subtle kick or a teaspoon of Dijon mustard for extra tanginess.
  • If you’re short on time, you can use pre-shredded cheese, but freshly grated cheese will give you a smoother and creamier sauce.

Variations and Substitutions

While classic mac and cheese is delicious on its own, there are endless ways to customize the recipe to suit your taste buds. Here are a few ideas:

  • Add cooked bacon or pancetta for a smoky flavor.
  • Sauté some onions and garlic for a savory twist.
  • Stir in cooked spinach or broccoli to add some greens to your dish.
  • For a touch of elegance, mix in some truffle oil or grated truffle.
  • Experiment with different types of cheese, such as Gouda, Swiss, or blue cheese, to create unique flavor combinations.

Serving Suggestions

Baked mac and cheese is a meal on its own, but you can elevate your dining experience by serving it with some delicious accompaniments. Here are a few ideas:

  • Pair it with a fresh green salad to balance out the richness of the dish.
  • Add a side of roasted vegetables for a burst of color and added nutrition.
  • Serve it alongside some crusty garlic bread or dinner rolls to mop up every last bit of cheese sauce.
  • For a comforting Southern-style meal, serve it with fried chicken and collard greens.
  • Pair it with a glass of crisp white wine or a cold beer for a refreshing contrast.

FAQs

Q: Can I make this recipe ahead of time?

A: Absolutely! You can assemble the mac and cheese ahead of time and refrigerate it until you’re ready to bake it. Just make sure to increase the baking time slightly to ensure it heats through.

Q: Can I freeze the leftovers?

A: Yes, you can freeze the leftovers in an airtight container for up to 3 months. When you’re ready to enjoy it again, simply thaw it in the refrigerator overnight and reheat it in the oven until warmed through.

Q: Can I use a different type of pasta?

A: While elbow macaroni is the traditional choice for mac and cheese, you can certainly experiment with other pasta shapes. Shells, penne, or rigatoni are great alternatives that hold the cheese sauce well.

Final Thoughts

Baked mac and cheese is the ultimate comfort food that never fails to bring joy to the table. It’s a versatile dish that can be enjoyed by people of all ages and is perfect for any occasion. Whether you’re cooking for a weeknight dinner or a special gathering, this recipe is sure to be a crowd-pleaser. So, grab your ingredients, follow the simple steps, and get ready to indulge in a bowl of cheesy goodness that will warm your heart and satisfy your taste buds.

We hope this article has inspired you to embark on a culinary adventure and create your own delicious baked mac and cheese masterpiece. Remember, the key to a perfect mac and cheese lies in the quality of your ingredients and the love you put into making it. So, gather your loved ones, share the joy of good food, and savor every bite of this classic comfort dish. Happy cooking!

Sriracha Chicken Pasta Salad

Introduction

Are you in the mood for a delicious and satisfying pasta salad? Look no further than Sriracha Chicken Pasta Salad! This recipe combines the bold flavors of Sriracha sauce with tender chicken and a variety of fresh vegetables, all tossed together with al dente pasta. Whether you’re preparing a meal for yourself or hosting a gathering with friends and family, this recipe is sure to impress. Let’s dive into the details of this mouthwatering dish and discover why it should be on your menu.

Why You’ll Love This Recipe

Sriracha Chicken Pasta Salad

There are so many reasons to love Sriracha Chicken Pasta Salad. First and foremost, it’s incredibly easy to make. With just a few simple ingredients and minimal prep time, you can have a delicious meal on the table in no time. The combination of the spicy Sriracha sauce with the savory chicken creates a flavor explosion that will leave your taste buds begging for more. Additionally, this recipe is versatile and can be customized to suit your preferences. Whether you want to add more vegetables or adjust the level of spiciness, this dish can easily be adapted to your liking.

Ingredients

To make Sriracha Chicken Pasta Salad, you’ll need the following ingredients:

  • 8 ounces pasta (penne or rotini work well)
  • 2 cups cooked chicken breast, shredded
  • 1 cup cherry tomatoes, halved
  • 1/2 cup red bell pepper, diced
  • 1/2 cup cucumber, diced
  • 1/4 cup red onion, thinly sliced
  • 1/4 cup fresh cilantro, chopped
  • 1/4 cup mayonnaise
  • 2 tablespoons Sriracha sauce
  • 2 tablespoons lime juice
  • 1 tablespoon honey
  • Salt and pepper to taste

Feel free to make any ingredient substitutions based on your preferences or dietary restrictions.

Step-by-Step Instructions

Follow these simple steps to create your delicious Sriracha Chicken Pasta Salad:

  1. Cook the pasta according to package instructions. Drain and set aside to cool.
  2. In a large bowl, combine the cooked pasta, shredded chicken, cherry tomatoes, red bell pepper, cucumber, red onion, and cilantro.
  3. In a separate small bowl, whisk together the mayonnaise, Sriracha sauce, lime juice, honey, salt, and pepper until well combined.
  4. Pour the dressing over the pasta mixture and toss gently to coat everything evenly.
  5. Refrigerate the salad for at least 30 minutes to allow the flavors to meld together.
  6. Before serving, give the salad a final toss and adjust the seasonings if needed.
  7. Enjoy your Sriracha Chicken Pasta Salad!

Pro Tip: If you prefer a spicier salad, feel free to add more Sriracha sauce to the dressing. If you’re not a fan of heat, you can reduce the amount of Sriracha or omit it altogether.

Expert Tips for Success

To ensure your Sriracha Chicken Pasta Salad turns out perfectly every time, keep these tips in mind:

  • Use al dente pasta: Be sure to cook the pasta until it is still slightly firm to the bite. This helps prevent the pasta from becoming mushy when mixed with the other ingredients.
  • Let it chill: Allowing the salad to refrigerate before serving not only enhances the flavors but also gives the ingredients time to absorb the dressing.
  • Adjust the spice level: Sriracha sauce can vary in its level of spiciness, so taste the dressing before adding it to the salad. Add more or less Sriracha depending on your preference.
  • Get creative with toppings: If you want to add some extra texture and flavor, consider topping your salad with crushed peanuts or sesame seeds.

Variations and Substitutions

While Sriracha Chicken Pasta Salad is already a fantastic dish as is, you can easily customize it to suit your taste and dietary preferences. Here are a few ideas:

  • Vegan version: Replace the chicken with tofu or chickpeas for a delicious vegan-friendly option.
  • Gluten-free option: Use gluten-free pasta instead of regular pasta to make this salad gluten-free.
  • Vegetarian twist: Skip the chicken and add more vegetables like roasted broccoli or grilled zucchini.

Feel free to experiment and create your own unique version of this flavorful pasta salad.

Serving Suggestions

Sriracha Chicken Pasta Salad is a versatile dish that can be enjoyed on its own or paired with other foods. Here are a few serving suggestions to maximize your culinary experience:

  • Serve it cold: This salad is best served chilled, making it perfect for picnics or outdoor gatherings.
  • Add a side: Pair the salad with some crusty bread or garlic breadsticks for a more substantial meal.
  • Delicious drinks: Enjoy your pasta salad with a refreshing glass of iced tea, lemonade, or a fruity mocktail.

No matter how you serve it, this dish is sure to impress your guests and leave them asking for seconds.

FAQs

Here are some common questions about Sriracha Chicken Pasta Salad:

Can I make this salad in advance?

Absolutely! This salad can be made a day ahead and stored in the refrigerator. Just give it a good toss before serving to redistribute the dressing.

Can I use a different type of pasta?

Yes, you can use any type of pasta you prefer. Penne and rotini work well in this recipe, but feel free to use your favorite shape.

Can I adjust the level of spiciness?

Definitely! The amount of Sriracha sauce can be adjusted to suit your taste buds. Start with a smaller amount and add more if desired.

Can I make this salad vegetarian?

Absolutely! Simply omit the chicken and add more vegetables or a plant-based protein like tofu or chickpeas.

Final Thoughts

Sriracha Chicken Pasta Salad is a delightful dish that brings together bold flavors and fresh ingredients. With its easy preparation and customizable nature, it’s a recipe that can cater to various dietary preferences and taste preferences. So why not give it a try? Whether you’re enjoying it for a quick weeknight dinner or bringing it to a potluck, this pasta salad is sure to become a favorite. Prepare to impress your taste buds and those of your loved ones with this delicious and satisfying Sriracha Chicken Pasta Salad!

Dill Pickle Ranch

Introduction

Welcome to the world of Dill Pickle Ranch! In this article, we will dive into the tantalizing flavors and unique combination of dill pickles and ranch dressing. This recipe is not only a delicious twist on a classic condiment but also a versatile addition that can elevate your dishes to new heights. Whether you’re a pickle lover or a ranch enthusiast, this Dill Pickle Ranch recipe is sure to tantalize your taste buds and leave you craving for more.

Why You’ll Love This Recipe

Dill Pickle Ranch

There are countless reasons why this Dill Pickle Ranch recipe will become your new go-to condiment. First and foremost, it’s incredibly easy to make. With just a handful of ingredients and a few simple steps, you can whip up a batch of this flavorful dressing in no time. The combination of tangy dill pickles and creamy ranch creates a harmonious blend of flavors that will leave you wanting more.

Not only is this recipe quick and easy, but it also offers a unique twist on traditional ranch dressing. The addition of dill pickles adds a vibrant and refreshing element to the creamy base, creating a flavor profile that is both tangy and savory. It’s the perfect balance of flavors that will take your salads, sandwiches, and dipping sauces to the next level.

Ingredients

To make this delectable Dill Pickle Ranch, you will need the following ingredients:

– 1 cup mayonnaise

– 1/2 cup sour cream

– 1/4 cup dill pickle juice

– 1/4 cup chopped dill pickles

– 1 tablespoon fresh dill, chopped

– 1 teaspoon garlic powder

– 1 teaspoon onion powder

– Salt and pepper to taste

Step-by-Step Instructions

Follow these simple steps to create your own homemade Dill Pickle Ranch:

  1. In a medium-sized bowl, combine the mayonnaise, sour cream, and dill pickle juice. Mix well to combine.
  2. Add the chopped dill pickles, fresh dill, garlic powder, onion powder, salt, and pepper to the bowl. Stir until all the ingredients are well incorporated.
  3. Taste the ranch dressing and adjust the seasonings according to your preference. Add more salt, pepper, or pickle juice if desired.
  4. Transfer the Dill Pickle Ranch to a jar or airtight container and refrigerate for at least 1 hour to allow the flavors to meld together.
  5. Once chilled, give the dressing a good stir before serving. Use it as a dipping sauce for crispy chicken tenders, drizzle it over a fresh salad, or spread it on sandwiches for a burst of tangy flavor.

Expert Tips for Success

To ensure the best results with your Dill Pickle Ranch, keep the following tips in mind:

– Use high-quality mayonnaise and sour cream for a creamy and rich dressing.

– Don’t skip the fresh dill. It adds a bright and herbaceous flavor that enhances the overall taste of the dressing.

– Feel free to adjust the amount of dill pickle juice depending on your preference. If you like a tangier dressing, add a bit more pickle juice.

– For a smoother consistency, blend the dressing in a food processor or blender until smooth.

Variations and Substitutions

If you’re looking to switch things up or cater to specific dietary preferences, here are some variations and substitutions you can try:

– Greek Yogurt: Substitute the sour cream with Greek yogurt for a lighter and tangier version of Dill Pickle Ranch.

– Vegan Ranch: Replace the mayonnaise and sour cream with vegan alternatives, such as vegan mayo and cashew-based sour cream, to make a delicious vegan Dill Pickle Ranch.

– Spicy Kick: Add a pinch of cayenne pepper or a few dashes of hot sauce to give your Dill Pickle Ranch a spicy twist.

Serving Suggestions

Dill Pickle Ranch is an incredibly versatile condiment that can be used in a variety of ways. Here are some serving suggestions to get you started:

– Drizzle it over a crisp and refreshing salad for a tangy and creamy dressing.

– Use it as a dip for fresh veggies, chicken wings, or crispy french fries.

– Spread it on sandwiches or wraps for an extra burst of flavor.

– Mix it into mashed potatoes for a tangy and creamy side dish.

FAQs

Q: How long can I store Dill Pickle Ranch?

A: Dill Pickle Ranch can be stored in an airtight container in the refrigerator for up to 1 week. However, we recommend consuming it within a few days for the best flavor.

Q: Can I use dried dill instead of fresh dill?

A: While fresh dill provides the best flavor, you can substitute it with dried dill if necessary. Use half the amount of dried dill called for in the recipe.

Final Thoughts

Get ready to embark on a flavor adventure with Dill Pickle Ranch. This tangy and creamy dressing will add a burst of excitement to your meals and leave your taste buds dancing with delight. Whether you’re hosting a party, preparing a family dinner, or simply craving a delicious dip, this recipe is a must-try. So grab your dill pickles and get ready to elevate your dishes to new heights with this irresistible Dill Pickle Ranch.

We hope you enjoy making and savoring this unique and tasty condiment as much as we do. Don’t forget to share your Dill Pickle Ranch experiences with us!

Tuscan Chicken Meatball Orzo

Introduction

Imagine sitting down to a delicious meal of tender chicken meatballs nestled in a bed of flavorful orzo pasta. The aroma fills the air as you take your first bite, savoring the combination of succulent chicken, aromatic herbs, and al dente pasta. Tuscan Chicken Meatball Orzo is a dish that captures the essence of Italian cuisine, bringing together simple ingredients to create a comforting and satisfying meal.

Originating from the picturesque region of Tuscany in Italy, this recipe pays homage to the traditional flavors and techniques of Tuscan cooking. It combines the rustic charm of homemade chicken meatballs with the hearty goodness of orzo, a small rice-shaped pasta that adds a delightful texture to the dish.

Why You’ll Love This Recipe

Tuscan Chicken Meatball Orzo

There are countless reasons to fall in love with Tuscan Chicken Meatball Orzo. Firstly, it’s incredibly easy to make, making it perfect for busy weeknight dinners or lazy weekends when you want something delicious without spending hours in the kitchen.

Additionally, this recipe is versatile, allowing you to customize it to suit your taste preferences or dietary needs. Whether you’re following a gluten-free diet or simply want to add more vegetables to the dish, there are plenty of substitutions and variations to explore.

Furthermore, this dish is a crowd-pleaser. With its robust flavors and comforting appeal, it’s sure to impress your family and friends during gatherings or potluck dinners. It’s a recipe that brings people together and leaves everyone asking for seconds.

Ingredients

For the chicken meatballs:

  • 1 pound ground chicken
  • 1/2 cup breadcrumbs
  • 1/4 cup grated Parmesan cheese
  • 1/4 cup chopped fresh parsley
  • 1/4 cup chopped fresh basil
  • 1/4 cup finely chopped onion
  • 2 cloves garlic, minced
  • 1 egg, lightly beaten
  • 1 teaspoon salt
  • 1/2 teaspoon black pepper

For the orzo:

  • 1 cup orzo pasta
  • 2 cups chicken broth
  • 1 tablespoon olive oil
  • 1 clove garlic, minced
  • 1/4 cup chopped sun-dried tomatoes
  • 1/4 cup chopped Kalamata olives
  • 1/4 cup crumbled feta cheese
  • 1 tablespoon chopped fresh basil
  • 1 tablespoon chopped fresh parsley
  • Salt and pepper to taste

Step-by-Step Instructions

  1. In a large bowl, combine the ground chicken, breadcrumbs, Parmesan cheese, parsley, basil, onion, garlic, egg, salt, and pepper. Mix well until all the ingredients are evenly incorporated.
  2. Shape the mixture into small meatballs, about 1 inch in diameter. You should have approximately 20 meatballs.
  3. In a large skillet, heat olive oil over medium heat. Add the meatballs and cook until browned on all sides, about 8-10 minutes. Remove the meatballs from the skillet and set aside.
  4. In the same skillet, add the minced garlic and cook for 1 minute until fragrant. Add the orzo pasta and stir to coat the pasta with the olive oil and garlic.
  5. Pour in the chicken broth and bring to a boil. Reduce the heat to low, cover the skillet, and simmer for 10-12 minutes or until the orzo is cooked and the liquid is absorbed.
  6. Stir in the sun-dried tomatoes, Kalamata olives, feta cheese, basil, and parsley. Season with salt and pepper to taste.
  7. Return the cooked meatballs to the skillet and gently toss to combine with the orzo.
  8. Remove from heat and let the dish rest for a few minutes before serving.

Expert Tips for Success

For the most flavorful chicken meatballs, use a combination of dark and white meat ground chicken. The dark meat adds moisture and richness, while the white meat keeps the meatballs light and tender. If you can’t find ground chicken, you can also use ground turkey as a substitute.

When shaping the meatballs, wet your hands with water or lightly coat them with olive oil. This will prevent the mixture from sticking to your hands, making it easier to roll them into perfect balls.

For a golden-brown crust on the meatballs, make sure the skillet is hot before adding them. This will ensure that they sear properly and develop a delicious crust while remaining juicy on the inside.

Variations and Substitutions

If you’re looking to add more vegetables to the dish, you can incorporate chopped spinach, roasted red peppers, or sautéed mushrooms into the orzo. These additions will not only enhance the flavor but also provide extra nutrients and color to the dish.

For a gluten-free version, replace the breadcrumbs with gluten-free breadcrumbs or almond meal. You can also use gluten-free pasta or even spiralized zucchini noodles instead of orzo.

Serving Suggestions

Tuscan Chicken Meatball Orzo is a complete meal on its own, but you can enhance the dining experience by serving it with a side salad or some crusty bread. A simple arugula salad dressed with lemon vinaigrette pairs perfectly with the flavors of the dish.

For a refreshing drink to accompany the meal, a chilled glass of white wine, such as Pinot Grigio or Sauvignon Blanc, complements the flavors of the chicken meatballs and adds a touch of elegance to the dining experience.

FAQs

Can I make the meatballs ahead of time?

Yes, you can make the meatballs ahead of time and refrigerate them for up to 24 hours before cooking. This makes meal preparation even more convenient, especially if you’re planning to serve the dish for a dinner party.

Can I freeze the leftovers?

Absolutely! Tuscan Chicken Meatball Orzo freezes well. Let the leftovers cool completely, then transfer them to an airtight container or freezer bags. Label and date the containers, and they can be stored in the freezer for up to 3 months. To reheat, simply thaw in the refrigerator overnight and warm in a skillet or microwave until heated through.

Final Thoughts

Tuscan Chicken Meatball Orzo is a delightful dish that brings the flavors of Tuscany to your table. With its tender chicken meatballs, savory orzo, and a medley of Mediterranean flavors, it’s a recipe that will transport you to the Italian countryside with every bite.

So why not gather your loved ones, put on some Italian music, and enjoy a cozy evening filled with the warmth and flavors of Tuscan cuisine? Whether you’re cooking for yourself or entertaining guests, this recipe is a guaranteed crowd-pleaser that will leave everyone asking for seconds.

Bourbon Blackberry Chicken

Introduction

Are you looking for a delicious and unique chicken recipe to impress your friends and family? Look no further than Bourbon Blackberry Chicken. This mouthwatering dish combines the rich flavors of bourbon and the sweetness of blackberries to create a truly unforgettable culinary experience. Whether you’re cooking for a special occasion or just want to treat yourself to a gourmet meal, this recipe is sure to please even the most discerning palates.

Why You’ll Love This Recipe

Bourbon Blackberry Chicken

There are so many reasons to love Bourbon Blackberry Chicken. First and foremost, it’s incredibly easy to make. With just a few simple ingredients and a little bit of preparation, you’ll have a restaurant-quality meal on the table in no time. Plus, the combination of bourbon and blackberries creates a unique and irresistible flavor profile that will have your taste buds dancing with delight.

Another reason to love this recipe is its versatility. You can serve Bourbon Blackberry Chicken as the main course for a fancy dinner party or as a casual weeknight meal. It pairs well with a variety of side dishes, such as roasted vegetables or mashed potatoes. And if you’re watching your waistline, you’ll be happy to know that this recipe can easily be modified to be low in calories and fat.

Ingredients

Before you start cooking, make sure you have the following ingredients on hand:

  • 4 boneless, skinless chicken breasts
  • 1 cup blackberries
  • 1/4 cup bourbon
  • 2 tablespoons olive oil
  • 2 cloves garlic, minced
  • 1 teaspoon dried thyme
  • Salt and pepper to taste

Optional ingredient substitutions:

  • If you don’t have bourbon, you can use whiskey or even red wine as a substitute.
  • If blackberries are not in season, you can use raspberries or blueberries instead.

Step-by-Step Instructions

Follow these simple steps to create a tantalizing Bourbon Blackberry Chicken:

  1. Preheat your oven to 375°F (190°C).
  2. In a small saucepan, combine the blackberries, bourbon, olive oil, garlic, thyme, salt, and pepper. Cook over medium heat until the blackberries start to break down and the sauce thickens slightly.
  3. Season the chicken breasts with salt and pepper, then place them in a baking dish.
  4. Pour the blackberry sauce over the chicken breasts, making sure they are evenly coated.
  5. Cover the baking dish with foil and bake for 25-30 minutes, or until the chicken is cooked through.
  6. Remove the foil and broil the chicken for an additional 2-3 minutes, or until the sauce is slightly caramelized.
  7. Serve the Bourbon Blackberry Chicken hot with your favorite side dishes and enjoy!

Cooking tips:

  • If you want to add a smoky flavor to the dish, you can grill the chicken instead of baking it. Simply brush the chicken with the blackberry sauce and grill over medium-high heat for 5-6 minutes per side, or until cooked through.
  • For an extra burst of flavor, garnish the finished dish with fresh blackberries and a sprig of thyme.

Expert Tips for Success

Here are a few expert tips to help you achieve the best results with your Bourbon Blackberry Chicken:

  • Marinate the chicken in the blackberry sauce for at least 30 minutes, or up to overnight, to enhance the flavor.
  • Make sure to use boneless, skinless chicken breasts for this recipe. The boneless cut ensures even cooking and the absence of skin allows the flavors to penetrate the meat.
  • Don’t skip the broiling step. It adds a beautiful caramelization to the chicken and intensifies the flavors of the blackberry sauce.
  • Feel free to adjust the amount of bourbon and blackberries to suit your taste. If you prefer a stronger bourbon flavor, add an extra splash of bourbon to the sauce.

Variations and Substitutions

While Bourbon Blackberry Chicken is delicious as is, you can also customize the recipe to suit your preferences:

If you’re vegetarian, you can substitute the chicken with tofu or tempeh. Simply marinate the tofu or tempeh in the blackberry sauce for at least 30 minutes, then grill or bake until cooked through.

If you’re following a gluten-free diet, make sure to use a gluten-free bourbon or whiskey, as some brands may contain gluten.

For a spicier version of this dish, add a pinch of red pepper flakes to the blackberry sauce.

Serving Suggestions

Bourbon Blackberry Chicken is a versatile dish that can be served with a variety of sides. Here are a few serving suggestions to get you started:

  • Pair the chicken with roasted sweet potatoes and sautéed green beans for a hearty and satisfying meal.
  • Serve it over a bed of creamy mashed potatoes or cauliflower mash for a comforting twist.
  • For a lighter option, serve the chicken with a fresh green salad and crusty bread.

FAQs

Q: Can I use frozen blackberries for this recipe?

A: Yes, you can use frozen blackberries if fresh ones are not available. Just make sure to thaw them before cooking.

Q: Can I make the blackberry sauce ahead of time?

A: Absolutely! You can prepare the blackberry sauce up to 3 days in advance and store it in the refrigerator until ready to use.

Q: Can I make this recipe on the stovetop instead of baking it?

A: Yes, you can cook the chicken on the stovetop if you prefer. Simply heat a large skillet over medium-high heat, add the chicken breasts, and cook for 6-8 minutes per side, or until cooked through. Pour the blackberry sauce over the chicken during the last few minutes of cooking.

Final Thoughts

Bourbon Blackberry Chicken is a true culinary delight that will impress your family and friends. With its unique combination of flavors and easy preparation, this recipe is a winner for any occasion. So why not give it a try and experience the magic of bourbon and blackberries in every bite? We’re confident that once you taste this dish, it will become a new favorite in your recipe repertoire. Enjoy!

Cincinnati Chili

Introduction

Cincinnati chili is a beloved dish that holds a special place in the hearts and stomachs of many. This unique take on chili originated in Cincinnati, Ohio, and has since gained popularity across the United States. What sets Cincinnati chili apart is its distinctive spice blend and the way it’s served. Unlike traditional chili, Cincinnati chili is typically served over spaghetti, topped with a mound of finely shredded cheddar cheese, and accompanied by oyster crackers. It’s a dish that combines comforting flavors with a touch of culinary creativity.

Why You’ll Love This Recipe

Cincinnati Chili

There are several reasons why this Cincinnati chili recipe is worth trying. Firstly, it’s incredibly easy to make, requiring just a handful of ingredients that are commonly found in most kitchens. Secondly, the flavors are unlike any chili you’ve tasted before. The combination of warm spices, hints of cinnamon, and a touch of sweetness create a depth of flavor that is both comforting and unique. Lastly, this recipe can easily be customized to suit your preferences, whether you prefer a spicier version or want to make it vegetarian-friendly.

Ingredients

Here’s what you’ll need to make this delicious Cincinnati chili:

  • 2 pounds ground beef
  • 1 large onion, finely chopped
  • 4 cloves garlic, minced
  • 2 tablespoons chili powder
  • 1 tablespoon ground cumin
  • 1 tablespoon unsweetened cocoa powder
  • 1 teaspoon ground cinnamon
  • 1/2 teaspoon ground allspice
  • 1/4 teaspoon cayenne pepper (optional for extra heat)
  • 2 cups beef broth
  • 1 can (6 ounces) tomato paste
  • 2 tablespoons apple cider vinegar
  • 1 tablespoon Worcestershire sauce
  • 1 tablespoon brown sugar
  • Salt and pepper to taste

Step-by-Step Instructions

  1. In a large pot or Dutch oven, cook the ground beef over medium heat until browned. Drain any excess fat.
  2. Add the chopped onion and minced garlic to the pot with the cooked beef. Sauté until the onion is translucent.
  3. In a small bowl, combine the chili powder, cumin, cocoa powder, cinnamon, allspice, and cayenne pepper. Stir to mix well.
  4. Add the spice mixture to the pot and stir until the beef and onions are coated.
  5. Add the beef broth, tomato paste, apple cider vinegar, Worcestershire sauce, and brown sugar to the pot. Stir to combine.
  6. Bring the chili to a simmer, then reduce the heat to low. Cover and let it simmer for at least 1 hour, stirring occasionally.
  7. Taste and season with salt and pepper according to your preference.
  8. To serve, cook spaghetti according to package instructions. Spoon the Cincinnati chili over the cooked spaghetti and top with a generous amount of shredded cheddar cheese. Serve with oyster crackers on the side.

Expert Tips for Success

For the best results, follow these expert tips:

  • Use lean ground beef to avoid excess grease in the chili.
  • Sautéing the onions and garlic with the ground beef adds extra flavor to the dish.
  • Simmering the chili for at least an hour allows the flavors to meld together beautifully.
  • Feel free to adjust the spice level by adding more or less cayenne pepper.
  • Top the chili with additional toppings like diced onions, sour cream, or hot sauce for added flavor.

Variations and Substitutions

If you’d like to put a personal twist on this Cincinnati chili recipe, here are a few ideas:

  • Vegetarian Option: Replace the ground beef with plant-based ground meat substitute or a combination of diced vegetables like mushrooms, bell peppers, and zucchini.
  • Spicier Version: Increase the amount of cayenne pepper or add a diced jalapeno pepper for an extra kick.
  • Healthier Option: Use ground turkey or chicken instead of beef for a leaner alternative.

Serving Suggestions

Cincinnati chili is traditionally served over spaghetti, but there are other delicious ways to enjoy it:

1. Chili Dogs: Spoon the chili over grilled hot dogs and top with shredded cheddar cheese and diced onions.

2. Nachos: Layer tortilla chips with Cincinnati chili, shredded cheese, jalapenos, and diced tomatoes. Bake until the cheese is melted and bubbly.

3. Baked Potatoes: Top baked potatoes with Cincinnati chili, sour cream, and chives for a hearty and satisfying meal.

FAQs

Q: Can I make Cincinnati chili in advance?

A: Absolutely! In fact, Cincinnati chili tastes even better the next day as the flavors continue to develop. Simply store it in an airtight container in the refrigerator for up to 3 days or freeze it for longer storage.

Q: Can I omit the cocoa powder?

A: While cocoa powder may seem like an unusual addition to chili, it adds a subtle richness and depth of flavor. However, if you don’t have cocoa powder or prefer not to use it, you can omit it from the recipe.

Final Thoughts

Cincinnati chili is a delightful twist on the classic chili recipe, with its unique spice blend and unconventional serving style. Whether you’re a fan of hearty comfort food or simply looking to try something new, this recipe is sure to satisfy. So gather your ingredients, follow the simple steps, and prepare to enjoy a bowl of Cincinnati chili that will warm your soul and leave you craving more.

Lasagna Stuffed Mushrooms

Introduction

Lasagna stuffed mushrooms are a delightful twist on the classic Italian dish. This recipe combines the rich flavors of lasagna with the earthy and tender texture of mushrooms, creating a mouthwatering treat that will impress your family and friends. Whether you’re a vegetarian looking for a hearty and satisfying dish or a meat lover wanting to try something new, these lasagna stuffed mushrooms are sure to become a favorite in your recipe collection.

Why You’ll Love This Recipe

Lasagna Stuffed Mushrooms

There are so many reasons to love this recipe! First and foremost, it’s incredibly delicious. The combination of creamy cheese, flavorful tomato sauce, and savory mushrooms is simply irresistible. Additionally, this recipe is versatile and can easily be customized to suit your preferences. Whether you want to add extra veggies, substitute the cheese, or make it gluten-free, the possibilities are endless. Lastly, these lasagna stuffed mushrooms are a great option for those who are looking for a low-carb or keto-friendly alternative to traditional lasagna. You get all the flavors you love without the heavy pasta.

Ingredients

To make these lasagna stuffed mushrooms, you will need the following ingredients:

  • 12 large mushrooms (portobello or cremini)
  • 1/2 cup ricotta cheese
  • 1/2 cup shredded mozzarella cheese
  • 1/4 cup grated Parmesan cheese
  • 1 cup marinara sauce
  • 1/4 teaspoon dried oregano
  • 1/4 teaspoon dried basil
  • 1/4 teaspoon garlic powder
  • Salt and pepper to taste
  • Fresh basil leaves for garnish

Feel free to customize the ingredients based on your preferences. You can add chopped spinach or sun-dried tomatoes for extra flavor, or use a different type of cheese if you prefer.

Step-by-Step Instructions

Follow these simple steps to make delicious lasagna stuffed mushrooms:

  1. Preheat your oven to 375°F (190°C).
  2. Remove the stems from the mushrooms and gently scrape out the gills using a spoon. Place the mushrooms on a baking sheet lined with parchment paper.
  3. In a bowl, combine the ricotta cheese, mozzarella cheese, Parmesan cheese, dried oregano, dried basil, garlic powder, salt, and pepper. Mix well.
  4. Spoon the marinara sauce into each mushroom cap, filling it about halfway. Then, spoon the cheese mixture on top of the sauce, filling it to the rim.
  5. Bake the stuffed mushrooms in the preheated oven for 20-25 minutes, or until the cheese is melted and golden brown.
  6. Remove from the oven and let them cool for a few minutes. Garnish with fresh basil leaves before serving.

Now, your delicious lasagna stuffed mushrooms are ready to be enjoyed!

Expert Tips for Success

Here are some tips to ensure that your lasagna stuffed mushrooms turn out perfectly:

  • Choose large mushrooms that are firm and fresh. They should have a sturdy cap to hold the filling.
  • Scraping out the gills of the mushrooms helps create more space for the filling and prevents them from becoming watery.
  • Feel free to use your favorite marinara sauce or make your own from scratch. The choice is yours!
  • If you prefer a more intense garlic flavor, you can use fresh minced garlic instead of garlic powder.
  • Don’t overstuff the mushrooms to prevent the filling from overflowing during baking.

Variations and Substitutions

While this recipe is delicious as is, you can also experiment with different variations and substitutions to suit your taste:

For a meaty twist, you can add cooked ground beef, Italian sausage, or diced cooked chicken to the filling mixture.

If you’re a fan of spicy flavors, try adding some red pepper flakes or a pinch of cayenne pepper to the cheese mixture.

If you’re following a vegetarian or vegan diet, you can substitute the cheese with dairy-free alternatives, such as vegan mozzarella or cashew cheese.

Feel free to get creative and customize the recipe according to your preferences. The possibilities are endless!

Serving Suggestions

Lasagna stuffed mushrooms make a fantastic appetizer or main dish. Here are some serving suggestions to enhance your dining experience:

As an appetizer, serve the stuffed mushrooms on a platter with toothpicks for easy picking. They pair well with a side of marinara sauce for dipping.

If you’re serving them as a main dish, accompany them with a fresh green salad or roasted vegetables for a well-balanced meal.

Pair this dish with a glass of red wine or a refreshing iced tea to complement the rich flavors.

FAQs

Q: Can I prepare these stuffed mushrooms in advance?

A: Yes, you can prepare the mushrooms ahead of time by stuffing them and refrigerating them until you’re ready to bake. Just make sure to add a few extra minutes to the baking time.

Q: Can I freeze the leftovers?

A: Yes, you can freeze the cooked stuffed mushrooms in an airtight container for up to 3 months. To reheat, simply bake them in the oven until heated through.

Q: Can I use a different type of mushroom?

A: Absolutely! While portobello and cremini mushrooms work well for this recipe, you can also use button mushrooms or any other large mushroom variety you prefer.

Final Thoughts

Lasagna stuffed mushrooms are a delicious and versatile dish that will satisfy both vegetarians and meat lovers alike. The combination of flavors and textures creates a delightful eating experience that is sure to impress. Whether you’re hosting a dinner party or simply craving a savory treat, these lasagna stuffed mushrooms are a must-try. So gather your ingredients, follow the simple steps, and indulge in a culinary delight that will leave you wanting more!

Parmesan Crisps

Introduction

Have you ever craved a crispy, savory snack that is both delicious and low-carb? Look no further than Parmesan crisps! These delightful little bites are not only incredibly easy to make, but they are also packed with flavor and have a satisfying crunch. Whether you’re looking for a quick snack or a unique appetizer to impress your guests, Parmesan crisps are the perfect choice. In this article, we’ll explore the world of Parmesan crisps, their history, why they’re so loved, and how you can make them at home. Get ready to tantalize your taste buds and discover a new favorite snack!

Why You’ll Love This Recipe

Parmesan Crisps

There are so many reasons to fall in love with Parmesan crisps. First and foremost, they are incredibly easy to make. With just one ingredient and a few simple steps, you can have a batch of these crispy treats ready in no time. Secondly, Parmesan crisps are naturally gluten-free and low in carbs, making them a great option for those following a specific diet. Whether you’re on a keto, paleo, or low-carb diet, these crisps will satisfy your craving for something crunchy without compromising your dietary goals. Lastly, the flavor! Parmesan cheese has a rich and nutty taste that intensifies when baked, resulting in a delightful umami experience with every bite. These crisps are addictive in the best way possible!

Ingredients

To make Parmesan crisps, you’ll only need one ingredient:

– 1 cup grated Parmesan cheese

That’s it! However, feel free to get creative with your choice of cheese. While Parmesan is the classic option, you can experiment with different types of hard and aged cheeses like Pecorino Romano or aged Cheddar for a unique twist on the traditional recipe.

Step-by-Step Instructions

Follow these simple steps to make your own delicious Parmesan crisps:

1. Preheat your oven to 400°F (200°C) and line a baking sheet with parchment paper.

2. Take small spoonfuls of grated Parmesan cheese and drop them onto the prepared baking sheet, spreading them out into thin circles. Leave some space between the circles as they will spread slightly during baking.

3. Place the baking sheet in the preheated oven and bake for 5-7 minutes, or until the edges of the cheese have turned golden brown.

4. Remove the baking sheet from the oven and let the Parmesan crisps cool for a few minutes. They will become even crispier as they cool down.

5. Once cooled, gently lift the crisps off the parchment paper using a spatula.

6. Serve and enjoy your homemade Parmesan crisps!

Expert Tips for Success

While making Parmesan crisps is a simple process, there are a few tips that can help you achieve the best results:

– Use freshly grated Parmesan cheese for the crispiest texture. Pre-packaged grated cheese often contains additives that can affect the outcome.

– Make sure to spread the grated cheese out thinly on the baking sheet. Thicker piles of cheese will take longer to bake and may result in uneven crisps.

– Keep a close eye on the crisps while they are in the oven, as they can quickly go from golden brown to burnt. Baking times may vary depending on your oven, so start checking them around the 5-minute mark.

– Allow the crisps to cool completely before removing them from the baking sheet. This will ensure that they have hardened and become extra crunchy.

Variations and Substitutions

While Parmesan crisps are delicious on their own, you can add a twist to the recipe by incorporating various flavors and ingredients:

– Garlic Parmesan Crisps: Add a pinch of garlic powder or minced garlic to the grated Parmesan before baking for a savory garlic kick.

– Herb-infused Crisps: Sprinkle dried herbs like oregano, thyme, or rosemary on top of the grated Parmesan before baking to infuse the crisps with a fragrant taste.

– Spicy Crisps: For those who enjoy a bit of heat, add a sprinkle of red pepper flakes or cayenne pepper to the grated Parmesan before baking.

– Cheese Blend: Experiment with different cheese combinations by mixing grated Parmesan with other hard cheeses like Asiago or Gruyere. This will create a more complex flavor profile.

Serving Suggestions

Parmesan crisps are incredibly versatile and can be enjoyed in many ways:

– As a Snack: Enjoy Parmesan crisps on their own as a guilt-free snack. They are perfect for satisfying those midday cravings or as an accompaniment to your favorite dips.

– Salad Topping: Crumble Parmesan crisps over your salads to add a crispy and cheesy element. They make a wonderful alternative to croutons.

– Soup Garnish: Float a Parmesan crisp on top of your favorite soup for added texture and flavor. They pair particularly well with tomato soup or butternut squash soup.

– Appetizer: Serve Parmesan crisps alongside a charcuterie board or cheese platter for an elegant and flavorful appetizer. They are a great alternative to traditional crackers.

FAQs

Q: Can I make Parmesan crisps ahead of time?

A: Yes, you can make Parmesan crisps ahead of time. Once cooled, store them in an airtight container at room temperature for up to 3 days. However, be aware that they might lose some of their crispiness over time.

Q: Can I freeze Parmesan crisps?

A: While it’s possible to freeze Parmesan crisps, they may lose their crisp texture after thawing. It’s best to enjoy them fresh for the ultimate crunch.

Q: Can I use pre-shredded Parmesan cheese?

A: It’s recommended to use freshly grated Parmesan cheese for the best results. Pre-shredded cheese often contains additives that can affect the texture and melting properties of the crisps.

Final Thoughts

Parmesan crisps are a delightful and versatile snack that are sure to please everyone. Whether you’re hosting a gathering, looking for a low-carb option, or simply craving something crispy and cheesy, these homemade crisps are the perfect solution. With their simplicity and incredible flavor, they will quickly become a staple in your snacking repertoire. So, grab some Parmesan cheese and get baking – your taste buds will thank you!