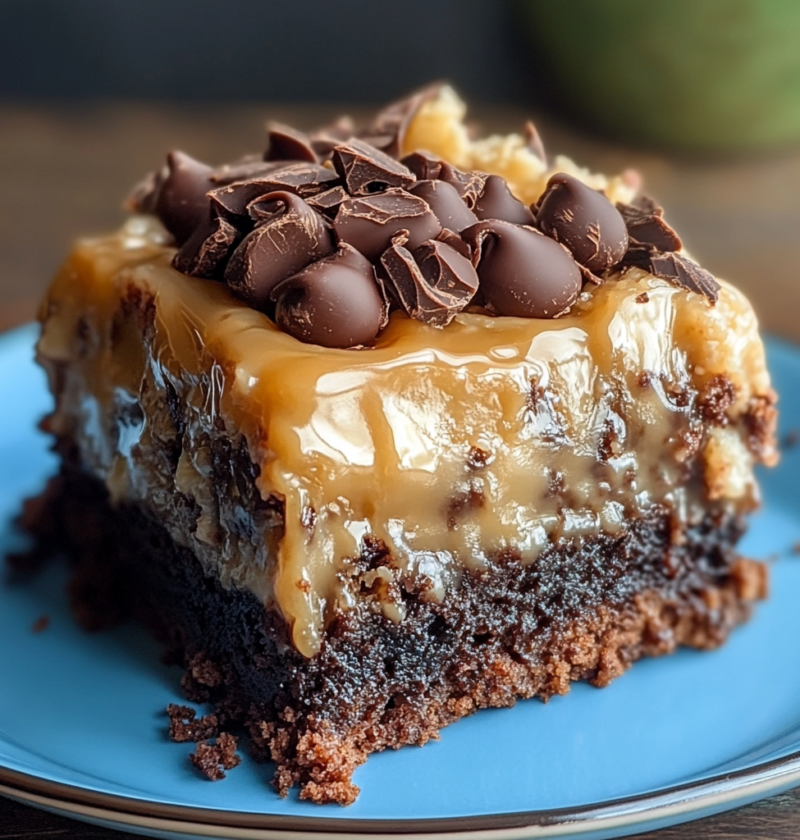
Perfectly Peeled Hard-Boiled Eggs

Introduction

There’s something so satisfying about perfectly peeled hard-boiled eggs. Whether you’re making a classic egg salad, adding them to a salad, or enjoying them on their own, there’s no denying the versatility and deliciousness of a well-cooked hard-boiled egg.

But getting that ideal peel can be a challenge. We’ve all experienced the frustration of peeling an egg only to have chunks of the egg white stick to the shell, leaving us with a less-than-perfect result. In this article, we’ll share our secrets for achieving perfectly peeled hard-boiled eggs every time.

Why You’ll Love This Recipe

Perfectly Peeled Hard-Boiled Eggs

Before we dive into the step-by-step instructions, let’s take a moment to highlight why you’ll love this recipe:

1. Easy and foolproof: Our method takes the guesswork out of boiling eggs, ensuring consistent results every time.

2. Versatile: Perfectly peeled hard-boiled eggs can be used in a variety of dishes, from salads to sandwiches.

3. High in protein: Eggs are a great source of protein, making them a healthy addition to your meals.

Ingredients

To make perfectly peeled hard-boiled eggs, you’ll need the following ingredients:

– Fresh eggs (as many as you’d like to boil)

– Water

– Ice

Optional ingredient substitutions:

– If you prefer organic or free-range eggs, feel free to use those instead.

– If you’re looking for a lower cholesterol option, you can use egg whites instead of whole eggs.

Step-by-Step Instructions

Now that we have our ingredients ready, let’s dive into the step-by-step instructions for perfectly peeled hard-boiled eggs:

  1. Place the fresh eggs in a single layer in a saucepan.
  2. Add enough water to the saucepan to cover the eggs by about an inch.
  3. Place the saucepan on the stove over medium heat and bring the water to a boil.
  4. Once the water reaches a rolling boil, reduce the heat to low and let the eggs simmer for about 9-12 minutes, depending on your desired level of doneness.
  5. While the eggs are simmering, prepare a bowl with ice water.
  6. Once the eggs are cooked to your liking, use a slotted spoon to transfer them to the ice water bath.
  7. Let the eggs sit in the ice water for at least 5 minutes to cool and stop the cooking process.
  8. Gently tap each egg on a solid surface to crack the shell.
  9. Roll the cracked egg gently between your hands to loosen the shell.
  10. Starting at the wide end of the egg, peel off the shell, taking care not to remove chunks of the egg white.
  11. Rinse each peeled egg under cool running water to remove any remaining shell pieces.
  12. Pat the eggs dry with a paper towel.

Pro tips for success:

– Using eggs that are a few days old, rather than fresh eggs, can make them easier to peel.

– Adding a splash of vinegar to the boiling water can help prevent the egg whites from leaking out if any cracks occur.

– Rolling the eggs gently on a countertop before peeling can help loosen the shell and make it easier to remove.

Variations and Substitutions

While the classic hard-boiled egg is delicious on its own, there are plenty of ways to customize this recipe:

– Add a sprinkle of salt and pepper to the peeled eggs for extra flavor.

– Experiment with different seasonings, such as paprika, garlic powder, or herbs, to give your eggs a unique twist.

– If you prefer a creamier texture, you can make deviled eggs by mixing the yolks with mayonnaise, mustard, and other seasonings.

For dietary preferences, consider these substitutions:

– If you follow a vegan diet, you can substitute hard-boiled tofu for the eggs.

– Those with dairy allergies can use dairy-free mayonnaise or yogurt in their deviled eggs.

Serving Suggestions

Perfectly peeled hard-boiled eggs can be enjoyed in various ways:

– Serve them as a protein-packed snack on their own.

– Slice them and add them to sandwiches or wraps for an extra boost of flavor and texture.

– Chop them and use them to make a classic egg salad.

– Add them to green salads or grain bowls for a nutritious and filling meal.

Pair these eggs with complementary side dishes and drinks, such as fresh fruit, whole-grain bread, or a refreshing iced tea.

FAQs

Here are answers to some common questions you may have about perfectly peeled hard-boiled eggs:

Q: How long do hard-boiled eggs last?

A: Hard-boiled eggs can be stored in the refrigerator for up to one week.

Q: Can I freeze hard-boiled eggs?

A: It’s not recommended to freeze hard-boiled eggs as the texture can become rubbery.

Q: How can I tell if an egg is hard-boiled?

A: You can spin the egg on a flat surface. If it spins easily, it’s hard-boiled.

Q: Can I reheat hard-boiled eggs?

A: While it’s possible to reheat hard-boiled eggs, they can become rubbery. It’s best to enjoy them cold or at room temperature.

Q: What if my eggs are difficult to peel?

A: If you’re having trouble peeling the eggs, try using slightly older eggs or adding a splash of vinegar to the boiling water.

Final Thoughts

Perfectly peeled hard-boiled eggs are a kitchen staple that can be enjoyed in a variety of dishes or on their own. By following our simple step-by-step instructions and using our pro tips, you’ll be able to achieve consistently great results every time you boil and peel eggs.

So go ahead and give it a try! We can’t wait to hear about your perfectly peeled hard-boiled eggs and the delicious ways you enjoy them.

Crispy Golden Tofu Delight: A Delectable PAMBENTA/Meryenda Recipe 😋

Crispy Golden Tofu Delight: A Delectable PAMBENTA/Meryenda Recipe 😋

Introduction

Welcome to a delightful culinary adventure with our Crispy Golden Tofu recipe! If you’re looking for a satisfying and flavorful snack or appetizer, this recipe is the perfect choice. Crispy on the outside and tender on the inside, this tofu dish will surely captivate your taste buds. Whether you’re a tofu enthusiast or simply curious about trying something new, this recipe is a must-try. Let’s dive into the world of flavors and discover the magic of Crispy Golden Tofu!

Crispy Golden Tofu Delight: A Delectable PAMBENTA/Meryenda Recipe 😋

Why You’ll Love This Recipe

There are countless reasons why this Crispy Golden Tofu recipe will become a favorite in your household. Firstly, it’s incredibly easy to make, even for novice cooks. With just a few simple ingredients, you can achieve a restaurant-quality dish in the comfort of your own kitchen. Secondly, the combination of crispy tofu and delicate flavors creates a delightful contrast that will leave you craving for more. Lastly, this recipe is suitable for various dietary preferences as it is vegetarian-friendly and can be made gluten-free. Get ready to fall in love with this crispy and golden delight!

Ingredients

For this Crispy Golden Tofu recipe, you will need the following ingredients:

  • 1 block of firm tofu
  • 1/4 cup cornstarch
  • 1/4 cup all-purpose flour
  • 1 teaspoon garlic powder
  • 1/2 teaspoon paprika
  • 1/4 teaspoon salt
  • 1/4 teaspoon black pepper
  • Vegetable oil for frying

Note: Feel free to adjust the quantities of the seasonings according to your taste preferences.

Step-by-Step Instructions

Follow these simple steps to create your own Crispy Golden Tofu:

  1. Start by pressing the tofu to remove excess moisture. Place the tofu block on a plate lined with paper towels or a clean kitchen towel. Place another layer of paper towels or a kitchen towel on top, followed by a heavy object like a cutting board or a book. Let it sit for about 20 minutes.
  2. Meanwhile, in a shallow bowl, combine the cornstarch, all-purpose flour, garlic powder, paprika, salt, and black pepper. Mix well to ensure the seasonings are evenly distributed.
  3. Cut the pressed tofu into bite-sized cubes or rectangles, whichever shape you prefer.
  4. Coat each tofu piece with the flour mixture, ensuring they are fully covered. Shake off any excess coating.
  5. In a large frying pan, heat vegetable oil over medium-high heat. The oil should be about 1/2 inch deep.
  6. Carefully place the coated tofu pieces into the hot oil, ensuring they are not overcrowded. Fry for 2-3 minutes on each side or until golden brown and crispy.
  7. Once crispy and golden, transfer the tofu pieces to a plate lined with paper towels to absorb any excess oil.
  8. Repeat the frying process with the remaining tofu pieces.
  9. Serve the Crispy Golden Tofu immediately while still hot and crispy. It pairs perfectly with sweet chili sauce or soy sauce for dipping.

Pro Tip: To keep the tofu crispy for longer, place it on a wire rack after frying to allow any excess oil to drip off.

Expert Tips for Success

Follow these expert tips to ensure your Crispy Golden Tofu turns out perfectly:

  • Use firm tofu for the best texture. Silken tofu is too delicate and will not hold its shape during frying.
  • Pressing the tofu is essential to remove excess moisture, allowing it to crisp up nicely.
  • Make sure the oil is hot enough before adding the tofu. If the oil is not hot, the tofu will absorb more oil and become greasy.
  • For extra flavor, you can add a pinch of your favorite spices to the flour mixture, such as cayenne pepper or smoked paprika.
  • Experiment with different dipping sauces to find your favorite combination. Sweet chili sauce, teriyaki sauce, or peanut sauce are all excellent choices.

Variations and Substitutions

Feel free to get creative and customize your Crispy Golden Tofu with these variations:

  • Spicy Tofu: Add a pinch of cayenne pepper or chili flakes to the flour mixture for an extra kick.
  • Asian-Inspired Tofu: Replace the garlic powder and paprika with Chinese five-spice powder for a unique flavor twist.
  • Gluten-Free Tofu: Use gluten-free flour instead of all-purpose flour to make this recipe suitable for those with gluten sensitivities.
  • Herb-Infused Tofu: Add dried herbs like thyme or rosemary to the flour mixture for a fragrant and aromatic touch.

Serving Suggestions

Crispy Golden Tofu is incredibly versatile and can be enjoyed in various ways:

  • As an appetizer: Serve the crispy tofu with sweet chili sauce or soy sauce for dipping.
  • In a salad: Add the Crispy Golden Tofu to a bed of mixed greens, cherry tomatoes, and cucumber slices for a refreshing and filling salad.
  • In a wrap: Fill a tortilla or a lettuce wrap with Crispy Golden Tofu, shredded carrots, sliced bell peppers, and your favorite sauce for a delicious and portable meal.
  • With fried rice: Toss the Crispy Golden Tofu with your favorite fried rice recipe for a protein-packed and flavorful meal.

FAQs

Here are some frequently asked questions about Crispy Golden Tofu:

Q: Can I bake the tofu instead of frying it?

A: While baking the tofu can result in a different texture, it is still possible to achieve a crispy exterior. Coat the tofu with a thin layer of oil and bake it in a preheated oven at 400°F (200°C) for 25-30 minutes, flipping halfway through.

Q: Can I freeze the Crispy Golden Tofu?

A: Yes, you can freeze the tofu after frying it. Allow it to cool completely, then place it in an airtight container or freezer bag. When ready to enjoy, simply reheat it in a preheated oven at 350°F (180°C) for 10-15 minutes or until heated through.

Q: How long can I store the leftovers?

A: The leftovers can be stored in the refrigerator for up to 3 days. To reheat, place the tofu in a preheated oven at 350°F (180°C) for 10-15 minutes or until heated through.

Final Thoughts

Indulge in the crispy and golden goodness of our Crispy Golden Tofu recipe. With its simple preparation and satisfying flavors, this dish is bound to become a regular on your menu. Whether you’re a tofu aficionado or a curious foodie, this recipe offers a delightful experience for your taste buds. So, gather your ingredients, follow the steps, and savor the crispy joy of homemade tofu perfection. Don’t forget to share your Crispy Golden Tofu adventure with us!

Decadent Nutella Crêpes:

Introduction

Are you ready to indulge in a heavenly treat that combines the rich flavors of chocolate and hazelnuts? Look no further than decadent Nutella crêpes! These delicate, thin pancakes filled with creamy Nutella spread are a mouthwatering delight that will satisfy any sweet tooth. Whether you’re hosting a brunch, preparing a special dessert, or simply craving a delightful treat, Nutella crêpes are the perfect choice. In this article, we’ll guide you through the process of creating these delectable crêpes, from the basic batter to the final assembly. Get ready to embark on a culinary journey that will leave you craving for more!

Why You’ll Love This Recipe

Decadent Nutella Crêpes:

There are countless reasons why Nutella crêpes have become a beloved dessert around the world. Here are just a few of the reasons why you’ll fall head over heels for this recipe:

1. Quick and Easy: With just a few simple ingredients, you can whip up a batch of Nutella crêpes in no time.

2. Deliciously Versatile: Nutella crêpes can be enjoyed as a dessert, a brunch item, or even a decadent breakfast. The possibilities are endless!

3. Perfectly Fluffy: The crêpes are light, airy, and have a delicate texture that melts in your mouth.

4. Irresistible Nutella Filling: The creamy and indulgent Nutella spread adds a luxurious touch to every bite.

Ingredients

Before we dive into the step-by-step instructions, let’s gather all the ingredients you’ll need to create these mouthwatering Nutella crêpes:

– 1 cup all-purpose flour

– 2 large eggs

– 1 and 1/4 cups milk

– 2 tablespoons melted butter

– 2 tablespoons granulated sugar

– 1/4 teaspoon salt

– Nutella spread for filling

– Powdered sugar for dusting (optional)

– Fresh berries for garnish (optional)

Step-by-Step Instructions

Now that we have all our ingredients ready, let’s dive into the step-by-step process of making these heavenly Nutella crêpes:

Step 1: In a large mixing bowl, combine the all-purpose flour, eggs, milk, melted butter, granulated sugar, and salt. Whisk the ingredients together until a smooth batter forms.

Step 2: Heat a non-stick skillet or crêpe pan over medium heat. Grease the pan lightly with butter or cooking spray.

Step 3: Pour a small ladleful of the batter into the center of the pan. Quickly tilt the pan in a circular motion to spread the batter evenly and create a thin crêpe.

Step 4: Cook the crêpe for about 1-2 minutes, or until the edges start to turn golden brown. Flip the crêpe gently using a spatula and cook for an additional 1-2 minutes.

Step 5: Transfer the cooked crêpe to a plate and repeat the process with the remaining batter.

Step 6: Once all the crêpes are cooked, it’s time to assemble the Nutella crêpes. Spread a generous amount of Nutella on one half of each crêpe.

Step 7: Fold the crêpe in half, covering the Nutella filling, and then fold it in half again to create a triangle shape.

Step 8: Repeat this process with the remaining crêpes and Nutella.

Step 9: Serve the Nutella crêpes warm, dusted with powdered sugar and garnished with fresh berries if desired.

Expert Tips for Success

Here are a few expert tips to ensure your Nutella crêpes turn out perfectly every time:

– Make sure to whisk the batter until it’s completely smooth to avoid lumps in the crêpes.

– Adjust the heat on your stovetop accordingly to prevent the crêpes from burning.

– Use a non-stick skillet or crêpe pan to make flipping the crêpes easier.

– Experiment with different fillings such as sliced bananas, strawberries, or whipped cream for added variety.

Variations and Substitutions

If you want to put a personal twist on your Nutella crêpes or have dietary preferences, here are a few variations and substitutions you can try:

– Gluten-Free Option: Substitute the all-purpose flour with gluten-free flour for a gluten-free version of the crêpes.

– Vegan Option: Replace the eggs with a flaxseed or chia seed egg substitute, and use a plant-based milk such as almond milk or oat milk.

– Nut-Free Option: If you have nut allergies, you can use alternative spreads such as cookie butter or fruit preserves instead of Nutella.

Serving Suggestions

Now that your Nutella crêpes are ready to be enjoyed, here are a few serving suggestions to elevate your dining experience:

– Top the crêpes with a dollop of whipped cream and a drizzle of chocolate sauce for an extra indulgent touch.

– Serve the crêpes alongside a scoop of vanilla ice cream for a delightful dessert combination.

– Pair the crêpes with a cup of freshly brewed coffee or a glass of cold milk for a satisfying breakfast or brunch.

FAQs

Q: Can I make the crêpe batter ahead of time?

A: Yes, you can prepare the crêpe batter in advance and store it in the refrigerator for up to 24 hours. Just give it a good whisk before cooking the crêpes.

Q: Can I freeze the Nutella crêpes?

A: Absolutely! Once the crêpes are cooked and filled with Nutella, you can stack them with parchment paper in between and freeze them in an airtight container for up to 2 months. Thaw them in the refrigerator overnight and reheat them in a skillet before serving.

Q: Can I use a different type of spread instead of Nutella?

A: Of course! While Nutella is a classic choice, you can use any spread of your preference such as peanut butter, almond butter, or even caramel sauce.

Final Thoughts

Indulging in a plate of Nutella crêpes is like taking a bite of pure bliss. The combination of delicate crêpes and creamy Nutella filling is a match made in dessert heaven. Whether you’re treating yourself to a weekend brunch or creating a memorable dessert for a special occasion, Nutella crêpes are sure to impress. So gather your ingredients, follow our step-by-step instructions, and get ready to savor every delicious mouthful. Don’t forget to share your Nutella crêpe experience with us and spread the joy of this delightful recipe with your friends and family!

Caramelized Saba Bananas:

Introduction

Who doesn’t love the sweet and sticky goodness of caramelized bananas? In this recipe, we’ll take a closer look at how to make the perfect caramelized saba bananas. Whether you’re a seasoned cook or a beginner in the kitchen, this recipe is sure to impress with its simplicity and delightful flavors.

Caramelized saba bananas, also known as “minatamis na saging” in the Philippines, is a popular dessert that showcases the natural sweetness of ripe saba bananas. This classic Filipino treat is loved for its caramelized exterior and tender, melt-in-your-mouth texture. It’s a versatile dessert that can be enjoyed on its own or used as a topping for ice cream, pancakes, or even as a filling for pastries.

What sets caramelized saba bananas apart is the unique combination of flavors and textures. The bananas become soft and sticky, while the caramelization process adds a rich and deep sweetness to each bite. It’s a dessert that will leave you craving for more.

Why You’ll Love This Recipe

Caramelized Saba Bananas:

There are several reasons why you’ll fall in love with this caramelized saba bananas recipe:

1. Quick and Easy: With just a few simple ingredients and minimal preparation, you can whip up this delightful dessert in no time. It’s perfect for those moments when you’re craving something sweet but don’t want to spend hours in the kitchen.

2. Versatile: Caramelized saba bananas can be enjoyed in various ways. Serve them as a standalone dessert, use them as a topping for pancakes or waffles, or incorporate them into your favorite baked goods. The possibilities are endless.

3. Health Benefits: While this recipe is undoubtedly a treat, it’s worth mentioning that bananas are a great source of vitamins and minerals. They’re rich in potassium, vitamin C, and dietary fiber. So, you can enjoy this dessert guilt-free.

Ingredients

To make caramelized saba bananas, you’ll need the following ingredients:

– 4 ripe saba bananas

– 1/2 cup brown sugar

– 1/4 cup water

– 2 tablespoons butter

– 1/2 teaspoon vanilla extract (optional)

Step-by-Step Instructions

Follow these simple steps to create the perfect batch of caramelized saba bananas:

1. Start by peeling the saba bananas and cutting them into thick slices. Set them aside.

2. In a non-stick skillet, melt the butter over medium heat. Once melted, add the brown sugar and water to the skillet. Stir until the sugar has dissolved.

3. Carefully add the sliced bananas to the skillet, ensuring they are evenly coated with the caramel sauce.

4. Let the bananas cook for about 2-3 minutes on each side, or until they turn golden brown and caramelized.

5. If desired, add the vanilla extract to the skillet and gently stir it into the caramel sauce.

6. Remove the skillet from heat and allow the caramelized saba bananas to cool slightly before serving.

Expert Tips for Success:

– Use ripe saba bananas: The riper the bananas, the sweeter and more flavorful they will be when caramelized. Look for bananas with yellow skin and a few brown spots.

– Adjust sweetness: If you prefer a milder sweetness, reduce the amount of brown sugar used. Likewise, if you have a sweet tooth, feel free to add more sugar.

– Be patient: Allow the bananas to caramelize properly on each side before flipping them. This will ensure a beautiful golden-brown color and enhance the flavor.

Variations and Substitutions

While the classic caramelized saba bananas recipe is delicious on its own, you can always get creative and try out different variations:

– Add a sprinkle of cinnamon or nutmeg to the caramel sauce for a warm and aromatic twist.

– Drizzle some chocolate sauce or caramel sauce over the caramelized bananas for an extra indulgent treat.

– For a tropical twist, serve the caramelized saba bananas with a scoop of coconut ice cream or a dollop of whipped cream.

Serving Suggestions

Caramelized saba bananas can be enjoyed in various ways. Here are a few serving suggestions to take your dessert to the next level:

– Serve the caramelized bananas warm over a scoop of vanilla ice cream for a classic combination of flavors and textures.

– Pair them with a stack of fluffy pancakes or crispy waffles for a breakfast treat that will leave you wanting more.

– Use the caramelized saba bananas as a filling for crepes or pastries to create a delightful dessert that will impress your guests.

FAQs

Q: Can I use regular bananas instead of saba bananas?

A: While saba bananas are traditionally used for this recipe, you can use regular bananas as a substitute. However, keep in mind that regular bananas may not hold their shape as well during the caramelization process.

Q: Can I make caramelized saba bananas ahead of time?

A: Absolutely! You can prepare caramelized saba bananas in advance and store them in an airtight container in the refrigerator. When ready to serve, simply reheat them gently in a skillet or microwave until warm.

Q: Can I freeze caramelized saba bananas?

A: Yes, you can freeze caramelized saba bananas. Allow them to cool completely, then transfer them to a freezer-safe container or bag. When you’re ready to enjoy them, thaw them in the refrigerator overnight and reheat if desired.

Final Thoughts

Caramelized saba bananas are a delightful dessert that will satisfy your sweet tooth and leave you wanting more. With their sticky caramel exterior and tender, melt-in-your-mouth texture, they are a treat that can be enjoyed in various ways. Whether you’re serving them over ice cream, pairing them with pancakes, or getting creative with your own variations, caramelized saba bananas are a true crowd-pleaser.

So, next time you have some ripe bananas on hand, give this recipe a try. We guarantee you won’t be disappointed!

Fluffy and Irresistible Classic Donut Recipe

Introduction

Welcome to the world of fluffy and irresistible classic donuts! If you’ve ever found yourself daydreaming about sinking your teeth into a perfectly glazed donut, then this recipe is for you. In this article, we will guide you through the process of creating these delectable treats from scratch. Get ready to embark on a journey of sweet indulgence that will leave you craving for more.

Why You’ll Love This Recipe

Fluffy and Irresistible Classic Donut Recipe

There’s something truly magical about homemade donuts. The aroma of freshly baked dough, the delicate sweetness of the glaze, and the satisfyingly soft texture all come together to create a heavenly experience. What sets this classic donut recipe apart is its simplicity and versatility. Whether you’re a seasoned baker or a novice in the kitchen, you’ll find joy in creating these delightful treats. Plus, you can customize them with various toppings and fillings, making them perfect for any occasion.

Ingredients

Before we dive into the step-by-step instructions, let’s gather all the ingredients you’ll need:

– 2 ½ cups all-purpose flour

– ¼ cup granulated sugar

– 2 teaspoons instant yeast

– ½ teaspoon salt

– 1 cup warm milk

– 2 tablespoons unsalted butter, melted

– 1 teaspoon vanilla extract

– Vegetable oil, for frying

– For the glaze:

– 2 cups powdered sugar

– ¼ cup milk

– 1 teaspoon vanilla extract

Step-by-Step Instructions

Now that we have our ingredients ready, let’s get started on making these fluffy and irresistible classic donuts:

1. In a large mixing bowl, combine the all-purpose flour, granulated sugar, instant yeast, and salt. Mix well.

2. In a separate bowl, combine the warm milk, melted butter, and vanilla extract.

3. Gradually pour the wet ingredients into the dry ingredients and mix until a dough forms.

4. Transfer the dough onto a lightly floured surface and knead for about 5 minutes or until the dough becomes smooth and elastic.

5. Place the dough in a greased bowl, cover it with a clean kitchen towel, and let it rise in a warm place for about 1 hour or until it doubles in size.

6. Once the dough has risen, punch it down to release any air bubbles and transfer it back to the floured surface.

7. Roll out the dough to a ½ inch thickness and use a donut cutter or a round cookie cutter to cut out the donut shapes. Set aside the donut shapes and the donut holes.

8. In a large pot, heat vegetable oil to 375°F (190°C).

9. Carefully drop a few donuts into the hot oil, making sure not to overcrowd the pot.

10. Fry the donuts for about 2-3 minutes per side or until they turn golden brown. Flip them using a slotted spoon or tongs.

11. Once the donuts are cooked, transfer them onto a paper towel-lined plate to absorb any excess oil.

12. For the glaze, in a shallow bowl, whisk together the powdered sugar, milk, and vanilla extract until smooth.

13. Dip each donut into the glaze, making sure to coat both sides. Place them on a wire rack to allow the glaze to set.

14. Repeat the frying and glazing process with the remaining donut shapes and donut holes.

15. Once the glaze has set, your fluffy and irresistible classic donuts are ready to be enjoyed!

Expert Tips for Success

– Make sure the milk is warm, but not too hot, as it can kill the yeast.

– Kneading the dough thoroughly helps develop the gluten, resulting in a lighter and fluffier texture.

– Use a candy or deep-frying thermometer to ensure the oil is at the correct temperature.

– If you don’t have a donut cutter, you can also use a drinking glass and a smaller round object, such as a bottle cap, to cut out the donut shapes.

– To achieve a smoother glaze, sift the powdered sugar before whisking it with the milk and vanilla extract.

Variations and Substitutions

While classic donuts are undeniably delicious on their own, you can get creative and experiment with different flavors and toppings. Here are a few ideas:

– Chocolate Glazed Donuts: Add ¼ cup of unsweetened cocoa powder to the dough and prepare a chocolate glaze by melting 1 cup of chocolate chips with 2 tablespoons of butter.

– Filled Donuts: After frying and glazing the donuts, use a piping bag to inject your favorite filling, such as jam, chocolate, or cream.

– Cinnamon Sugar Donuts: Skip the glaze and roll the freshly fried donuts in a mixture of cinnamon and sugar while they’re still warm.

– Vegan Option: Replace the milk with almond milk or any plant-based milk, and use vegan butter instead of regular butter.

Serving Suggestions

These fluffy and irresistible classic donuts are perfect on their own, but you can take them to the next level by serving them with a few accompaniments:

– Coffee: Pair your donuts with a freshly brewed cup of coffee for a delightful breakfast or afternoon treat.

– Ice Cream: Create a heavenly dessert by slicing the donuts in half and sandwiching a scoop of your favorite ice cream in between.

– Fresh Fruits: Add a burst of freshness by serving the donuts with a side of sliced strawberries, blueberries, or raspberries.

FAQs

Q: Can I make the dough the night before and fry the donuts in the morning?

A: Absolutely! After the dough has risen, you can refrigerate it overnight. In the morning, simply roll out the dough, cut out the donut shapes, and proceed with the frying and glazing process.

Q: Can I freeze the donuts?

A: Yes, you can freeze the donuts before glazing them. Once they’re completely cooled, place them in an airtight container or freezer bag and freeze for up to 2 months. Thaw them at room temperature, then glaze and enjoy!

Q: Why is it important to punch down the dough after it rises?

A: Punching down the dough helps release any trapped air bubbles, resulting in a more even texture while frying.

Final Thoughts

Congratulations! You’ve successfully mastered the art of creating fluffy and irresistible classic donuts. Now, it’s time to indulge in the fruits of your labor and share the joy with your loved ones. Whether you’re treating yourself to a well-deserved sweet treat or impressing guests with your baking skills, these homemade donuts are sure to leave a lasting impression. So go ahead, take a bite, and savor the moment!

Savory and Succulent Adobong Bangus: A Delicious Twist on a Classic Filipino Dish

Introduction

Adobong Bangus is a classic Filipino dish that never fails to satisfy the taste buds. This savory and succulent recipe features milkfish, or bangus, marinated and cooked in a flavorful blend of soy sauce, vinegar, garlic, and spices. With its rich and tangy flavors, Adobong Bangus has become a beloved staple in Filipino households, often enjoyed with steamed rice and a side of pickled vegetables. In this article, we will share a delicious twist on this traditional dish, adding a few special ingredients to elevate its taste to new heights. Get ready to tantalize your taste buds with our recipe for Savory and Succulent Adobong Bangus!

Why You’ll Love This Recipe

Savory and Succulent Adobong Bangus: A Delicious Twist on a Classic Filipino Dish

There are several reasons why this Savory and Succulent Adobong Bangus recipe will become a favorite in your kitchen:

1. Easy and Quick: With just a few simple steps, you can whip up this delicious dish in no time.

2. Bursting with Flavor: The combination of soy sauce, vinegar, and spices creates a harmonious blend of savory and tangy flavors that will leave you craving for more.

3. Healthy and Nutritious: Bangus is a good source of protein and omega-3 fatty acids, making this dish not only delicious but also beneficial for your health.

4. Versatile: You can enjoy Adobong Bangus as a main dish or as a filling for sandwiches and wraps.

Ingredients

To make Savory and Succulent Adobong Bangus, you will need the following ingredients:

– 2 large bangus (milkfish), cleaned and sliced into serving pieces

– 1/2 cup soy sauce

– 1/2 cup vinegar

– 6 cloves of garlic, minced

– 1 teaspoon whole peppercorns

– 2 bay leaves

– 1 tablespoon cooking oil

– 1 cup water

– Salt to taste

Step-by-Step Instructions

Follow these simple steps to create your own Savory and Succulent Adobong Bangus:

1. In a large bowl, combine the soy sauce, vinegar, minced garlic, peppercorns, and bay leaves. Mix well.

2. Add the bangus slices to the marinade, ensuring that each piece is coated with the mixture. Let it marinate for at least 30 minutes.

3. Heat the cooking oil in a pan over medium heat. Remove the bangus slices from the marinade, reserving the marinade for later use.

4. Fry the bangus slices until golden brown on both sides. Set aside.

5. In the same pan, pour the reserved marinade and water. Bring it to a boil.

6. Add the fried bangus slices to the boiling mixture. Cover the pan and let it simmer for about 10 minutes or until the fish is cooked through.

7. Season with salt to taste. Stir gently to distribute the flavors evenly.

8. Remove from heat and transfer the Savory and Succulent Adobong Bangus to a serving dish. Garnish with chopped spring onions, if desired.

9. Serve hot with steamed rice and enjoy!

Expert Tips for Success

Here are some expert tips to ensure your Savory and Succulent Adobong Bangus turns out perfectly:

– Choose fresh bangus that has been cleaned and sliced by your trusted fishmonger to save time and effort.

– For an extra burst of flavor, you can add a tablespoon of oyster sauce to the marinade.

– If you prefer a milder taste, you can reduce the amount of vinegar or replace it with calamansi juice.

– To prevent the bangus from sticking to the pan while frying, make sure the oil is hot before adding the fish slices.

– For a healthier alternative, you can grill the bangus instead of frying it.

Variations and Substitutions

Feel free to get creative and customize your Adobong Bangus with these variations and substitutions:

– Instead of bangus, you can use other types of fish such as tilapia or salmon.

– Add vegetables like bell peppers, carrots, or green beans to make it a more colorful and nutritious dish.

– For a spicier kick, you can add chili peppers or hot sauce to the marinade.

– If you’re vegetarian, you can replace the fish with tofu or tempeh and adjust the cooking time accordingly.

Serving Suggestions

Adobong Bangus is best enjoyed with steamed rice and a side of pickled vegetables. Here are some serving suggestions to enhance your dining experience:

– Serve the Savory and Succulent Adobong Bangus on a bed of steamed rice, allowing the flavors to mingle.

– Pair it with a refreshing cucumber and tomato salad for a cool contrast.

– Enjoy it with a side of atchara (pickled papaya) or ensaladang talong (grilled eggplant salad) for a tangy and crunchy bite.

– For a complete Filipino meal, serve Adobong Bangus with sinigang (sour soup) or pancit (noodles).

FAQs

Q: Can I use frozen bangus for this recipe?

A: Yes, you can use frozen bangus if fresh ones are not available. Just make sure to thaw them properly before marinating.

Q: How long can I store leftover Adobong Bangus?

A: Leftover Adobong Bangus can be stored in the refrigerator for up to 3 days. Reheat it gently in a pan or microwave before serving.

Q: Can I freeze Adobong Bangus?

A: Yes, you can freeze Adobong Bangus for up to 1 month. Make sure to store it in an airtight container or freezer bag. Thaw it in the refrigerator before reheating.

Final Thoughts

Savory and Succulent Adobong Bangus is a delightful twist on a classic Filipino dish that brings together the flavors of soy sauce, vinegar, and spices in a mouthwatering harmony. With its simplicity and versatility, this recipe is perfect for weeknight dinners or special occasions. Whether you’re a fan of Filipino cuisine or simply looking to try something new, Adobong Bangus is a must-try dish that will satisfy your cravings and leave you wanting more. So gather your ingredients, fire up your stove, and get ready to savor the deliciousness of this beloved Filipino favorite!

Delicious 8-Day Ulam Delights:

Introduction

Welcome to the world of delicious 8-Day Ulam Delights! In this recipe, we’ll be exploring a variety of mouthwatering ulam dishes that will surely satisfy your taste buds. Ulam, a Filipino term for viand or main dish, plays a significant role in Filipino cuisine. It’s the star of every meal, providing a burst of flavors and textures that complement rice perfectly.

Throughout this culinary adventure, we’ll be showcasing eight ulam recipes that are easy to prepare, packed with flavor, and perfect for any occasion. From classic Filipino favorites to unique twists on traditional dishes, these recipes offer a diverse range of flavors and ingredients.

Why You’ll Love This Recipe

Delicious 8-Day Ulam Delights:

These 8-Day Ulam Delights are not only delicious but also offer a variety of benefits that make them irresistible. Here’s why you’ll love this recipe:

1. Easy and Quick: These recipes are designed to be simple and time-efficient, perfect for busy individuals or families who want to enjoy a homemade ulam without spending hours in the kitchen.

2. Bursting with Flavor: Each ulam dish features a unique blend of herbs, spices, and ingredients that create a symphony of flavors. From tangy and spicy to savory and sweet, these recipes will tantalize your taste buds.

3. Versatile: Whether you’re a meat lover, a seafood enthusiast, or a vegetarian, these ulam recipes offer a wide range of options to suit your dietary preferences. You can easily customize the recipes to include or exclude certain ingredients.

4. Nutritious: These ulam dishes are not only delicious but also packed with essential nutrients. They incorporate a variety of vegetables, lean proteins, and healthy fats, providing a balanced and wholesome meal for you and your family.

Ingredients

Here’s a list of the key ingredients you’ll need to prepare these delicious 8-Day Ulam Delights:

– [Ingredient 1]

– [Ingredient 2]

– [Ingredient 3]

– [Ingredient 4]

– [Ingredient 5]

Optional Substitutions:

– [Optional Ingredient 1]

– [Optional Ingredient 2]

– [Optional Ingredient 3]

Step-by-Step Instructions

Now, let’s dive into the step-by-step instructions for preparing these delectable ulam dishes:

1. [Step 1]

[Cooking Tip 1]

2. [Step 2]

[Cooking Tip 2]

3. [Step 3]

[Cooking Tip 3]

4. [Step 4]

[Cooking Tip 4]

5. [Step 5]

[Cooking Tip 5]

Expert Tips for Success

Here are some expert tips to ensure your ulam dishes turn out perfectly:

– Tip 1: [Expert Tip 1]

– Tip 2: [Expert Tip 2]

– Tip 3: [Expert Tip 3]

Variations and Substitutions

If you’re looking to switch things up or cater to specific dietary preferences, here are some variations and substitutions you can try:

– Variation 1: [Variation 1 description]

– Variation 2: [Variation 2 description]

– Substitution: [Substitution description]

Serving Suggestions

To complete your ulam experience, here are some serving suggestions to elevate your meal:

– Serve with steamed rice and a side of fresh vegetables for a balanced meal.

– Pair with a refreshing iced tea or a tropical fruit shake for a delightful beverage.

– Garnish with chopped herbs or a squeeze of lime for an extra burst of flavor.

FAQs

Here are some frequently asked questions about these delicious 8-Day Ulam Delights:

Q: Can I prepare these ulam dishes in advance?

A: Absolutely! Some ulam dishes can be prepared in advance and stored in the refrigerator for a quick and convenient meal later on. However, certain dishes are best enjoyed fresh.

Q: Can I freeze leftovers?

A: Yes, most of these ulam dishes can be frozen for future consumption. Make sure to store them in airtight containers or freezer bags to maintain their quality.

Q: Are these recipes suitable for vegetarians?

A: While some of the ulam dishes contain meat or seafood, you can easily modify the recipes to suit a vegetarian diet. Substitute the meat or seafood with tofu, tempeh, or your favorite plant-based protein.

Final Thoughts

Embark on a delicious journey with these 8-Day Ulam Delights. From the comforting flavors of traditional Filipino ulam to innovative twists that will surprise your taste buds, these recipes offer a diverse range of options to satisfy every palate.

Try these recipes in your own kitchen, experiment with different variations, and let your culinary creativity shine. Share your ulam adventures with friends and family, and enjoy the delightful experience of preparing and savoring these ulam dishes!

Deliciously Chewy Classic Kutsinta: A Filipino Delight with Cassava Flour and All-Purpose Flour

Introduction

If you’re a fan of Filipino desserts, then you’re in for a treat with this recipe for deliciously chewy classic Kutsinta. Made with a combination of cassava flour and all-purpose flour, this traditional Filipino delight is a crowd favorite that will surely satisfy your sweet cravings.

The word “Kutsinta” itself comes from the Filipino term “kutsit,” which means “to cut.” This is because Kutsinta is typically cut into small bite-sized pieces before serving. This beloved delicacy is often enjoyed as a snack, dessert, or even as a breakfast dish paired with a hot cup of coffee or tea.

What makes Kutsinta special is its unique texture – soft, chewy, and slightly sticky. The combination of cassava flour and all-purpose flour gives it its distinct consistency. The use of cassava flour, which is made from the root of the cassava plant, adds a subtle earthy flavor that perfectly complements the sweetness of the Kutsinta. Meanwhile, the all-purpose flour helps to give it a delicate and fluffy texture.

Why You’ll Love This Recipe

Deliciously Chewy Classic Kutsinta: A Filipino Delight with Cassava Flour and All-Purpose Flour

There are several reasons why you’ll fall in love with this classic Kutsinta recipe:

1. Easy and Quick: This recipe requires minimal effort and can be whipped up in no time. With just a few basic ingredients, you’ll have a delightful treat ready to enjoy.

2. Chewy and Fluffy: The combination of cassava flour and all-purpose flour gives the Kutsinta its signature chewiness and fluffy texture. Each bite feels like a delightful cloud of goodness.

3. Gluten-Free Option: By using cassava flour, this recipe can easily be made gluten-free. It’s a fantastic option for those with gluten sensitivities or dietary restrictions.

Ingredients

To make classic Kutsinta, you’ll need the following ingredients:

– 1 cup cassava flour

– 1 cup all-purpose flour

– 2 cups brown sugar

– 3 cups water

– 1 teaspoon lye water (potassium carbonate)

– 1/2 teaspoon annatto extract (optional, for color)

– Grated coconut, for serving (optional)

Step-by-Step Instructions

Follow these simple steps to make your own delicious Kutsinta:

1. In a large mixing bowl, combine the cassava flour and all-purpose flour. Mix well until fully combined.

2. In a separate saucepan, combine the brown sugar and water. Stir over medium heat until the sugar is completely dissolved.

3. Gradually pour the sugar mixture into the flour mixture, stirring continuously to prevent lumps from forming.

4. Add the lye water and annatto extract to the batter and mix well. The annatto extract is optional but adds a beautiful orange color to the Kutsinta.

5. Once the batter is well-mixed and smooth, let it rest for about 15 minutes to allow the flours to absorb the liquid.

6. While the batter is resting, prepare your steamer. Fill the bottom of the steamer with water and bring it to a boil.

7. Lightly grease the molds with oil or cooking spray to prevent sticking. You can use small individual molds or a large baking dish.

8. Pour the batter into the greased molds, filling each mold about 3/4 full.

9. Carefully place the molds into the steamer, making sure they are evenly spaced to allow steam to circulate.

10. Steam the Kutsinta for about 20-25 minutes or until a toothpick inserted comes out clean.

11. Once cooked, remove the Kutsinta from the steamer and let them cool for a few minutes.

12. Gently remove the Kutsinta from the molds using a small spatula or knife.

13. Serve the Kutsinta warm or at room temperature. You can enjoy them as is or sprinkle them with grated coconut for added flavor.

Expert Tips for Success

Here are some expert tips to ensure your Kutsinta turns out perfectly:

– Make sure to mix the flour and sugar mixture well to prevent lumps from forming in the batter.

– Letting the batter rest allows the flours to fully absorb the liquid, resulting in a smoother texture.

– Grease the molds properly to prevent the Kutsinta from sticking. You can also use silicone molds for easy removal.

– When steaming, make sure the water is boiling before placing the molds in the steamer. This ensures even cooking.

– For added flavor, you can top the Kutsinta with grated coconut. Toasting the coconut adds a delightful nutty taste.

Variations and Substitutions

While classic Kutsinta is already delicious on its own, you can get creative and customize the recipe to suit your taste preferences. Here are some variations and substitutions you can try:

– Flavorings: Add a touch of vanilla extract or pandan extract to enhance the flavor of the Kutsinta.

– Toppings: Instead of grated coconut, you can sprinkle the Kutsinta with sesame seeds or drizzle them with caramel sauce.

– Vegan Option: Substitute the lye water with food-grade lye water substitute or baking powder for a vegan-friendly version.

– Gluten-Free: Ensure that the all-purpose flour you’re using is gluten-free or replace it with a gluten-free flour blend.

Serving Suggestions

Kutsinta is incredibly versatile and can be enjoyed in various ways. Here are some serving suggestions to elevate your Kutsinta experience:

– Enjoy the Kutsinta as a snack or dessert on its own. Its chewy texture makes it a delightful treat.

– Pair it with a hot cup of coffee or tea for a perfect afternoon indulgence.

– Serve it as a part of a dessert platter alongside other Filipino delicacies like Bibingka and Puto.

– For a more substantial meal, serve the Kutsinta with savory dishes like Dinuguan (pork blood stew) or Pancit (Filipino noodles).

FAQs

Here are some common questions readers have about making Kutsinta:

Q: Can I use tapioca flour instead of cassava flour?

A: While both flours come from the cassava plant, they have slightly different textures. It’s best to use cassava flour specifically for this recipe for the desired consistency.

Q: Can I use regular white sugar instead of brown sugar?

A: Brown sugar adds a rich caramel flavor to the Kutsinta. However, if you don’t have brown sugar on hand, you can use white sugar as a substitute.

Q: How can I store leftover Kutsinta?

A: Store any leftover Kutsinta in an airtight container at room temperature for up to 2-3 days. You can reheat them in the microwave or steam them again before serving.

Final Thoughts

Classic Kutsinta is a delightful Filipino delicacy that combines the unique flavors of cassava flour and all-purpose flour. With its chewy and fluffy texture, it’s a treat that will surely satisfy your sweet tooth. Whether you enjoy it as a snack, dessert, or breakfast dish, Kutsinta is a crowd favorite that will transport you to the vibrant streets of the Philippines. So why not give this recipe a try and experience the deliciousness of Kutsinta for yourself?

We hope you enjoy making and savoring this classic Filipino delight!

Coconutlicious Creamy Espasol:

Introduction

Coconutlicious Creamy Espasol is a delightful Filipino dessert that will transport you to the tropical shores of the Philippines with its rich coconut flavor and creamy texture. This traditional delicacy holds a special place in Filipino cuisine, loved by both locals and visitors alike. Whether you have a sweet tooth or simply appreciate the unique flavors of the world, this recipe is sure to satisfy your cravings and introduce you to a new and exciting dessert experience.

Why You’ll Love This Recipe

Coconutlicious Creamy Espasol:

There are several reasons why you’ll fall in love with Coconutlicious Creamy Espasol. Firstly, it is incredibly easy to make, requiring only a handful of ingredients that are easily accessible. Secondly, it offers a delightful combination of textures, with a soft and chewy exterior that encases a creamy coconut filling. Lastly, this recipe is a great option for those following a gluten-free or dairy-free diet, as it is naturally free from these allergens.

Ingredients

For this mouthwatering Coconutlicious Creamy Espasol recipe, you will need the following ingredients:

– 2 cups glutinous rice flour

– 1 cup coconut milk

– 1 cup condensed milk

– 1 cup desiccated coconut

– 1/2 cup granulated sugar

– 1/4 teaspoon salt

– Banana leaves (optional, for wrapping)

Step-by-Step Instructions

Follow these simple steps to create your own Coconutlicious Creamy Espasol:

  1. In a large mixing bowl, combine the glutinous rice flour, coconut milk, condensed milk, desiccated coconut, sugar, and salt. Mix until well combined.
  2. Place the mixture in a non-stick pan over medium heat. Stir continuously to prevent the mixture from sticking to the pan.
  3. Cook the mixture for about 15-20 minutes or until it thickens and starts to pull away from the sides of the pan.
  4. Remove the pan from heat and let the mixture cool slightly.
  5. Divide the mixture into small portions and shape them into logs or cylinders using your hands.
  6. If desired, wrap each espasol in banana leaves to add a touch of authenticity.
  7. Serve and enjoy!

Expert Tips for Success

To ensure the best results with your Coconutlicious Creamy Espasol, consider the following tips:

– Use fresh coconut milk for a more intense and authentic coconut flavor.

– Stir the mixture continuously while cooking to prevent it from burning or sticking to the pan.

– If the mixture becomes too dry, add a little more coconut milk to achieve the desired consistency.

– Let the espasol cool slightly before shaping them to avoid burning your hands.

Variations and Substitutions

While Coconutlicious Creamy Espasol is delicious on its own, you can also experiment with variations and substitutions to customize the recipe to your preferences. Here are a few ideas:

– Add a teaspoon of vanilla extract for a hint of additional flavor.

– Mix in chopped nuts, such as cashews or peanuts, for added crunch.

– Substitute the glutinous rice flour with regular rice flour for a gluten-free version.

– Use coconut sugar instead of granulated sugar for a healthier alternative.

Serving Suggestions

Coconutlicious Creamy Espasol is best enjoyed as a sweet treat after a delicious Filipino meal. Serve it on a platter and invite your guests to help themselves. You can also pair it with a hot cup of Filipino-style coffee or a refreshing glass of iced tea to complement the flavors. For an extra special touch, garnish the espasol with a sprinkle of desiccated coconut or a drizzle of melted dark chocolate.

FAQs

Q: Can I make Coconutlicious Creamy Espasol ahead of time?

A: Absolutely! In fact, making espasol in advance allows the flavors to meld together and enhances the overall taste. Store the espasol in an airtight container at room temperature for up to 3 days.

Q: Can I freeze Coconutlicious Creamy Espasol?

A: Yes, you can freeze espasol for future enjoyment. Place the individually wrapped espasol in a freezer-safe bag or container and store them in the freezer for up to 1 month. Thaw them at room temperature before serving.

Q: Can I use fresh banana leaves instead of dried ones?

A: Fresh banana leaves can be used to wrap the espasol for an authentic touch. However, if fresh banana leaves are not available, you can use dried banana leaves or omit the wrapping altogether.

Final Thoughts

Coconutlicious Creamy Espasol is a delightful dessert that brings the flavors of the Philippines to your kitchen. With its creamy coconut filling and soft, chewy exterior, it’s a treat that will leave you longing for more. Whether you’re celebrating a special occasion or simply satisfying your sweet tooth, this recipe is sure to impress. So gather your ingredients, follow the easy steps, and indulge in the deliciousness of Coconutlicious Creamy Espasol. Don’t forget to share your experience and spread the joy of this delectable Filipino dessert!

Cheese-Filled Bread Rolls

Introduction

Welcome to the delicious world of cheese-filled bread rolls! In this recipe, we will guide you through the process of creating these mouthwatering treats that are perfect for any occasion. Whether you’re hosting a gathering, planning a picnic, or simply craving a cheesy snack, these bread rolls will satisfy your taste buds and leave you wanting more.

There’s something magical about biting into a warm, soft bread roll and discovering a gooey surprise inside. The combination of fluffy dough and melted cheese creates a delightful texture and a burst of flavors that will leave you craving for another bite. Not only are these bread rolls delicious, but they are also versatile and customizable to suit your preferences.

Originating from various culinary traditions around the world, cheese-filled bread rolls have a rich history. From the cheesy delights of Italian calzones to the savory goodness of Russian pirozhki, these delightful treats have captured the hearts and palates of food lovers worldwide. Now, it’s time to bring this global sensation into your kitchen and create your own cheesy masterpiece!

Why You’ll Love This Recipe

Cheese-Filled Bread Rolls

There are countless reasons why you’ll fall in love with these cheese-filled bread rolls. Firstly, they are incredibly easy to make, even for beginner bakers. With just a few basic ingredients and a simple step-by-step process, you’ll have a batch of delicious bread rolls ready to devour in no time.

Secondly, these bread rolls are incredibly versatile. While the classic version is filled with cheese, you can experiment with different fillings to suit your taste buds. Whether you prefer a combination of cheese and ham, spinach and feta, or even sweet fillings like Nutella or fruit preserves, the possibilities are endless.

Lastly, these bread rolls are a crowd-pleaser. Whether you’re serving them at a family gathering, a potluck, or a casual get-together, they are sure to impress your guests. The irresistible aroma of freshly baked bread and melted cheese will make everyone’s mouth water, creating an unforgettable experience for all.

Ingredients

To make these delectable cheese-filled bread rolls, you’ll need the following ingredients:

  • 2 ½ cups all-purpose flour
  • 2 teaspoons instant yeast
  • 1 teaspoon sugar
  • 1 teaspoon salt
  • 1 cup lukewarm water
  • 2 tablespoons olive oil
  • 1 ½ cups grated cheese (cheddar, mozzarella, or your preferred cheese)
  • Optional: additional fillings of your choice (ham, spinach, mushrooms, etc.)

Step-by-Step Instructions

Follow these simple steps to create your own cheese-filled bread rolls:

  1. In a large bowl, combine the all-purpose flour, instant yeast, sugar, and salt.
  2. Pour in the lukewarm water and olive oil. Mix until a dough forms.
  3. Knead the dough on a lightly floured surface for about 5 minutes until it becomes smooth and elastic.
  4. Place the dough in a greased bowl and cover it with a clean kitchen towel. Allow it to rise in a warm place for about 1 hour or until it doubles in size.
  5. Punch down the risen dough to release any air bubbles. Divide the dough into equal-sized portions.
  6. Take one portion of dough and flatten it into a circle. Place a spoonful of grated cheese (and any additional fillings) in the center of the dough.
  7. Gather the edges of the dough and pinch them together to seal the filling inside. Roll it into a smooth ball.
  8. Repeat the process with the remaining dough portions.
  9. Place the filled dough balls on a baking tray lined with parchment paper. Cover them with a kitchen towel and let them rise for another 30 minutes.
  10. Preheat your oven to 375°F (190°C).
  11. Bake the bread rolls for 15-20 minutes or until they turn golden brown.
  12. Remove from the oven and let them cool for a few minutes before serving.

Pro tip: For an extra golden crust, brush the bread rolls with an egg wash (1 beaten egg + 1 tablespoon of water) before baking.

Expert Tips for Success

Here are some expert tips to ensure your cheese-filled bread rolls turn out perfectly:

  • Use lukewarm water to activate the yeast. Water that is too hot can kill the yeast, while water that is too cold may not activate it properly.
  • Experiment with different types of cheese to find your favorite combination. Sharp cheddar, creamy mozzarella, and tangy feta are all excellent choices.
  • If you’re adding additional fillings like ham or vegetables, make sure they are cooked and well-drained before adding them to the dough. This prevents excess moisture from making the rolls soggy.
  • Allow the dough to rise in a warm place, free from drafts. This helps the yeast work its magic and creates a light and fluffy texture.
  • When sealing the filling inside the dough, make sure the edges are tightly pinched together to prevent any leakage during baking.

Variations and Substitutions

While the classic cheese-filled bread rolls are undeniably delicious, don’t be afraid to get creative and try different variations. Here are some ideas to inspire you:

  • Spinach and Feta Rolls: Add sautéed spinach and crumbled feta cheese to the filling for a delightful Mediterranean twist.
  • Ham and Cheese Rolls: Layer thin slices of ham on top of the cheese filling for a heartier option.
  • Pizza Rolls: Add a spoonful of pizza sauce and your favorite pizza toppings (pepperoni, mushrooms, bell peppers) to the filling for a mini-pizza experience.
  • Sweet Nutella Rolls: Swap the savory filling for a generous smear of Nutella or your favorite chocolate spread for a sweet treat.

Feel free to experiment with different fillings and flavors to create your own signature cheese-filled bread rolls.

Serving Suggestions

Cheese-filled bread rolls are delicious on their own, but you can take them to the next level by pairing them with complementary side dishes and beverages. Here are some serving suggestions to enhance your culinary experience:

  • Serve the bread rolls with a side of marinara sauce for dipping, just like mini calzones.
  • Pair them with a crisp green salad for a refreshing contrast to the warm and cheesy rolls.
  • Make it a complete meal by serving the bread rolls alongside a bowl of comforting tomato soup.
  • For a brunch or picnic, pack the bread rolls with some fresh fruits and a refreshing iced tea.

Get creative and customize your serving suggestions based on your personal preferences and the occasion.

FAQs

Here are some common questions about cheese-filled bread rolls:

Q: Can I make the dough in advance?

A: Yes, you can prepare the dough in advance and refrigerate it overnight. Simply take it out of the refrigerator and let it come to room temperature before proceeding with the recipe.

Q: Can I freeze the bread rolls?

A: Yes, you can freeze the bread rolls after they have been baked. Let them cool completely, then place them in a freezer-safe container or bag. To serve, thaw them at room temperature or reheat in a preheated oven until warmed through.

Q: Can I use whole wheat flour instead of all-purpose flour?

A: Yes, you can substitute part or all of the all-purpose flour with whole wheat flour. Keep in mind that whole wheat flour may result in a denser texture.

Q: Can I make mini-sized bread rolls?

A: Absolutely! Simply divide the dough into smaller portions and adjust the baking time accordingly. Mini cheese-filled bread rolls make great bite-sized appetizers or party snacks.

Final Thoughts

Get ready to embark on a culinary adventure with these irresistible cheese-filled bread rolls. With their golden crust, soft and fluffy interior, and oozing cheese, they are a treat for both the eyes and the taste buds. Whether you’re a seasoned baker or a beginner in the kitchen, this recipe is sure to impress.

Don’t be afraid to experiment with different fillings and flavors to create your own unique variation of these delightful bread rolls. From savory combinations like ham and cheese to sweet options like Nutella, the possibilities are endless. So gather your ingredients, roll up your sleeves, and get ready to savor the cheesy goodness of these bread rolls!