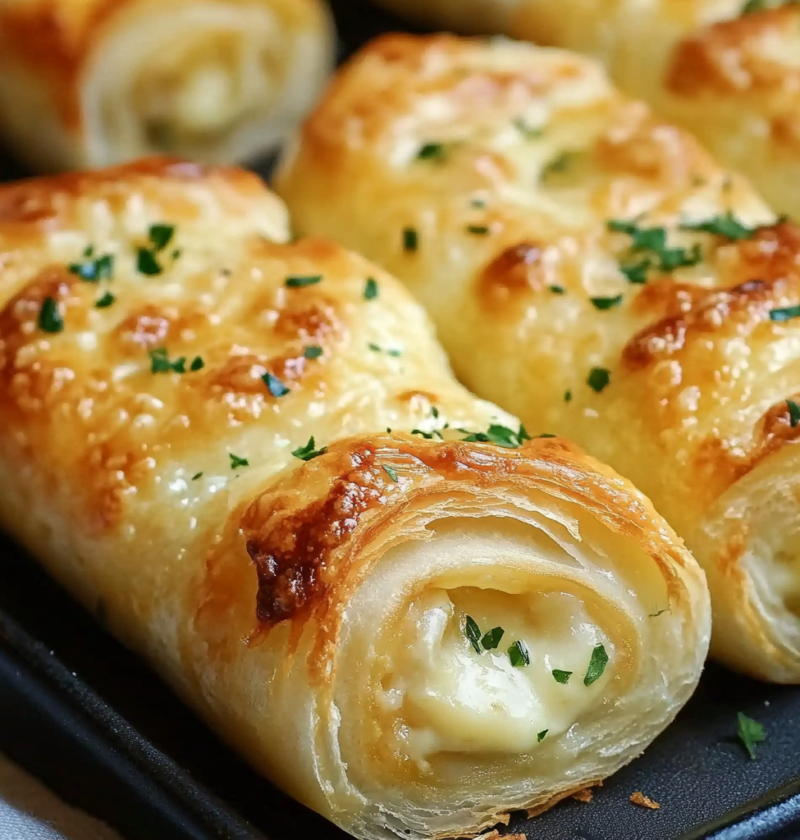
Flavorful Beef and Cabbage Casserole

Introduction

Are you looking for a hearty and flavorful meal that will satisfy your taste buds? Look no further than this delicious Beef and Cabbage Casserole. Packed with savory beef, tender cabbage, and a blend of spices, this casserole is sure to become a family favorite. Whether you’re hosting a dinner party or simply craving comfort food, this recipe is a winner. Let’s dive into the details and discover how to make this mouthwatering dish.

Why You’ll Love This Recipe

Flavorful Beef and Cabbage Casserole

There are several reasons why you’ll fall in love with this Beef and Cabbage Casserole:

Firstly, it’s incredibly easy to make. With just a few simple steps, you’ll have a wholesome meal on the table in no time. Perfect for busy weeknights or lazy Sundays.

Secondly, it’s a versatile recipe that can be customized to suit your preferences. You can add your favorite vegetables, experiment with different spices, or even substitute the beef with chicken or tofu.

Lastly, this casserole is not only delicious but also nutritious. Cabbage is low in calories and packed with vitamins and fiber. Combined with lean beef, this dish provides a balanced and satisfying meal.

Ingredients

Before we get into the cooking process, let’s gather all the ingredients we’ll need for this tasty Beef and Cabbage Casserole:

  • 1 pound ground beef
  • 1 small head of cabbage, shredded
  • 1 onion, diced
  • 2 cloves of garlic, minced
  • 1 can diced tomatoes
  • 1 cup beef broth
  • 1 teaspoon paprika
  • 1/2 teaspoon dried thyme
  • Salt and pepper to taste
  • 2 tablespoons vegetable oil

Feel free to adjust the quantities based on your preferences and the number of servings you’d like to make.

Step-by-Step Instructions

Now that we have our ingredients ready, let’s dive into the step-by-step process of making this delicious Beef and Cabbage Casserole:

  1. Preheat your oven to 375°F (190°C).
  2. In a large skillet, heat the vegetable oil over medium heat.
  3. Add the diced onion and minced garlic to the skillet. Sauté until the onion becomes translucent and the garlic is fragrant.
  4. Add the ground beef to the skillet and cook until browned, breaking it up into small pieces with a spatula.
  5. Once the beef is cooked, add the shredded cabbage to the skillet. Stir well to combine.
  6. Pour in the diced tomatoes and beef broth. Sprinkle in the paprika, dried thyme, salt, and pepper. Stir to evenly distribute the spices.
  7. Reduce the heat to low and let the mixture simmer for about 10 minutes, allowing the flavors to meld together.
  8. Transfer the mixture to a casserole dish and spread it out evenly.
  9. Cover the dish with aluminum foil and bake in the preheated oven for 30 minutes.
  10. After 30 minutes, remove the foil and bake for an additional 15 minutes to allow the top to brown slightly.
  11. Remove from the oven and let the casserole cool for a few minutes before serving.

Now that you’ve followed these simple steps, your Beef and Cabbage Casserole is ready to be enjoyed!

Expert Tips for Success

Here are a few expert tips to ensure your Beef and Cabbage Casserole turns out perfectly:

1. Use lean ground beef to reduce the fat content of the dish. Alternatively, you can use ground turkey or chicken for a healthier option.

2. Don’t overcook the cabbage. It should be tender but still have a slight crunch. Overcooking can make it mushy and affect the overall texture of the casserole.

3. Experiment with spices to add your own twist to the recipe. Try adding a pinch of chili powder for a hint of heat or a sprinkle of cumin for a smoky flavor.

4. If you prefer a cheesy topping, sprinkle some grated cheddar or mozzarella cheese over the casserole during the last few minutes of baking.

Variations and Substitutions

This Beef and Cabbage Casserole recipe can be easily customized to suit your taste preferences or dietary needs:

1. Vegetarian Variation: Omit the beef and substitute it with plant-based protein alternatives like tofu or tempeh. You can also add extra vegetables like mushrooms or bell peppers for added flavor and texture.

2. Gluten-Free Option: Ensure that the beef broth and canned diced tomatoes you use are gluten-free. If you prefer a thicker consistency, you can add a tablespoon of cornstarch mixed with water to the mixture before baking.

3. Low-Carb Version: Replace the cabbage with thinly sliced zucchini or cauliflower florets. This will reduce the carb content while still providing a similar texture and flavor.

Serving Suggestions

Now that your Beef and Cabbage Casserole is ready, it’s time to serve it up and enjoy! Here are a few serving suggestions:

1. Serve the casserole hot straight from the oven, allowing the flavors to meld together beautifully.

2. Garnish with fresh parsley or chopped green onions for a pop of color and added freshness.

3. Pair the casserole with a side of crusty bread or dinner rolls to soak up the delicious juices.

4. Serve alongside a crisp green salad for a refreshing contrast to the warm and comforting casserole.

FAQs

Q: Can I make this casserole ahead of time?

A: Absolutely! You can prepare the casserole in advance and refrigerate it for up to 24 hours. Simply cover the casserole dish tightly with plastic wrap or aluminum foil and bake it when you’re ready. You may need to adjust the baking time slightly if the casserole is chilled.

Q: Can I freeze the leftovers?

A: Yes, this casserole freezes well. Allow it to cool completely, then transfer individual portions or the entire casserole to airtight containers or freezer bags. It can be stored in the freezer for up to 3 months. Thaw in the refrigerator overnight before reheating.

Q: Can I substitute the cabbage with a different vegetable?

A: Absolutely! While cabbage adds a unique flavor and texture to this casserole, you can substitute it with other leafy greens like kale or Swiss chard. Just keep in mind that the cooking time may vary slightly depending on the vegetable you choose.

Final Thoughts

There you have it – a delicious and flavorful Beef and Cabbage Casserole that’s sure to impress. This dish is perfect for cozy family dinners, potlucks, or any occasion where you want to serve a crowd-pleasing meal. Give it a try, and let the comforting aroma fill your kitchen. Don’t forget to share your cooking experience and any personal twists you added. Happy cooking!

Bursting with Sweet Cherries:

Introduction

Imagine biting into a juicy, plump cherry, bursting with sweet and tangy flavor. The vibrant red hue, the refreshing juiciness, and the delightful pop as you savor each bite – cherries are a true summer delight. Whether enjoyed fresh, baked into a pie, or blended into a smoothie, cherries bring a burst of sweetness to any dish. In this article, we will explore the world of cherries and discover the endless possibilities they offer in the culinary realm. So grab a handful of cherries and let’s dive into their delectable world!

Why You’ll Love This Recipe

Bursting with Sweet Cherries:

There’s something special about cherries that makes them irresistible. Maybe it’s their natural sweetness or their versatility in both sweet and savory dishes. Whatever it may be, here are a few reasons why you’ll love this cherry recipe:

1. Bursting with Flavor: Cherries are known for their intense and vibrant flavor that adds a delightful burst of sweetness to any recipe.

2. Versatile: From pies and tarts to salads and sauces, cherries can be used in a wide range of dishes, making them a versatile ingredient in the kitchen.

3. Nutritional Benefits: Cherries are not only delicious but also packed with essential nutrients like vitamins A and C, fiber, and antioxidants, making them a healthy addition to your diet.

Ingredients

To create a cherry-inspired masterpiece, you will need the following ingredients:

– Fresh cherries: 2 cups

– Sugar: 1/2 cup

– All-purpose flour: 1/4 cup

– Butter: 2 tablespoons, melted

– Vanilla extract: 1 teaspoon

– Lemon juice: 1 tablespoon

– Salt: a pinch

Step-by-Step Instructions

Follow these simple steps to create a mouthwatering cherry recipe:

  1. Preheat your oven to 375°F (190°C).
  2. In a large bowl, combine the cherries, sugar, flour, melted butter, vanilla extract, lemon juice, and a pinch of salt. Mix well until the cherries are coated with the mixture.
  3. Transfer the cherry mixture to a baking dish and spread it evenly.
  4. Bake in the preheated oven for 30-35 minutes or until the cherries are bubbling and the top is golden brown.
  5. Remove from the oven and let it cool for a few minutes before serving.

Pro Tip: To enhance the flavor, you can sprinkle a bit of cinnamon or nutmeg on top of the cherry mixture before baking.

Expert Tips for Success

Here are some expert tips to help you achieve the best results with your cherry recipe:

1. Choose Ripe Cherries: Look for cherries that are plump, firm, and have a deep red color. Ripe cherries will have the best flavor and sweetness.

2. Pit the Cherries: Remove the pits from the cherries before using them in your recipe. This can be done using a cherry pitter or a small knife.

3. Adjust the Sweetness: If you prefer a sweeter dessert, you can increase the amount of sugar in the recipe. Similarly, if you prefer a less sweet dessert, you can reduce the amount of sugar.

Variations and Substitutions

While cherries shine on their own, you can also experiment with different variations and substitutions to customize your cherry recipe:

– Cherry Crumble: Instead of using a traditional pie crust, you can make a delicious cherry crumble by topping the cherry mixture with a mixture of oats, flour, butter, and sugar.

– Cherry Smoothie: Blend fresh cherries with yogurt, honey, and a splash of almond milk for a refreshing cherry smoothie.

– Cherry Salad: Toss fresh cherries with mixed greens, goat cheese, and a balsamic vinaigrette for a vibrant and flavorful salad.

Serving Suggestions

Once your cherry recipe is ready, here are a few serving suggestions to elevate your dining experience:

– Serve the cherry dessert warm with a scoop of vanilla ice cream for a classic combination of flavors.

– Garnish your cherry pie with a dollop of whipped cream and a sprinkle of grated chocolate for an indulgent treat.

– Pair your cherry smoothie with a slice of toasted almond bread for a balanced and wholesome breakfast.

FAQs

Q: Can I use frozen cherries instead of fresh cherries?

A: Yes, you can use frozen cherries if fresh cherries are not available. Just make sure to thaw and drain them before using in your recipe.

Q: How long can I store the cherry dessert?

A: The cherry dessert can be stored in an airtight container in the refrigerator for up to 3 days.

Final Thoughts

Cherries are indeed nature’s sweet gems, and this cherry recipe allows their natural flavors to shine. Whether you’re baking a cherry pie for a special occasion or simply enjoying a bowl of fresh cherries on a sunny day, cherries are guaranteed to bring a smile to your face. So go ahead, embrace the burst of sweetness that cherries offer, and let your taste buds dance with delight!

CHOCOLATE PECAN TURTLE CLUSTERS

Introduction

Chocolate pecan turtle clusters are a delectable treat that combines the rich flavors of chocolate, crunchy pecans, and gooey caramel. These clusters are not only delicious but also easy to make, making them a perfect choice for any occasion. Whether you’re looking for a sweet treat to satisfy your cravings or a delightful homemade gift, chocolate pecan turtle clusters are sure to impress.

Why You’ll Love This Recipe

CHOCOLATE PECAN TURTLE CLUSTERS

There are several reasons why you’ll fall in love with this chocolate pecan turtle clusters recipe:

Firstly, these clusters are incredibly easy to make. With just a few simple steps, you can create a batch of mouthwatering treats that will leave everyone wanting more.

Secondly, the combination of chocolate, pecans, and caramel creates a flavor explosion that is hard to resist. The sweetness of the caramel, the nuttiness of the pecans, and the richness of the chocolate come together to create a truly indulgent treat.

Lastly, these clusters can be enjoyed by everyone. Whether you’re following a specific dietary plan or have certain food restrictions, you can easily adapt this recipe to suit your needs. From vegan caramel options to gluten-free chocolate, the possibilities are endless.

Ingredients

To make the chocolate pecan turtle clusters, you will need the following ingredients:

– 1 cup of pecan halves

– 1 cup of chocolate chips

– 1/2 cup of caramel candies

– 1 tablespoon of butter

Step-by-Step Instructions

Follow these simple steps to create your own delicious chocolate pecan turtle clusters:

1. Preheat your oven to 350°F (175°C) and line a baking sheet with parchment paper.

2. Arrange the pecan halves in small clusters on the prepared baking sheet, leaving enough space between each cluster.

3. In a microwave-safe bowl, melt the chocolate chips in 30-second intervals, stirring between each interval, until smooth and creamy.

4. Spoon a small amount of melted chocolate over each pecan cluster, ensuring that the pecans are well coated.

5. In a separate microwave-safe bowl, combine the caramel candies and butter. Heat in the microwave in 30-second intervals, stirring between each interval, until the caramel is melted and smooth.

6. Drizzle the melted caramel over the chocolate-coated pecan clusters, allowing it to gently cascade over the sides.

7. Place the baking sheet in the refrigerator for about 30 minutes, or until the chocolate and caramel have set.

8. Once set, remove the clusters from the refrigerator and carefully peel them off the parchment paper.

9. Store the chocolate pecan turtle clusters in an airtight container at room temperature for up to one week.

Expert Tips for Success

Here are some expert tips to ensure your chocolate pecan turtle clusters turn out perfectly:

– Use high-quality chocolate chips for the best flavor and texture.

– If you prefer a softer caramel texture, you can add a splash of heavy cream to the caramel mixture before melting.

– Toasting the pecans before assembling the clusters can add an extra depth of flavor.

– Experiment with different chocolate flavors, such as dark chocolate or white chocolate, to create unique variations.

Variations and Substitutions

While the classic chocolate pecan turtle clusters recipe is already delicious, you can also try some creative variations:

– Add a sprinkle of sea salt over the clusters to enhance the sweet and salty contrast.

– Replace the pecans with almonds or walnuts for a different nutty flavor.

– Use different types of caramel, such as salted caramel or butterscotch, to add a twist to the clusters.

– For a festive touch, drizzle some melted white chocolate over the clusters and decorate with colorful sprinkles.

Serving Suggestions

Chocolate pecan turtle clusters are a delightful treat on their own, but you can also serve them in various ways:

– Pair the clusters with a scoop of vanilla ice cream for an indulgent dessert.

– Serve them as part of a dessert platter alongside other bite-sized treats.

– Package them in a decorative box or jar and give them as homemade gifts during the holiday season.

FAQs

Q: Can I use store-bought caramel sauce instead of melting caramel candies?

A: While you can certainly use store-bought caramel sauce, melting caramel candies gives the clusters a thicker and gooier caramel layer.

Q: Can I freeze the chocolate pecan turtle clusters?

A: Yes, you can freeze the clusters in an airtight container for up to 3 months. Thaw them at room temperature before serving.

Q: Can I use milk chocolate instead of semi-sweet chocolate chips?

A: Absolutely! Milk chocolate will add a sweeter and creamier taste to the clusters.

Final Thoughts

Chocolate pecan turtle clusters are a delightful treat that combines the irresistible flavors of chocolate, pecans, and caramel. With their easy preparation and customizable variations, these clusters are perfect for any occasion. Whether you enjoy them as a personal indulgence or share them with loved ones, these homemade treats are sure to bring joy and satisfaction.

So go ahead, gather your ingredients, and embark on a delicious chocolate pecan turtle clusters adventure. It’s time to treat yourself to a batch of these heavenly clusters!

Cracker Barrel Meatloaf

Cracker Barrel Meatloaf Recipe

Introduction

Are you craving a hearty and delicious meatloaf that will transport you back to the comforting flavors of home-cooked meals? Look no further than this Cracker Barrel Meatloaf recipe. With its savory blend of ground beef, onions, and spices, this classic American dish is sure to satisfy your taste buds and leave you wanting more. Whether you’re cooking for your family or hosting a dinner party, this recipe is a crowd-pleaser that will have everyone asking for seconds.

Cracker Barrel Meatloaf

Why You’ll Love This Recipe

There are several reasons why this Cracker Barrel Meatloaf recipe stands out from the rest:

1. Easy to Make: With simple ingredients and straightforward instructions, this recipe is perfect for both beginner and experienced cooks.

2. Bursting with Flavor: The combination of onions, garlic, and spices in this meatloaf creates a rich and savory taste that will have your taste buds dancing with delight.

3. Moist and Tender: The addition of breadcrumbs and milk keeps the meatloaf moist and tender, ensuring a juicy bite every time.

4. Versatile: This recipe can be easily customized to suit your preferences. Add your favorite herbs or spices, or incorporate vegetables for an extra dose of nutrition.

Ingredients

For the meatloaf:

  • 1 1/2 pounds ground beef
  • 1/2 cup breadcrumbs
  • 1/2 cup milk
  • 1/2 cup finely chopped onion
  • 1/4 cup ketchup
  • 2 tablespoons Worcestershire sauce
  • 1 teaspoon garlic powder
  • 1 teaspoon dried thyme
  • 1/2 teaspoon salt
  • 1/4 teaspoon black pepper

For the glaze:

  • 1/4 cup ketchup
  • 2 tablespoons brown sugar
  • 1 tablespoon Dijon mustard

Step-by-Step Instructions

1. Preheat your oven to 350°F (175°C) and lightly grease a loaf pan.

2. In a large bowl, combine the ground beef, breadcrumbs, milk, chopped onion, ketchup, Worcestershire sauce, garlic powder, dried thyme, salt, and black pepper. Mix well until all the ingredients are evenly incorporated.

3. Transfer the meat mixture to the greased loaf pan, pressing it down gently to form an even layer.

4. In a small bowl, whisk together the ketchup, brown sugar, and Dijon mustard to make the glaze.

5. Spread the glaze evenly over the top of the meatloaf.

6. Place the loaf pan in the preheated oven and bake for 1 hour, or until the internal temperature reaches 160°F (71°C).

7. Remove the meatloaf from the oven and let it rest for 5-10 minutes before slicing. This allows the juices to redistribute and ensures a moist and tender meatloaf.

Expert Tips for Success

1. Use lean ground beef to reduce excess grease and ensure a moist meatloaf.

2. Let the meatloaf rest before slicing to prevent it from falling apart.

3. For added flavor, sauté the onions before adding them to the meat mixture.

4. Feel free to experiment with different herbs and spices to customize the flavor of your meatloaf.

5. If you prefer a tangier glaze, add a splash of apple cider vinegar or Worcestershire sauce.

Variations and Substitutions

1. Turkey Meatloaf: Substitute ground turkey for the ground beef for a leaner option.

2. Vegetarian Meatloaf: Replace the ground beef with a mixture of cooked lentils, mushrooms, and breadcrumbs for a delicious vegetarian alternative.

3. Gluten-Free Meatloaf: Use gluten-free breadcrumbs or crushed gluten-free crackers instead of regular breadcrumbs.

4. Sweet and Spicy Glaze: Add a pinch of cayenne pepper or a few dashes of hot sauce to the glaze for a kick of heat.

Serving Suggestions

This Cracker Barrel Meatloaf pairs perfectly with classic comfort food sides such as mashed potatoes, roasted vegetables, or creamy mac and cheese. For a complete meal, serve with a fresh green salad or steamed broccoli. Don’t forget to drizzle some extra glaze over the sliced meatloaf for an added burst of flavor.

FAQs

Q: Can I make this meatloaf ahead of time?

A: Absolutely! You can prepare the meatloaf mixture in advance and refrigerate it until you’re ready to bake. Just make sure to let it come to room temperature before baking to ensure even cooking.

Q: Can I freeze leftovers?

A: Yes, you can freeze any leftover meatloaf for future meals. Simply wrap individual slices in plastic wrap or aluminum foil and store them in an airtight container or freezer bag. Thaw in the refrigerator overnight before reheating.

Q: How long will the leftovers keep in the refrigerator?

A: Leftover meatloaf can be stored in the refrigerator for up to 3-4 days. Make sure to place it in an airtight container to maintain freshness.

Final Thoughts

Cracker Barrel Meatloaf is a classic comfort food that brings warmth and nostalgia to any meal. With its flavorful blend of spices and juicy texture, this recipe is a guaranteed crowd-pleaser. Whether you’re cooking for a family dinner or hosting a gathering, this meatloaf will surely become a favorite in your household. So, roll up your sleeves, gather your ingredients, and get ready to enjoy a taste of home with this delicious Cracker Barrel Meatloaf.

Cheesy Chicken fritters

Introduction

Imagine sinking your teeth into crispy, golden-brown fritters bursting with cheesy goodness. Cheesy chicken fritters are a delightful twist on traditional chicken recipes that will leave your taste buds craving for more. Whether you’re looking for a quick and easy appetizer or a satisfying main course, these fritters are the perfect choice. In this article, we’ll walk you through the step-by-step process of making cheesy chicken fritters that are crispy on the outside and tender on the inside. Let’s dive in and explore the world of cheesy chicken fritters!

Why You’ll Love This Recipe

Cheesy Chicken fritters

There are numerous reasons why cheesy chicken fritters deserve a special place in your recipe collection. First and foremost, they are incredibly easy to make, requiring just a handful of ingredients. Whether you’re a seasoned cook or a kitchen novice, this recipe is foolproof, guaranteeing delicious results every time. Additionally, these fritters are incredibly versatile and can be served as an appetizer, a party snack, or as the star of a wholesome meal. They are also a great way to use up leftover chicken, making them both budget-friendly and convenient. So, get ready to fall in love with these cheesy, crispy delights!

Ingredients

For this mouthwatering recipe, you’ll need the following ingredients:

  • 1 pound boneless, skinless chicken breast
  • 1 cup shredded cheddar cheese
  • 1/4 cup finely chopped onion
  • 2 cloves garlic, minced
  • 1/4 cup chopped fresh parsley
  • 1/2 teaspoon salt
  • 1/4 teaspoon black pepper
  • 1/4 teaspoon paprika
  • 1/4 cup all-purpose flour
  • 2 large eggs, beaten
  • 2 tablespoons vegetable oil, for frying

Note: Feel free to customize the recipe by adding your favorite herbs or spices. You can also substitute the cheddar cheese with mozzarella, pepper jack, or any other cheese of your choice for a unique flavor profile.

Step-by-Step Instructions

Follow these simple steps to create cheesy chicken fritters that will impress your family and friends:

  1. Start by cooking the chicken breast. You can either poach it, bake it, or use leftover cooked chicken. Once cooked, shred the chicken into small, bite-sized pieces.
  2. In a large mixing bowl, combine the shredded chicken, cheddar cheese, onion, garlic, parsley, salt, black pepper, and paprika. Mix well until all the ingredients are evenly incorporated.
  3. Add the all-purpose flour to the mixture and stir until it forms a sticky batter. This will help bind the fritters together.
  4. In a separate bowl, beat the eggs until well combined. Gradually add the beaten eggs to the chicken mixture, stirring continuously, until the batter becomes thick and cohesive.
  5. Heat the vegetable oil in a frying pan over medium heat. Using a spoon or an ice cream scoop, carefully drop spoonfuls of the batter into the hot oil, flattening them slightly with the back of the spoon.
  6. Cook the fritters for about 3-4 minutes on each side, or until they turn golden brown and crispy. Make sure to flip them gently to prevent them from falling apart.
  7. Once cooked, transfer the fritters to a paper towel-lined plate to drain any excess oil. Repeat the frying process until all the batter is used.
  8. Serve the cheesy chicken fritters hot and enjoy their irresistible crispy exterior and gooey, cheesy interior.

Pro Tips:

  • If you prefer a spicier flavor, add a pinch of cayenne pepper or chili flakes to the batter.
  • To achieve an extra crispy texture, refrigerate the batter for 30 minutes before frying.
  • Make sure the oil is hot enough before adding the fritters to avoid them becoming greasy. Test the oil by dropping a small amount of batter into the pan; it should sizzle and bubble immediately.

Expert Tips for Success

Here are some expert tips to help you achieve perfect cheesy chicken fritters:

  • Don’t overcook the chicken breast. It’s best to cook it until it’s just tender and juicy, as it will continue to cook slightly during the frying process.
  • For extra flavor, sauté the onions and garlic before adding them to the chicken mixture.
  • Ensure that the cheese is evenly distributed throughout the batter for a gooey, melty center.
  • Use a non-stick frying pan or cast-iron skillet for the best results and easy cleanup.

Variations and Substitutions

If you’re looking to put a unique spin on your cheesy chicken fritters, here are some creative variations and substitutions:

  • Swap the chicken breast with ground chicken or turkey for a different texture.
  • Add finely diced bell peppers or jalapenos for an extra kick of flavor.
  • Experiment with different types of cheese, such as pepper jack, feta, or Swiss, to create a flavor combination that suits your taste buds.
  • For a gluten-free option, replace the all-purpose flour with almond flour or gluten-free breadcrumbs.

Serving Suggestions

Cheesy chicken fritters are incredibly versatile and can be served in various ways. Here are some serving suggestions to elevate your culinary experience:

  • Enjoy the fritters as a standalone appetizer with your favorite dipping sauce, such as ranch dressing or barbecue sauce.
  • Make a delicious fritter sandwich by placing a couple of fritters between two buns and adding your favorite toppings and condiments.
  • Pair the fritters with a fresh green salad for a light and refreshing meal.
  • Serve them alongside crispy french fries or sweet potato fries for a satisfying and indulgent treat.

FAQs

Q: Can I make the batter ahead of time?

A: While it’s best to cook the fritters immediately after preparing the batter, you can refrigerate the batter for up to 1 hour before frying. This will help the flavors meld together and prevent the fritters from falling apart.

Q: Can I freeze the fritters?

A: Yes, you can freeze the cooked fritters for up to 2 months. Simply place them in an airtight container or freezer bag and thaw them in the refrigerator before reheating in a preheated oven or a skillet.

Q: Can I use canned chicken instead of fresh chicken breast?

A: While fresh chicken breast is recommended for the best texture and flavor, canned chicken can be used as a convenient alternative. Make sure to drain it well before incorporating it into the batter.

Final Thoughts

Cheesy chicken fritters are a delectable treat that will satisfy your cravings for something crispy, cheesy, and utterly delicious. With their simple preparation, versatile serving options, and mouthwatering flavors, these fritters are sure to become a family favorite. So, roll up your sleeves, gather the ingredients, and embark on a culinary adventure that will leave everyone wanting more. Get ready to indulge in the crispy, cheesy perfection of homemade chicken fritters!

ground beef

Introduction

Ground beef is a versatile and delicious ingredient that can be used in a wide variety of dishes. Whether you’re making burgers, meatballs, tacos, or Bolognese sauce, ground beef adds a rich and savory flavor that is hard to resist. In this article, we’ll explore the many ways you can use ground beef in your cooking and share some tips and tricks for getting the best results.

Why You’ll Love This Recipe

ground beef

There are several reasons why ground beef is a popular choice for home cooks:

1. Versatility: Ground beef can be used in countless recipes, from classic comfort foods to international dishes.

2. Affordability: Ground beef is often more budget-friendly compared to other types of meat.

3. Flavorful: The fat content in ground beef adds a delicious richness to dishes.

4. Easy to Cook: Ground beef cooks quickly and is forgiving, making it a great option for beginners.

Ingredients

To make the most of your ground beef recipes, you’ll need the following ingredients:

– Ground beef

– Onion

– Garlic

– Salt and pepper

– Optional: herbs and spices of your choice

Step-by-Step Instructions

Follow these simple steps to create a delicious ground beef dish:

1. Heat a skillet over medium heat and add a small amount of oil.

2. Add the chopped onion and garlic to the skillet and sauté until they become fragrant and translucent.

3. Add the ground beef to the skillet and break it up with a spatula.

4. Cook the ground beef until it browns, stirring occasionally to ensure it cooks evenly.

5. Season the beef with salt, pepper, and any additional herbs or spices you prefer.

6. Continue cooking until the ground beef is fully cooked and no longer pink.

7. Serve the ground beef in your desired dish, whether it’s burgers, tacos, or pasta sauce.

Expert Tips for Success

Here are some tips from the pros to help you achieve the best results with your ground beef:

– Choose ground beef with a higher fat content for added flavor and juiciness.

– Don’t overcrowd the skillet when cooking ground beef. Cook it in batches if necessary.

– Drain excess fat from the cooked ground beef to reduce the greasiness of your dish.

– Add a splash of Worcestershire sauce or soy sauce to enhance the umami flavor of the ground beef.

Variations and Substitutions

While ground beef is delicious on its own, you can also get creative and customize your recipes:

– Substitute ground turkey or chicken for a leaner option.

– Mix ground beef with ground pork for a richer flavor.

– Add chopped vegetables like bell peppers or carrots for extra texture and nutrients.

Serving Suggestions

Here are some ideas for serving your ground beef dish:

– For burgers, toast the buns and top them with your favorite condiments and toppings.

– Serve tacos with a variety of toppings such as shredded lettuce, diced tomatoes, and sour cream.

– Pair Bolognese sauce with al dente pasta and a sprinkle of Parmesan cheese.

FAQs

Q: Can I freeze cooked ground beef?

A: Yes, cooked ground beef can be frozen for up to three months. Allow it to cool completely before transferring it to an airtight container or freezer bag.

Q: Can I use ground beef that has turned brown?

A: Ground beef that has turned brown is still safe to eat. However, it may have a slightly different flavor and texture compared to fresh ground beef.

Final Thoughts

Ground beef is a staple ingredient that can elevate any dish with its rich flavor and versatility. Whether you’re cooking for a weeknight dinner or a special occasion, ground beef is sure to satisfy your taste buds. So go ahead, get creative in the kitchen, and enjoy the endless possibilities that ground beef has to offer!

Ultimate Air Fryer Garlic Cheese Bread

Introduction

Welcome to the world of crispy, cheesy goodness – the Ultimate Air Fryer Garlic Cheese Bread! If you’re a fan of garlic bread and love the irresistible combination of garlic, cheese, and a perfectly crunchy crust, then this recipe is a must-try for you. Whether you’re preparing a casual weeknight dinner or hosting a gathering with friends and family, this garlic cheese bread will undoubtedly be a crowd-pleaser. Get ready to embark on a culinary adventure that will tantalize your taste buds and leave you craving for more.

Why You’ll Love This Recipe

Ultimate Air Fryer Garlic Cheese Bread

There are countless reasons why this Ultimate Air Fryer Garlic Cheese Bread recipe should be a staple in your kitchen. First and foremost, it’s incredibly easy and quick to make. With just a handful of ingredients and minimal effort, you can whip up a mouthwatering garlic cheese bread that will rival any restaurant version. The air fryer ensures a perfectly crispy exterior while keeping the inside fluffy and soft.

Another reason to love this recipe is its versatility. You can enjoy it as a standalone snack, a side dish for pasta or soup, or even as an appetizer. It’s a fantastic way to elevate any meal and add a touch of cheesy indulgence. Additionally, if you’re following a vegetarian diet, this garlic cheese bread ticks all the boxes and provides a satisfying and flavorful option.

Ingredients

For this Ultimate Air Fryer Garlic Cheese Bread, you’ll need the following ingredients:

  • 1 French baguette
  • 4 cloves of garlic, minced
  • ½ cup of unsalted butter, softened
  • 1 cup of shredded mozzarella cheese
  • ¼ cup of grated Parmesan cheese
  • 2 tablespoons of fresh parsley, finely chopped
  • 1 teaspoon of dried oregano
  • ½ teaspoon of salt

Optional ingredient substitution: If you prefer a different type of cheese, feel free to experiment with alternatives like cheddar or provolone. You can also add a sprinkle of red pepper flakes if you like a little heat.

Step-by-Step Instructions

  1. Preheat your air fryer to 400°F (200°C).
  2. Cut the French baguette in half lengthwise, creating two long halves.
  3. In a small bowl, combine the minced garlic, softened butter, parsley, oregano, and salt.
  4. Spread the garlic butter mixture evenly over the cut sides of the baguette.
  5. Sprinkle the shredded mozzarella cheese and grated Parmesan cheese on top of the garlic butter.
  6. Place the prepared garlic cheese bread halves in the air fryer basket, cut side up.
  7. Air fry for 8-10 minutes or until the cheese is melted and bubbly, and the bread is golden brown.
  8. Remove from the air fryer and let it cool for a few minutes before slicing.
  9. Garnish with additional fresh parsley if desired.
  10. Serve warm and enjoy!

Pro tip: For extra flavor, you can brush a bit of garlic-infused olive oil on the cut sides of the baguette before spreading the garlic butter mixture.

Expert Tips for Success

To achieve the best results with your Ultimate Air Fryer Garlic Cheese Bread, keep the following tips in mind:

– Make sure to preheat your air fryer. This helps ensure even cooking and a crispy crust.

– Use a French baguette or any crusty bread that you prefer. The texture of the bread plays a significant role in the final result.

– Don’t skimp on the garlic! Freshly minced garlic adds an incredible depth of flavor.

– Adjust the cooking time based on your air fryer model and personal preference. Keep an eye on the bread to prevent it from burning.

Variations and Substitutions

While the Ultimate Air Fryer Garlic Cheese Bread is already a delicious treat on its own, you can get creative and customize it to suit your taste preferences. Here are a few ideas:

– Add a sprinkle of dried chili flakes or a drizzle of hot sauce for a spicy kick.

– Experiment with different cheese combinations like mozzarella and cheddar, or add some crumbled feta for a tangy twist.

– If you’re a fan of herbs, feel free to incorporate fresh basil or rosemary into the garlic butter mixture.

– For a cheesy garlic pull-apart bread, you can make diagonal cuts across the bread halves before spreading the garlic butter and cheese.

Serving Suggestions

The Ultimate Air Fryer Garlic Cheese Bread is incredibly versatile and pairs well with various dishes. Here are a few serving suggestions to elevate your meal:

– Serve it alongside a bowl of hot tomato soup for a comforting and satisfying lunch or dinner.

– Enjoy it as an appetizer at your next gathering. Cut the bread into smaller slices or bite-sized pieces for easy snacking.

– Pair it with a pasta dish like spaghetti carbonara or lasagna for a complete Italian-inspired feast.

– Serve the garlic cheese bread as a side dish with grilled chicken, steak, or roasted vegetables.

FAQs

Q: Can I make this recipe ahead of time?

A: While the garlic cheese bread is best enjoyed fresh, you can prepare the garlic butter mixture in advance and store it in the refrigerator. When ready to serve, spread the mixture on the bread and air fry as directed.

Q: Can I freeze the garlic cheese bread?

A: It’s not recommended to freeze the cooked garlic cheese bread as the texture may become soggy. However, you can freeze the unbaked garlic bread halves. Just wrap them tightly in plastic wrap and aluminum foil, then thaw and bake when desired.

Q: How do I store leftovers?

A: If you happen to have any leftovers, store them in an airtight container in the refrigerator. Reheat in the air fryer or oven until warmed through.

Final Thoughts

The Ultimate Air Fryer Garlic Cheese Bread is a game-changer when it comes to satisfying your cravings for the perfect combination of garlic, cheese, and crunch. With its simplicity and incredible taste, this recipe will become a favorite go-to for all occasions. So go ahead, try it out, and let the flavors transport you to a world of cheesy delight!

We hope you enjoy making and devouring this delicious garlic cheese bread as much as we do. Don’t forget to share your experience and creativity with us in the comments below. Happy cooking!

Ultimate Butter and Cheese Baked Squash Casserole

Introduction

Are you looking for the ultimate comfort food that will satisfy your cravings and warm your soul? Look no further than this mouthwatering Ultimate Butter and Cheese Baked Squash Casserole. This delightful dish combines the creamy goodness of butter and cheese with the natural sweetness of squash, creating a perfect harmony of flavors. Whether you’re hosting a dinner party or simply want to indulge in a cozy home-cooked meal, this recipe is guaranteed to impress. Let’s dive into the details and discover why this casserole is a must-try!

Why You’ll Love This Recipe

Ultimate Butter and Cheese Baked Squash Casserole

There are several reasons why this Ultimate Butter and Cheese Baked Squash Casserole will become your new favorite. Firstly, it is incredibly easy to make, requiring just a handful of simple ingredients. With minimal effort, you can create a flavorful masterpiece that will leave your taste buds begging for more. Secondly, this casserole is versatile and can be enjoyed as a side dish or a main course. It pairs well with various proteins, making it a perfect addition to any meal. Lastly, this recipe is a great way to incorporate nutritious squash into your diet, as it provides essential vitamins and minerals.

Ingredients

To create this delectable Butter and Cheese Baked Squash Casserole, you will need the following ingredients:

– 4 cups of yellow squash, sliced

– 1/2 cup of butter, melted

– 1 cup of shredded cheddar cheese

– 1/2 cup of breadcrumbs

– 1/4 cup of grated Parmesan cheese

– 2 cloves of garlic, minced

– 1/2 teaspoon of dried thyme

– Salt and pepper to taste

Step-by-Step Instructions

Now that we have gathered our ingredients, let’s dive into the step-by-step instructions on how to make this irresistible Butter and Cheese Baked Squash Casserole:

  1. Preheat your oven to 375°F (190°C) and grease a baking dish.
  2. In a large bowl, combine the sliced squash, melted butter, minced garlic, dried thyme, salt, and pepper. Toss until the squash is evenly coated with the butter and seasonings.
  3. Transfer the squash mixture to the greased baking dish, spreading it out evenly.
  4. In a separate bowl, mix together the shredded cheddar cheese and breadcrumbs. Sprinkle this mixture over the top of the squash.
  5. Lastly, sprinkle the grated Parmesan cheese over the entire casserole.
  6. Bake in the preheated oven for 25-30 minutes, or until the cheese is golden and bubbly.
  7. Remove from the oven and let it cool for a few minutes before serving.

Pro Tip: For a crispy topping, broil the casserole for an additional 2-3 minutes after baking.

Expert Tips for Success

To ensure the best results with your Butter and Cheese Baked Squash Casserole, here are some expert tips:

– Use fresh yellow squash for the best flavor and texture.

– Feel free to experiment with different types of cheese, such as mozzarella or Gruyere, to add your own twist to the dish.

– If you want to make this casserole ahead of time, prepare it up until step 4, cover with foil, and refrigerate. When ready to bake, simply remove from the refrigerator and proceed with the remaining steps.

Variations and Substitutions

If you’re looking to customize this recipe, here are a few variations and substitutions you can try:

– For a vegetarian option, replace the butter with olive oil and use vegetarian-friendly cheese.

– Add a kick of spice by sprinkling some red pepper flakes over the squash mixture.

– For a gluten-free version, use gluten-free breadcrumbs or crushed gluten-free crackers.

– Experiment with different herbs and spices, such as rosemary or paprika, to enhance the flavors to your liking.

Serving Suggestions

This delectable Butter and Cheese Baked Squash Casserole can be served as a side dish or a main course. Here are some serving suggestions to elevate your meal:

– Pair it with grilled chicken or steak for a complete and satisfying dinner.

– Serve it alongside a fresh salad and crusty bread for a light and wholesome lunch.

– Add a dollop of sour cream or Greek yogurt on top for an extra creamy finish.

– Garnish with fresh herbs, such as parsley or chives, to add a pop of color and freshness.

FAQs

Q: Can I freeze the Butter and Cheese Baked Squash Casserole?

A: Yes, you can freeze the casserole before baking. Simply prepare it up until step 4, cover tightly with plastic wrap and aluminum foil, and freeze for up to 3 months. When ready to bake, thaw it in the refrigerator overnight and proceed with the remaining steps.

Q: Can I use zucchini instead of yellow squash?

A: Absolutely! Zucchini can be a great substitute for yellow squash in this recipe. Just make sure to adjust the cooking time accordingly, as zucchini tends to cook faster.

Final Thoughts

Indulge in the comforting flavors of this Ultimate Butter and Cheese Baked Squash Casserole. With its creamy texture, cheesy goodness, and delicate balance of flavors, this dish is guaranteed to become a family favorite. Whether you’re cooking for a special occasion or a weeknight dinner, this recipe is a winner. So go ahead, gather the ingredients, and let your taste buds embark on a flavorful journey. Don’t forget to share your cooking experience and spread the joy of this delightful casserole with your loved ones!

Ultimate Creamy and Cheesy Texas Potatoes Casserole

Ultimate Creamy and Cheesy Texas Potatoes Casserole

Introduction

Prepare yourself for a mouthwatering journey through the heart of Texas with this ultimate creamy and cheesy Texas potatoes casserole recipe. Whether you’re hosting a family gathering or simply craving some comfort food, this dish is sure to impress. With its rich flavors, indulgent textures, and a touch of southern charm, this recipe is a true crowd-pleaser.

Originating from the Lone Star State, this casserole is a beloved classic that has been passed down through generations. It showcases the bold flavors and hearty ingredients that Texas cuisine is known for. Imagine a creamy potato base, perfectly seasoned with a medley of herbs and spices, topped with a generous layer of ooey-gooey cheese. Each bite is a harmonious blend of comfort and satisfaction.

What sets this recipe apart is its simplicity and versatility. Whether you’re a seasoned chef or a beginner in the kitchen, you’ll find the step-by-step instructions easy to follow. Plus, with just a handful of common ingredients, this casserole can be whipped up in no time. It’s the perfect dish to bring to potlucks, holiday gatherings, or even to enjoy as a comforting weeknight meal.

Why You’ll Love This Recipe

There are countless reasons why this creamy and cheesy Texas potatoes casserole recipe deserves a special place in your culinary repertoire. Here are just a few:

1. Easy and Quick

With its straightforward instructions and minimal prep time, this recipe is a lifesaver for busy individuals or those new to cooking. Whether you’re short on time or energy, you can still enjoy a delicious homemade meal without sacrificing flavor.

Ultimate Creamy and Cheesy Texas Potatoes Casserole

2. Creamy and Fluffy

Thanks to the combination of potatoes and a luscious cream sauce, this casserole boasts a creamy and fluffy texture that is simply irresistible. Each forkful melts in your mouth, leaving you craving for more.

3. Cheesy and Crispy

The golden layer of melted cheese on top creates a delightful contrast to the creamy potatoes underneath. As it bakes to perfection, the cheese turns wonderfully crispy, adding a satisfying crunch to each bite.

4. Versatile and Customizable

This recipe serves as a blank canvas for culinary creativity. Feel free to experiment with different cheese varieties, add in your favorite herbs and spices, or incorporate additional ingredients like bacon or vegetables to make it your own.

5. Dietary Benefits

While this dish is undeniably indulgent, you can still make it suitable for different dietary preferences. Swap regular cheese for a dairy-free alternative, use gluten-free breadcrumbs, or opt for low-fat ingredients to create a lighter version without compromising on taste.

Ingredients

For the casserole, you will need the following ingredients:

  • 6 large potatoes, peeled and thinly sliced
  • 1 cup shredded cheddar cheese
  • 1 cup shredded mozzarella cheese
  • 1 cup heavy cream
  • 1/2 cup chicken broth
  • 2 cloves garlic, minced
  • 1 teaspoon dried thyme
  • 1 teaspoon dried rosemary
  • Salt and pepper to taste
  • 1/4 cup grated Parmesan cheese
  • 2 tablespoons butter, melted

Note: Feel free to adjust the quantities based on your preferences and the number of servings needed.

Step-by-Step Instructions

Follow these simple steps to create the ultimate creamy and cheesy Texas potatoes casserole:

  1. Preheat your oven to 375°F (190°C) and grease a baking dish with butter or cooking spray.
  2. In a large bowl, combine the heavy cream, chicken broth, minced garlic, dried thyme, dried rosemary, salt, and pepper. Mix well.
  3. Place a layer of sliced potatoes at the bottom of the greased baking dish. Pour a portion of the cream mixture over the potatoes, ensuring they are well-coated.
  4. Sprinkle a handful of shredded cheddar and mozzarella cheese over the potatoes.
  5. Repeat steps 3 and 4 to create additional layers until all the potatoes and cream mixture are used.
  6. In a small bowl, mix together the grated Parmesan cheese and melted butter. Sprinkle this mixture evenly over the top layer of the casserole.
  7. Cover the baking dish with aluminum foil and bake for 45 minutes. Then, remove the foil and bake for an additional 15-20 minutes or until the top is golden and the potatoes are tender.
  8. Remove the casserole from the oven and let it cool for a few minutes before serving.

Pro tip: For an extra crispy topping, broil the casserole for the last 2-3 minutes of baking.

Expert Tips for Success

To ensure your creamy and cheesy Texas potatoes casserole turns out perfectly every time, keep these expert tips in mind:

1. Choose the Right Potatoes: Opt for starchy potatoes like Russets or Yukon Golds, as they have a higher starch content, resulting in a creamier texture.

2. Slice Evenly: To ensure even cooking, make sure to slice your potatoes into uniform thickness. This will help prevent some slices from becoming overcooked while others remain undercooked.

3. Use Fresh Herbs: While dried herbs work well in this recipe, using fresh thyme and rosemary will enhance the flavors and add a vibrant touch.

4. Don’t Overmix: When combining the cream mixture with the potatoes, gently toss them together until evenly coated. Overmixing may result in mashed potatoes instead of distinct layers.

5. Let it Rest: Allow the casserole to cool for a few minutes before serving. This will help the flavors meld together and make it easier to slice and serve.

Variations and Substitutions

Get creative and put your own spin on this classic Texas recipe with these variations and substitutions:

1. Spicy Kick

If you prefer a spicier version, add a pinch of cayenne pepper or a diced jalapeno to the cream mixture. This will give your casserole a delightful kick.

2. Loaded Potato Casserole

Take inspiration from loaded baked potatoes by topping your casserole with crumbled bacon, chopped green onions, and a dollop of sour cream before serving.

3. Vegetarian Twist

Omit the chicken broth and use vegetable broth instead to make this dish suitable for vegetarians. You can also add in sautéed mushrooms or spinach for extra flavor and nutrients.

4. Dairy-Free Delight

If you’re lactose intolerant or following a dairy-free diet, replace the heavy cream and cheese with coconut milk and dairy-free cheese alternatives. You’ll still achieve a creamy and flavorful result.

Serving Suggestions

This creamy and cheesy Texas potatoes casserole is delicious on its own, but you can elevate your dining experience with the following serving suggestions:

1. Pair with a Green Salad: Serve a crisp green salad on the side to add a refreshing contrast to the rich flavors of the casserole.

2. Add a Protein: Serve the casserole alongside grilled chicken, steak, or roasted vegetables to create a well-rounded meal.

3. Garnish with Fresh Herbs: Sprinkle some freshly chopped parsley or chives over the casserole before serving to add a pop of color and a burst of freshness.

FAQs

Here are answers to some common questions you may have about this creamy and cheesy Texas potatoes casserole:

Q: Can I make this casserole ahead of time?

A: Absolutely! You can prepare the casserole up until step 6, cover it tightly with plastic wrap, and refrigerate it overnight. When you’re ready to bake, simply remove it from the refrigerator, let it come to room temperature, and continue with the baking instructions.

Q: Can I freeze the leftovers?

A: Yes! This casserole freezes well. Allow it to cool completely, then transfer individual portions or the entire dish to airtight containers or freezer bags. It can be stored in the freezer for up to 3 months. When you’re ready to enjoy it, thaw it in the refrigerator overnight and reheat in the oven.

Q: Can I use different types of cheese?

A: Absolutely! Feel free to experiment with different cheese combinations to suit your taste. Gouda, Monterey Jack, or even blue cheese can add a unique twist to the dish.

Final Thoughts

Get ready to savor the flavors of Texas with this ultimate creamy and cheesy Texas potatoes casserole. Its creamy texture, cheesy topping, and versatile nature make it a standout dish for any occasion. Whether you’re feeding a hungry crowd or treating yourself to a comforting meal, this casserole is guaranteed to satisfy.

So, gather your ingredients, preheat your oven, and get ready to indulge in a taste of Texas. Prepare to be transported to a world where comfort meets flavor, and every bite leaves you longing for more. Try this recipe today and allow your taste buds to experience the true essence of Texas cuisine.

Smoky Ham and Bean Soup

Introduction

Welcome to our delicious and comforting recipe for Smoky Ham and Bean Soup. This hearty soup is perfect for chilly nights or when you’re in need of a comforting meal. The combination of smoky ham and tender beans creates a flavorful and satisfying dish that will warm you from the inside out. Whether you’re a seasoned chef or a beginner in the kitchen, this recipe is simple to follow and will impress your family and friends. So, let’s dive in and discover how to make this mouthwatering soup!

Why You’ll Love This Recipe

Smoky Ham and Bean Soup

There are so many reasons to love this smoky ham and bean soup. First and foremost, it’s incredibly delicious. The smoky flavor of the ham adds depth and richness to the soup, while the beans provide a creamy and hearty texture. This recipe is also incredibly versatile, allowing you to customize it to your taste. Additionally, it’s a budget-friendly option that can be made with ingredients you likely already have on hand. Lastly, this soup is packed with protein and fiber, making it a nutritious choice for any meal.

Ingredients

To make this smoky ham and bean soup, you’ll need the following ingredients:

– 1 pound smoked ham, diced

– 1 onion, diced

– 3 cloves of garlic, minced

– 2 carrots, diced

– 2 celery stalks, diced

– 2 cups dried white beans, soaked overnight

– 6 cups chicken or vegetable broth

– 1 bay leaf

– 1 teaspoon smoked paprika

– Salt and pepper to taste

– Fresh parsley for garnish (optional)

Step-by-Step Instructions

Follow these simple steps to create your delicious smoky ham and bean soup:

  1. Heat a large pot over medium heat and add the diced ham. Cook until the ham is browned and crispy, about 5 minutes.
  2. Add the diced onion, minced garlic, carrots, and celery to the pot. Cook for an additional 5 minutes, or until the vegetables have softened.
  3. Drain and rinse the soaked white beans, then add them to the pot along with the chicken or vegetable broth.
  4. Add the bay leaf and smoked paprika to the pot. Bring the soup to a boil, then reduce the heat to low and let it simmer for 1-2 hours, or until the beans are tender.
  5. Season with salt and pepper to taste. Remove the bay leaf before serving.
  6. Garnish with fresh parsley if desired.

Enjoy your homemade smoky ham and bean soup!

Expert Tips for Success

Here are a few expert tips to ensure your smoky ham and bean soup turns out perfectly:

  • For an extra smoky flavor, you can use a combination of smoked ham and smoked paprika.
  • Soaking the beans overnight helps to reduce their cooking time and ensures they cook evenly.
  • If you’re short on time, you can use canned beans instead of dried. Just be sure to rinse them well before adding them to the soup.
  • Feel free to customize this recipe by adding additional vegetables such as potatoes or bell peppers.
  • If you prefer a thicker soup, you can mash some of the cooked beans with a fork or blend a portion of the soup in a blender before serving.

Variations and Substitutions

This smoky ham and bean soup is incredibly versatile and can be adapted to suit your preferences. Here are a few variations and substitutions you can try:

  • If you’re vegetarian or vegan, you can omit the ham and use smoked tofu or tempeh instead.
  • For a different flavor profile, you can use different types of beans such as black beans or kidney beans.
  • If you prefer a spicier soup, you can add some diced jalapenos or a pinch of cayenne pepper.
  • Feel free to experiment with different herbs and spices to customize the flavor of the soup.

Serving Suggestions

This smoky ham and bean soup is a complete meal on its own, but you can also serve it with some delicious accompaniments. Here are a few serving suggestions:

  • Crusty bread or dinner rolls are perfect for dipping into the soup.
  • A side salad with fresh greens and a tangy vinaigrette will add a refreshing element to the meal.
  • A sprinkle of grated Parmesan cheese on top of the soup adds a savory touch.
  • Pair the soup with a glass of red wine or a crisp apple cider for a delightful combination.

FAQs

Here are some common questions about smoky ham and bean soup:

Can I freeze the soup?

Yes, this soup freezes well. Allow it to cool completely before transferring it to airtight containers or freezer bags. It will keep in the freezer for up to 3 months. Thaw in the refrigerator overnight before reheating.

Can I use canned beans instead of dried beans?

Yes, you can use canned beans if you’re short on time. Just be sure to rinse them well before adding them to the soup.

Can I use a different type of meat?

Absolutely! While the smoky flavor of ham adds a delicious touch to this soup, you can also use other types of meat such as bacon or smoked sausage.

Can I make this soup in a slow cooker?

Yes, this soup can easily be made in a slow cooker. Simply brown the ham and sauté the vegetables in a separate pan, then transfer everything to the slow cooker along with the remaining ingredients. Cook on low for 6-8 hours or on high for 3-4 hours.

Final Thoughts

Smoky ham and bean soup is a classic comfort food that never fails to satisfy. This recipe is easy to make, packed with flavor, and perfect for any occasion. Whether you’re cooking for yourself or a crowd, this soup is sure to be a hit. So grab your ingredients, roll up your sleeves, and get ready to enjoy a bowl of deliciousness!

We hope you enjoy making and savoring this smoky ham and bean soup as much as we do. Don’t forget to share your cooking experience and any variations you try. Happy cooking!