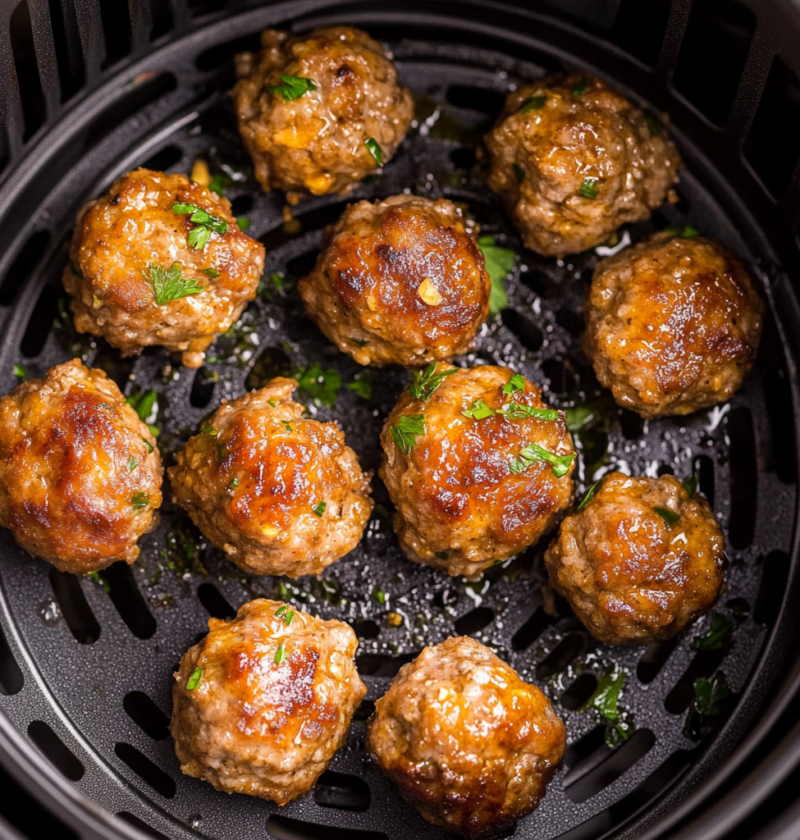
Savory Slow-Cooked Steak and Potato Delight

Introduction

Welcome to the world of savory slow-cooked steak and potato delight! This mouthwatering recipe is a true delight for meat lovers and potato enthusiasts alike. Picture tender, juicy steak that falls apart with a gentle touch, accompanied by perfectly cooked potatoes that are infused with rich flavors. Whether you’re cooking for a special occasion or simply craving a comforting meal, this recipe is sure to satisfy your taste buds and leave you wanting more.

There’s something magical about slow-cooked dishes. The low and slow cooking method allows the flavors to develop and meld together, resulting in a dish that is bursting with taste. In this recipe, we take the time to let the steak and potatoes simmer gently, allowing them to absorb all the delicious flavors from the aromatic herbs and spices. The end result is a dish that is tender, flavorful, and incredibly satisfying.

This recipe has a rich history, with variations found in cuisines around the world. From hearty stews to classic comfort food, slow-cooked steak and potatoes have been a staple in many cultures for centuries. The combination of tender meat and soft potatoes creates a harmony of textures and flavors that is hard to resist. So, let’s dive into the details and learn how to create this savory masterpiece in your own kitchen.

Why You’ll Love This Recipe

There are plenty of reasons why this recipe will become a favorite in your household. Firstly, it’s incredibly easy to prepare. With just a few simple steps, you’ll have an impressive dish that tastes like it took hours to make. Secondly, the flavors in this recipe are outstanding. The slow cooking process allows the steak to become incredibly tender, while the potatoes soak up all the delicious juices, creating a symphony of flavors in every bite. Lastly, this recipe is versatile. You can serve it as a main course for a special dinner or as a comforting dish on a lazy Sunday afternoon. No matter the occasion, this savory slow-cooked steak and potato delight is guaranteed to impress.

Ingredients

Before we dive into the cooking process, let’s gather all the ingredients needed for this delectable dish. For the steak and potato delight, you will need:

– 2 pounds of steak (choose your favorite cut, such as ribeye or sirloin) – 4 large potatoes, peeled and cut into chunks – 1 onion, finely chopped – 3 cloves of garlic, minced – 1 tablespoon of olive oil – 1 cup of beef broth – 1 tablespoon of Worcestershire sauce – 1 teaspoon of dried thyme – 1 teaspoon of paprika – Salt and pepper to taste

Step-by-Step Instructions

Now that we have all the ingredients ready, let’s start cooking this savory slow-cooked steak and potato delight. Follow these step-by-step instructions for a delicious outcome:

  1. Start by seasoning the steak with salt, pepper, and paprika. Heat the olive oil in a large skillet over medium-high heat. Sear the steak on both sides until browned. Remove the steak from the skillet and set it aside.
  2. In the same skillet, add the chopped onion and minced garlic. Saute until the onion turns translucent and the garlic becomes fragrant.
  3. Add the beef broth, Worcestershire sauce, dried thyme, and a pinch of salt and pepper. Stir well to combine.
  4. Return the steak to the skillet, along with any juices that have accumulated. Add the potatoes to the skillet as well.
  5. Cover the skillet and reduce the heat to low. Let the steak and potatoes simmer for about 2 hours, or until the steak is tender and the potatoes are cooked through.
  6. Once the steak and potatoes are cooked, remove them from the skillet and transfer them to a serving dish.
  7. Optional: If desired, you can thicken the sauce by simmering it over medium heat until it reaches your desired consistency.
  8. Serve the savory slow-cooked steak and potato delight hot, garnished with fresh herbs if desired.

Expert Tips for Success:

To ensure the best results with this recipe, here are some expert tips:

– Choose a good quality steak for maximum flavor and tenderness. Look for marbling in the meat, as this will result in a juicier end product. – Let the steak come to room temperature before cooking. This will ensure even cooking throughout. – Don’t rush the browning process. Searing the steak on high heat will create a flavorful crust. – Use a skillet with a tight-fitting lid to trap the steam and create a moist cooking environment. – Feel free to customize the recipe by adding your favorite herbs and spices. Experiment with different combinations to find your perfect flavor profile.

Variations and Substitutions

This recipe is incredibly versatile, allowing you to make various substitutions and adjustments to suit your preferences. Here are a few ideas to get you started:

– If you’re not a fan of steak, you can easily swap it for chicken or pork. Just adjust the cooking time accordingly to ensure the meat is fully cooked. – For a vegetarian version, you can substitute the steak with portobello mushrooms or tofu. The cooking time may vary, so keep an eye on the texture of the mushrooms or tofu. – Feel free to add vegetables to the dish for added nutrition. Carrots, bell peppers, and green beans all work well with the flavors in this recipe. – If you prefer a spicier dish, you can add a dash of hot sauce or red pepper flakes to the cooking liquid. – For a creamier sauce, stir in a dollop of sour cream or heavy cream at the end of cooking.

Serving Suggestions

This savory slow-cooked steak and potato delight can be enjoyed on its own or paired with complementary side dishes. Here are a few serving suggestions to enhance your dining experience:

– Serve the dish with a side of steamed vegetables, such as broccoli or green beans. The fresh, crisp texture of the vegetables provides a nice contrast to the tender steak and potatoes. – For a complete meal, serve the steak and potatoes over a bed of cooked rice or mashed potatoes. This will create a hearty and fulfilling plate. – A simple green salad with a tangy vinaigrette dressing is a great accompaniment to balance out the richness of the dish. – A glass of red wine or a cold beer pairs well with the flavors in this recipe. Choose a wine or beer that complements the richness of the steak.

FAQs

Here are some commonly asked questions about this savory slow-cooked steak and potato delight:

Q: Can I prepare this recipe in a slow cooker instead of a skillet? A: Yes, you can definitely adapt this recipe for a slow cooker. Simply follow the same steps of browning the steak and sautéing the onions and garlic in a separate skillet. Transfer everything to the slow cooker, add the remaining ingredients, and cook on low for 6-8 hours or on high for 3-4 hours.

Q: Can I make this recipe ahead of time? A: Absolutely! In fact, this dish tastes even better the next day as the flavors have had time to develop. Simply store the cooked steak and potatoes in an airtight container in the refrigerator. When ready to serve, reheat gently on the stovetop or in the oven until heated through.

Q: Can I freeze the leftovers? A: Yes, you can freeze the leftovers for future meals. Make sure to cool the steak and potatoes completely before transferring them to a freezer-safe container. They can be stored in the freezer for up to 3 months. Thaw in the refrigerator overnight before reheating.

Final Thoughts

There you have it, a comprehensive guide to creating a savory slow-cooked steak and potato delight. This recipe is a true crowd-pleaser that will leave you and your loved ones satisfied and impressed. The tender steak, the flavorful potatoes, and the mouthwatering aromas will make this dish a regular on your menu. So, gather your ingredients, follow the step-by-step instructions, and get ready to indulge in a culinary masterpiece. Don’t forget to share your cooking adventures and experiences with us. Happy cooking!

Savory Slow-Cooked Steak and Potato Delight

Savory Slow-Cooked Steak and Potato Delight

Recipe by Author

Tender, juicy steak paired with perfectly cooked potatoes infused with rich flavors, slow-cooked to perfection. This comforting and flavorful dish is a crowd-pleaser that is easy to prepare and versatile in serving options.

Course: Main Dish Cuisine: Global Difficulty: medium
4.5 from 120 votes
🍽️
Servings
4
⏱️
Prep time
15
minutes
🔥
Cooking time
120
minutes
📊
Calories
480
kcal
Cook Mode
Keep the screen of your device on

Ingredients

  • 2 pounds of steak (such as ribeye or sirloin)
  • 4 large potatoes, peeled and cut into chunks
  • 1 onion, finely chopped
  • 3 cloves of garlic, minced
  • 1 tablespoon of olive oil
  • 1 cup of beef broth
  • 1 tablespoon of Worcestershire sauce
  • 1 teaspoon of dried thyme
  • 1 teaspoon of paprika
  • Salt and pepper to taste

Directions

  1. Season the steak with salt, pepper, and paprika. Sear in a large skillet. Set aside.
  2. Saute onion and garlic in the same skillet until translucent and fragrant.
  3. Add beef broth, Worcestershire sauce, thyme, salt, and pepper. Stir to combine.
  4. Return the steak to the skillet with accumulated juices. Add potatoes.
  5. Cover and simmer over low heat for about 2 hours until steak is tender and potatoes are cooked through.
  6. Remove steak and potatoes from skillet and transfer to a serving dish.
  7. Optional: Thicken the sauce by simmering to desired consistency.
  8. Serve hot, garnished with fresh herbs if desired.

Nutrition Facts

Calories: 480
Fat: 19
Carbohydrates: 28
Protein: 46
Sodium: 820
Fiber: 4
Sugar: 2

Wholesome Lentil Delight

Introduction

Are you looking for a hearty and nutritious meal that is not only delicious but also easy to prepare? Look no further than the Wholesome Lentil Delight! This recipe combines the rich flavors of lentils with aromatic spices to create a dish that is both comforting and satisfying. Whether you are a seasoned cook or a beginner in the kitchen, this recipe is sure to impress both your taste buds and your guests.

Why You’ll Love This Recipe

There are several reasons why this Wholesome Lentil Delight recipe deserves a spot in your culinary repertoire. First and foremost, it is incredibly easy to make. With just a few simple ingredients and minimal prep work, you can have a wholesome and flavorful meal on the table in no time. Additionally, this recipe is packed with nutritional benefits. Lentils are an excellent source of plant-based protein, fiber, and various vitamins and minerals. They are also low in fat and cholesterol, making them a healthy choice for those looking to maintain a balanced diet.

Ingredients

To make this Wholesome Lentil Delight, you will need the following ingredients:

  • 1 cup dried lentils
  • 2 cups vegetable broth
  • 1 onion, diced
  • 3 cloves of garlic, minced
  • 1 tablespoon olive oil
  • 1 teaspoon cumin
  • 1 teaspoon paprika
  • 1/2 teaspoon turmeric
  • Salt and pepper to taste

Optional ingredient substitutions:

If you prefer a spicier flavor, you can add a pinch of cayenne pepper or a chopped jalapeno pepper to the recipe. For a touch of sweetness, you can also include a diced carrot or a tablespoon of honey.

Step-by-Step Instructions

  1. Start by rinsing the lentils under cold water to remove any debris.
  2. In a large pot, heat the olive oil over medium heat. Add the diced onion and minced garlic, and sauté until they become translucent and fragrant.
  3. Add the cumin, paprika, turmeric, salt, and pepper to the pot. Stir well to coat the onions and garlic with the spices.
  4. Next, add the rinsed lentils and vegetable broth to the pot. Bring the mixture to a boil, then reduce the heat to low and cover the pot.
  5. Simmer the lentils for approximately 20-25 minutes, or until they are tender and have absorbed most of the liquid.
  6. Once the lentils are cooked, remove the pot from the heat and let them sit for a few minutes to cool slightly. Serve the Wholesome Lentil Delight hot, garnished with fresh herbs if desired.

Expert Tips for Success:

– To enhance the flavors of the dish, you can garnish it with a squeeze of lemon juice or a dollop of plain yogurt.

– If you prefer a creamier texture, you can blend a portion of the cooked lentils with an immersion blender or a food processor before serving.

– For a complete meal, serve the Wholesome Lentil Delight over a bed of fluffy basmati rice or with a side of warm naan bread.

Variations and Substitutions

While this Wholesome Lentil Delight recipe is already packed with flavor, you can easily customize it to suit your taste preferences. Here are a few variations and substitutions you can try:

– Instead of vegetable broth, you can use chicken broth or water for a lighter flavor.

– Add diced tomatoes or tomato paste for a tangy twist.

– If you enjoy a bit of heat, sprinkle some red pepper flakes or add a dash of hot sauce to the lentils.

– Feel free to experiment with different spices such as coriander, cinnamon, or ginger to create your own unique flavor profile.

Serving Suggestions

The Wholesome Lentil Delight can be enjoyed on its own as a satisfying vegetarian main dish, or you can pair it with other complementary dishes for a complete meal. Here are a few serving suggestions:

– Serve the lentils over a bed of fluffy steamed rice for a filling and nutritious dinner.

– Pair the Wholesome Lentil Delight with warm naan bread or pita bread for a delicious and comforting lunch.

– For a lighter option, serve the lentils on top of a bed of mixed greens and drizzle with a lemon vinaigrette.

FAQs

Q: Can I make this recipe ahead of time?

A: Absolutely! The Wholesome Lentil Delight can be prepared in advance and stored in the refrigerator for up to 3 days. Simply reheat it on the stove or in the microwave before serving.

Q: Can I freeze the lentils?

A: Yes, you can freeze the cooked lentils for up to 3 months. Allow them to cool completely before transferring them to a freezer-safe container or bag. Thaw them in the refrigerator overnight before reheating.

Q: Can I use canned lentils instead of dried lentils?

A: While dried lentils are recommended for this recipe, you can substitute them with canned lentils if needed. Just be sure to rinse and drain the canned lentils before using them.

Final Thoughts

The Wholesome Lentil Delight is a versatile and nutritious dish that is perfect for any occasion. Whether you are a vegetarian looking for a protein-packed meal or simply want to incorporate more plant-based foods into your diet, this recipe is a winner. With its flavorful spices and hearty texture, it is sure to become a favorite in your kitchen. So go ahead, give it a try, and let the Wholesome Lentil Delight delight your taste buds!

Wholesome Lentil Delight

Wholesome Lentil Delight

Recipe by Author

A hearty and nutritious dish that combines the rich flavors of lentils with aromatic spices to create a comforting and satisfying meal. Perfect for vegetarians or anyone looking for a flavorful plant-based option.

Course: Main Dish Cuisine: International Difficulty: easy
4.5 from 210 votes
🍽️
Servings
4
⏱️
Prep time
15
minutes
🔥
Cooking time
25
minutes
📊
Calories
260
kcal
Cook Mode
Keep the screen of your device on

Ingredients

  • 1 cup dried lentils
  • 2 cups vegetable broth
  • 1 onion, diced
  • 3 cloves of garlic, minced
  • 1 tablespoon olive oil
  • 1 teaspoon cumin
  • 1 teaspoon paprika
  • 1/2 teaspoon turmeric
  • Salt and pepper to taste

Directions

  1. Start by rinsing the lentils under cold water to remove any debris.
  2. In a large pot, heat the olive oil over medium heat. Add the diced onion and minced garlic, and sauté until they become translucent and fragrant.
  3. Add the cumin, paprika, turmeric, salt, and pepper to the pot. Stir well to coat the onions and garlic with the spices.
  4. Add the rinsed lentils and vegetable broth to the pot. Bring the mixture to a boil, then reduce the heat to low and cover the pot.
  5. Simmer the lentils for approximately 20-25 minutes, or until they are tender and have absorbed most of the liquid.
  6. Once the lentils are cooked, remove the pot from the heat and let them sit for a few minutes to cool slightly. Serve the Wholesome Lentil Delight hot, garnished with fresh herbs if desired.

Nutrition Facts

Calories: 260
Fat: 5
Carbohydrates: 40
Protein: 15
Sodium: 600
Fiber: 15
Sugar: 5

Sweet Potato Sensations:

Introduction

Sweet Potato Sensations is a delightful recipe that will tickle your taste buds and warm your soul. This recipe holds a special place in my heart because it reminds me of lazy Sundays spent in my grandmother’s kitchen, the aroma of cinnamon and nutmeg filling the air. But this recipe isn’t just a nostalgic trip down memory lane; it’s a delicious and versatile dish that can be enjoyed in a variety of ways. Whether you prefer it savory or sweet, as a side dish or a main course, Sweet Potato Sensations is sure to become a favorite in your kitchen.

Why You’ll Love This Recipe

There are many reasons to love Sweet Potato Sensations. First and foremost, it’s incredibly easy to make. With just a few simple ingredients and minimal prep work, you can have a mouthwatering dish ready in no time. Secondly, this recipe is incredibly versatile. You can customize it to suit your taste preferences, adding your favorite seasonings and toppings. Finally, sweet potatoes are packed with nutrients, making this recipe not only delicious but also nutritious.

Ingredients

To make Sweet Potato Sensations, you will need the following ingredients:

– 4 large sweet potatoes

– 1/4 cup melted butter

– 1/4 cup brown sugar

– 1 teaspoon cinnamon

– 1/2 teaspoon nutmeg

– 1/4 teaspoon salt

– Optional toppings: chopped pecans, marshmallows

Step-by-Step Instructions

Follow these simple steps to create your own Sweet Potato Sensations:

  1. Preheat the oven to 375°F (190°C).
  2. Wash the sweet potatoes and prick them with a fork.
  3. Place the sweet potatoes on a baking sheet and bake for 45-60 minutes, or until they are tender.
  4. Remove the sweet potatoes from the oven and let them cool slightly.
  5. Peel the sweet potatoes and place the flesh in a large mixing bowl.
  6. Add the melted butter, brown sugar, cinnamon, nutmeg, and salt to the bowl.
  7. Mash the sweet potatoes and mix all the ingredients together until well combined.
  8. Transfer the mixture to a baking dish and smooth the top with a spatula.
  9. If desired, sprinkle chopped pecans or marshmallows on top.
  10. Bake for an additional 15-20 minutes, or until the topping is golden and bubbly.
  11. Remove from the oven and let it cool for a few minutes before serving.

Expert Tips for Success

Here are some expert tips to help you achieve the best results with your Sweet Potato Sensations:

– Choose sweet potatoes that are firm and have smooth skin.

– Prick the sweet potatoes before baking to allow steam to escape and prevent them from bursting.

– For extra flavor, you can roast the sweet potatoes instead of baking them. Simply wrap them in foil and place them in a preheated 400°F (200°C) oven for about an hour, or until tender.

– If you prefer a smoother texture, you can use a hand mixer or blender to mash the sweet potatoes.

– Feel free to adjust the amount of sugar and spices to suit your taste.

Variations and Substitutions

While Sweet Potato Sensations is delicious as is, you can get creative and customize the recipe to suit your preferences. Here are a few ideas:

– Savory Version: Skip the brown sugar, cinnamon, and nutmeg. Instead, add savory spices like paprika, garlic powder, and rosemary for a savory twist.

– Vegan Version: Replace the melted butter with coconut oil or vegan butter substitute.

– Gluten-Free Version: This recipe is naturally gluten-free, so no substitutions are necessary.

– Toppings: In addition to chopped pecans and marshmallows, you can also try topping your Sweet Potato Sensations with a drizzle of maple syrup, toasted coconut flakes, or a dollop of whipped cream.

Serving Suggestions

Sweet Potato Sensations can be enjoyed in various ways. Here are a few serving suggestions:

– Side Dish: Serve Sweet Potato Sensations as a delicious side dish alongside roasted chicken, grilled steak, or your favorite protein.

– Breakfast: Add a dollop of Greek yogurt and a sprinkle of granola to your Sweet Potato Sensations for a nutritious and satisfying breakfast.

– Dessert: Serve Sweet Potato Sensations as a dessert by topping it with a scoop of vanilla ice cream or a drizzle of caramel sauce.

– Snack: Enjoy a small portion of Sweet Potato Sensations as a tasty and filling snack between meals.

FAQs

Here are some common questions about Sweet Potato Sensations:

Q: Can I make this recipe ahead of time?

A: Yes, you can prepare the sweet potato mixture in advance and refrigerate it until you’re ready to bake. Simply let it come to room temperature before baking.

Q: Can I freeze Sweet Potato Sensations?

A: Yes, you can freeze Sweet Potato Sensations. After baking, let it cool completely, then cover tightly with foil or plastic wrap and freeze for up to 3 months. Thaw in the refrigerator before reheating.

Q: Can I use canned sweet potatoes?

A: While fresh sweet potatoes are recommended for the best flavor and texture, you can use canned sweet potatoes in a pinch. Just make sure to drain them well before mashing.

Q: Can I use other types of potatoes?

A: While this recipe specifically calls for sweet potatoes, you can experiment with other types of potatoes if desired. However, keep in mind that the flavor and texture may vary.

Final Thoughts

Sweet Potato Sensations is a recipe that combines simplicity and deliciousness in one dish. Whether you choose to enjoy it as a side dish, breakfast, dessert, or snack, this versatile recipe is sure to become a favorite in your kitchen. So go ahead, give it a try, and let the delightful flavors of sweet potatoes bring warmth and joy to your table.

Sweet Potato Sensations:

Sweet Potato Sensations:

Recipe by Author

A delightful and versatile dish made with sweet potatoes, butter, brown sugar, and warm spices like cinnamon and nutmeg. This recipe is a perfect balance of sweet and savory flavors that will warm your soul and become a favorite in your kitchen.

Course: Side Dish Cuisine: American Difficulty: easy
4.5 from 95 votes
🍽️
Servings
6
⏱️
Prep time
15
minutes
🔥
Cooking time
80
minutes
📊
Calories
280
kcal
Cook Mode
Keep the screen of your device on

Ingredients

  • 4 large sweet potatoes
  • 1/4 cup melted butter
  • 1/4 cup brown sugar
  • 1 teaspoon cinnamon
  • 1/2 teaspoon nutmeg
  • 1/4 teaspoon salt
  • Optional toppings: chopped pecans, marshmallows

Directions

  1. Preheat the oven to 375°F (190°C).
  2. Wash the sweet potatoes and prick them with a fork.
  3. Place the sweet potatoes on a baking sheet and bake for 45-60 minutes, or until they are tender.
  4. Remove the sweet potatoes from the oven and let them cool slightly.
  5. Peel the sweet potatoes and place the flesh in a large mixing bowl.
  6. Add the melted butter, brown sugar, cinnamon, nutmeg, and salt to the bowl.
  7. Mash the sweet potatoes and mix all the ingredients together until well combined.
  8. Transfer the mixture to a baking dish and smooth the top with a spatula.
  9. If desired, sprinkle chopped pecans or marshmallows on top.
  10. Bake for an additional 15-20 minutes, or until the topping is golden and bubbly.
  11. Remove from the oven and let it cool for a few minutes before serving.

Nutrition Facts

Calories: 280
Fat: 8
Carbohydrates: 50
Protein: 3
Sodium: 180
Fiber: 6
Sugar: 20

Creamy Garlic Shrimp Pasta

Introduction

Welcome to the world of creamy garlic shrimp pasta! If you’re a fan of seafood and pasta, this dish is a match made in culinary heaven. Bursting with flavors and textures, this recipe is sure to become a family favorite. Whether you’re cooking for a special occasion or simply craving a comforting meal, this creamy garlic shrimp pasta ticks all the boxes. So, grab your apron and let’s dive into the delightful world of this mouthwatering dish.

Why You’ll Love This Recipe

There are countless reasons why this creamy garlic shrimp pasta is a winner. Firstly, it’s incredibly easy to make, even for novice cooks. With just a handful of ingredients and simple steps, you can whip up a gourmet-worthy dish in no time. Secondly, it’s versatile and customizable. You can add your favorite veggies or experiment with different types of pasta to make it your own. Lastly, the combination of creamy sauce, tender shrimp, and aromatic garlic creates a symphony of flavors that will leave you craving more.

Ingredients

To create this delectable creamy garlic shrimp pasta, you will need the following ingredients:

  • 8 ounces of fettuccine pasta
  • 1 pound of shrimp, peeled and deveined
  • 4 cloves of garlic, minced
  • 1 cup of heavy cream
  • 1/2 cup of grated Parmesan cheese
  • 2 tablespoons of butter
  • 1 tablespoon of olive oil
  • Salt and pepper to taste
  • Fresh parsley for garnish

Feel free to make ingredient substitutions based on your preferences. For example, you can use linguine instead of fettuccine or substitute the shrimp with chicken or mushrooms for a vegetarian version.

Step-by-Step Instructions

Now that we have all the ingredients ready, let’s dive into the step-by-step instructions:

  1. Bring a large pot of salted water to a boil. Cook the fettuccine pasta according to the package instructions until al dente. Drain and set aside.
  2. In a large skillet, heat the olive oil and butter over medium heat. Add the minced garlic and sauté until fragrant, about 1 minute.
  3. Add the shrimp to the skillet and cook until they turn pink and opaque, about 2-3 minutes per side. Season with salt and pepper to taste. Remove the shrimp from the skillet and set aside.
  4. In the same skillet, pour in the heavy cream and bring it to a gentle simmer. Let it cook for a few minutes until it starts to thicken slightly.
  5. Add the grated Parmesan cheese to the cream sauce and stir until it melts and combines with the sauce.
  6. Return the cooked shrimp to the skillet and toss them in the creamy sauce. Cook for an additional minute to heat the shrimp through.
  7. Add the cooked fettuccine pasta to the skillet and toss it with the creamy garlic shrimp sauce until well-coated.
  8. Remove from heat and garnish with freshly chopped parsley.

Now, your creamy garlic shrimp pasta is ready to be served and enjoyed!

Expert Tips for Success

Here are some expert tips to ensure your creamy garlic shrimp pasta turns out perfectly:

  • Use fresh shrimp for the best flavor and texture.
  • Don’t overcook the shrimp to prevent them from becoming rubbery. They cook quickly, so keep a close eye on them.
  • For a spicier kick, add a pinch of red pepper flakes to the garlic and oil mixture.
  • To make the dish more vibrant, add colorful veggies like bell peppers or cherry tomatoes.

Variations and Substitutions

This recipe is incredibly versatile, allowing you to make various substitutions and modifications. Here are a few ideas to customize your creamy garlic shrimp pasta:

  • Try using different types of pasta, such as penne, rigatoni, or even gnocchi.
  • If you’re not a fan of shrimp, you can substitute it with chicken, scallops, or even tofu for a vegetarian twist.
  • Add your favorite vegetables like spinach, sun-dried tomatoes, or mushrooms to enhance the flavors and add nutritional value.

Serving Suggestions

To elevate your creamy garlic shrimp pasta experience, serve it with a side salad and some crusty garlic bread. The fresh salad will provide a refreshing contrast to the rich pasta dish, while the garlic bread will perfectly complement the flavors. Additionally, a glass of chilled white wine or a citrus-infused mocktail will bring out the flavors and create a well-rounded meal.

FAQs

Q: Can I use frozen shrimp for this recipe?

A: Yes, you can use frozen shrimp. Just make sure to thaw them thoroughly before cooking.

Q: Can I make this dish ahead of time?

A: While the dish is best enjoyed immediately, you can prepare the sauce and cook the shrimp in advance. When you’re ready to serve, simply reheat the sauce, cook the pasta, and combine everything together.

Q: Can I freeze the leftovers?

A: Cream-based sauces don’t freeze well, as they tend to separate when thawed. It’s best to enjoy the creamy garlic shrimp pasta fresh.

Final Thoughts

Creamy garlic shrimp pasta is a delightful dish that brings together the best of both worlds – seafood and pasta. With its creamy sauce, perfectly cooked shrimp, and aromatic garlic, it’s a recipe that never fails to impress. Whether you’re cooking for a special occasion or a cozy weeknight dinner, this dish is a crowd-pleaser. So, gather your ingredients, follow the simple steps, and indulge in a plateful of creamy goodness. Bon appétit!

Creamy Garlic Shrimp Pasta

Creamy Garlic Shrimp Pasta

Recipe by Author

Indulge in the delightful world of creamy garlic shrimp pasta, a dish that combines tender shrimp, creamy sauce, and aromatic garlic for a symphony of flavors. This versatile and easy-to-make recipe is sure to become a family favorite!

Course: Main Dish Cuisine: Italian Difficulty: medium
4.5 from 120 votes
🍽️
Servings
4
⏱️
Prep time
10
minutes
🔥
Cooking time
20
minutes
📊
Calories
540
kcal
Cook Mode
Keep the screen of your device on

Ingredients

  • 8 ounces fettuccine pasta
  • 1 pound shrimp, peeled and deveined
  • 4 cloves garlic, minced
  • 1 cup heavy cream
  • 1/2 cup grated Parmesan cheese
  • 2 tablespoons butter
  • 1 tablespoon olive oil
  • Salt and pepper to taste
  • Fresh parsley for garnish

Directions

  1. Bring a large pot of salted water to a boil. Cook the fettuccine pasta according to package instructions until al dente. Drain and set aside.
  2. In a large skillet, heat olive oil and butter over medium heat. Add minced garlic and sauté until fragrant, about 1 minute.
  3. Add shrimp to the skillet and cook until pink and opaque, about 2-3 minutes per side. Season with salt and pepper. Remove shrimp from skillet and set aside.
  4. In the same skillet, pour in the heavy cream and bring to a gentle simmer. Let it cook for a few minutes until it starts to thicken slightly.
  5. Add grated Parmesan cheese to the cream sauce and stir until melted and combined.
  6. Return the cooked shrimp to the skillet and toss in the creamy sauce. Cook for an additional minute to heat the shrimp through.
  7. Add the cooked fettuccine pasta to the skillet and toss with the creamy garlic shrimp sauce until well-coated.
  8. Remove from heat and garnish with freshly chopped parsley.

Nutrition Facts

Calories: 540
Fat: 33
Carbohydrates: 39
Protein: 29
Sodium: 720
Fiber: 2
Sugar: 3

Sumptuous Kentucky Blackberry Cobbler:

Introduction

Imagine a warm summer day, the sun shining brightly, and the sweet scent of ripe blackberries filling the air. There’s something truly delightful about the combination of tangy blackberries and buttery, golden crust that makes Kentucky Blackberry Cobbler a classic Southern dessert. This beloved dish has been passed down through generations, bringing joy and satisfaction to countless families.

Blackberry cobbler holds a special place in the hearts of many Kentuckians. It’s a dessert that embodies the essence of the Bluegrass State, with its rich agricultural heritage and abundance of fresh produce. This recipe is a celebration of the bountiful blackberry harvest that graces the rolling hills of Kentucky each summer.

Why You’ll Love This Recipe

There are many reasons to fall in love with this sumptuous Kentucky Blackberry Cobbler. First and foremost, it’s incredibly easy to make. With just a handful of simple ingredients and a few basic steps, you can create a mouthwatering dessert that will impress your family and friends.

Another reason to adore this recipe is its versatility. Whether you prefer a traditional cobbler or a gluten-free variation, there’s a version of this beloved dessert to suit your needs. You can also adjust the sweetness level to your liking, making it perfect for those who enjoy a more tart or sweeter treat.

Furthermore, this recipe allows you to showcase the natural flavors and textures of fresh blackberries. Each juicy bite bursts with the essence of summer, transporting you to a simpler time when life was sweeter and desserts were made with love.

Ingredients

To create this delectable Kentucky Blackberry Cobbler, you’ll need the following ingredients:

  • 4 cups fresh blackberries
  • 1 cup all-purpose flour
  • 1 cup granulated sugar
  • 1/2 cup unsalted butter, melted
  • 1 teaspoon baking powder
  • 1/2 teaspoon salt
  • 1 cup milk
  • 1 teaspoon vanilla extract

Optional: Vanilla ice cream or whipped cream for serving.

Step-by-Step Instructions

Follow these simple steps to create your own delicious Kentucky Blackberry Cobbler:

  1. Preheat your oven to 350°F (175°C). Grease a 9×9-inch baking dish.
  2. In a mixing bowl, combine the flour, sugar, baking powder, and salt.
  3. Add the melted butter, milk, and vanilla extract to the dry ingredients. Stir until just combined.
  4. Gently fold in the fresh blackberries, being careful not to crush them.
  5. Pour the batter into the greased baking dish, spreading it evenly.
  6. Bake for 45-50 minutes, or until the cobbler is golden brown and bubbling.
  7. Remove from the oven and let it cool for a few minutes before serving.
  8. Serve warm, with a scoop of vanilla ice cream or a dollop of whipped cream if desired.

Expert Tips for Success:

  • For an extra burst of flavor, add a sprinkle of cinnamon or a squeeze of lemon juice to the blackberries before folding them into the batter.
  • If you prefer a crumbly topping, you can substitute half of the flour with rolled oats or almond meal.
  • Make sure to use ripe, juicy blackberries for the best results. If fresh blackberries are not available, you can use frozen ones, but be sure to thaw them first and drain any excess liquid.

Variations and Substitutions

While this classic Kentucky Blackberry Cobbler recipe is truly delightful on its own, there are several variations and substitutions you can explore:

  • For a gluten-free version, substitute the all-purpose flour with a gluten-free flour blend.
  • If you prefer a sweeter cobbler, increase the amount of sugar in the batter or sprinkle some sugar on top before baking.
  • Add a touch of warmth and spice by incorporating a pinch of nutmeg or a dash of cinnamon into the batter.
  • For a vegan option, replace the butter with coconut oil and the milk with almond milk or another plant-based milk alternative.

Serving Suggestions

The best way to enjoy a slice of Kentucky Blackberry Cobbler is when it’s still warm from the oven. The contrast between the crispy, golden crust and the juicy blackberries is simply irresistible. For an extra touch of indulgence, serve it with a scoop of vanilla ice cream or a dollop of freshly whipped cream.

This delightful dessert pairs well with a variety of beverages. A glass of cold milk, a cup of hot tea, or a scoop of vanilla bean ice cream alongside the cobbler all make for a perfect accompaniment.

FAQs

Q: Can I use frozen blackberries instead of fresh ones?

A: Yes, you can use frozen blackberries. Just make sure to thaw them first and drain any excess liquid to prevent the cobbler from becoming too watery.

Q: Can I use other fruits instead of blackberries?

A: Absolutely! This recipe works well with various fruits, such as blueberries, raspberries, or a combination of berries. Feel free to experiment and create your own unique fruit cobbler.

Q: How should I store the leftovers?

A: If you have any leftovers (which is rare!), you can store them in an airtight container in the refrigerator for up to three days. Reheat individual portions in the microwave or oven before serving.

Final Thoughts

Kentucky Blackberry Cobbler is a timeless dessert that brings people together and evokes memories of warm summer days and cherished family gatherings. With its simple yet irresistible combination of fresh blackberries and buttery crust, this recipe is a true crowd-pleaser.

So, why not treat yourself and your loved ones to a taste of Southern comfort? Gather some fresh blackberries, roll up your sleeves, and embark on a culinary journey that will fill your home with the delightful aroma of a homemade Kentucky Blackberry Cobbler.

Try this recipe, and be prepared to fall in love with the sweet, tangy, and utterly delicious flavors that will transport you to the heart of Kentucky with every bite.

Sumptuous Kentucky Blackberry Cobbler:

Sumptuous Kentucky Blackberry Cobbler:

Recipe by Author

A classic Southern dessert featuring tangy blackberries and a buttery golden crust, Kentucky Blackberry Cobbler is a beloved dish passed down through generations in Kentucky.

Course: Dessert Cuisine: Southern Difficulty: easy
4.5 from 120 votes
🍽️
Servings
8
⏱️
Prep time
30
minutes
🔥
Cooking time
45
minutes
📊
Calories
280
kcal
Cook Mode
Keep the screen of your device on

Ingredients

  • 4 cups fresh blackberries
  • 1 cup all-purpose flour
  • 1 cup granulated sugar
  • 1/2 cup unsalted butter, melted
  • 1 teaspoon baking powder
  • 1/2 teaspoon salt
  • 1 cup milk
  • 1 teaspoon vanilla extract
  • Vanilla ice cream or whipped cream for serving

Directions

  1. Preheat your oven to 350°F (175°C). Grease a 9×9-inch baking dish.
  2. In a mixing bowl, combine the flour, sugar, baking powder, and salt.
  3. Add the melted butter, milk, and vanilla extract to the dry ingredients. Stir until just combined.
  4. Gently fold in the fresh blackberries, being careful not to crush them.
  5. Pour the batter into the greased baking dish, spreading it evenly.
  6. Bake for 45-50 minutes, or until the cobbler is golden brown and bubbling.
  7. Remove from the oven and let it cool for a few minutes before serving.
  8. Serve warm, with a scoop of vanilla ice cream or a dollop of whipped cream if desired.

Nutrition Facts

Calories: 280
Fat: 10
Carbohydrates: 47
Protein: 3
Sodium: 180
Fiber: 5
Sugar: 30

White Chocolate Strawberry Cheesecake

White Chocolate Strawberry Cheesecake: A Divine Dessert

Introduction

Indulge in the heavenly combination of creamy white chocolate and luscious strawberries with this exquisite White Chocolate Strawberry Cheesecake recipe. Whether you’re celebrating a special occasion or simply treating yourself to a delightful dessert, this recipe is sure to impress.

Imagine sinking your fork into a velvety smooth cheesecake, adorned with juicy strawberries and drizzled with a rich white chocolate ganache. The sweet and tangy flavors dance harmoniously on your taste buds, creating a symphony of pure bliss.

With its origins dating back to ancient Greece, cheesecake has stood the test of time as a beloved dessert. Its evolution has led to countless variations, and this White Chocolate Strawberry Cheesecake is a testament to the decadence and creativity that can be achieved.

Why You’ll Love This Recipe

This White Chocolate Strawberry Cheesecake recipe is more than just a dessert; it’s an experience. Here are a few reasons why you’ll fall head over heels for this indulgent treat:

Easy to Make: Despite its impressive appearance, this cheesecake comes together with ease. You don’t need to be a professional baker to create a masterpiece in your own kitchen.

Delicate and Creamy: The combination of white chocolate and cream cheese creates a velvety smooth texture that melts in your mouth. Each bite is a luxurious delight.

Bursting with Freshness: The addition of fresh strawberries adds a vibrant and refreshing element to the cheesecake. It’s like taking a bite of summer.

Customizable: While this recipe highlights the irresistible combination of white chocolate and strawberries, you can easily adapt it to your preferences. Experiment with different fruits or even add a hint of citrus for a delightful twist.

Ingredients

To create this delectable White Chocolate Strawberry Cheesecake, you’ll need the following ingredients:

  • 1 1/2 cups graham cracker crumbs
  • 1/2 cup unsalted butter, melted
  • 3 cups cream cheese, softened
  • 1 cup granulated sugar
  • 1 teaspoon vanilla extract
  • 4 large eggs
  • 8 ounces white chocolate, melted and cooled
  • 1 cup fresh strawberries, sliced
  • 1/4 cup strawberry jam
  • 1/4 cup heavy cream

Note: If desired, you can substitute the strawberries with other berries or fruits of your choice. Additionally, you can use a gluten-free alternative for the graham cracker crumbs for a gluten-free version of this cheesecake.

Step-by-Step Instructions

Follow these simple steps to create your own White Chocolate Strawberry Cheesecake:

  1. Preheat your oven to 325°F (163°C). Grease a 9-inch springform pan and set aside.
  2. In a medium bowl, combine the graham cracker crumbs and melted butter. Press the mixture evenly into the bottom of the prepared pan to form the crust.
  3. In a large mixing bowl, beat the cream cheese, sugar, and vanilla extract until smooth and creamy. Add the eggs, one at a time, mixing well after each addition.
  4. Gently fold in the melted white chocolate until well combined. Be careful not to overmix.
  5. Pour the cream cheese mixture over the crust in the prepared pan. Smooth the top with a spatula.
  6. Bake for 50-60 minutes or until the edges are set and the center is slightly jiggly.
  7. Remove the cheesecake from the oven and let it cool in the pan for 10 minutes.
  8. Meanwhile, in a small saucepan, heat the strawberry jam and heavy cream over low heat until melted and well combined.
  9. Carefully run a knife around the edges of the pan to loosen the cheesecake. Remove the sides of the springform pan.
  10. Arrange the sliced strawberries on top of the cheesecake and generously drizzle the strawberry ganache over the strawberries.
  11. Refrigerate the cheesecake for at least 4 hours, or preferably overnight, to allow it to set.
  12. Once chilled, slice and serve the White Chocolate Strawberry Cheesecake, and savor each heavenly bite.

Pro Tip: For a perfectly smooth and crack-free cheesecake, make sure all your ingredients are at room temperature before you begin.

Expert Tips for Success

Creating the perfect White Chocolate Strawberry Cheesecake requires a little finesse. Here are some expert tips to ensure your cheesecake turns out divine:

Use High-Quality White Chocolate: The quality of the white chocolate greatly impacts the flavor of the cheesecake. Choose a high-quality brand for the best results.

Avoid Overmixing: When incorporating the melted white chocolate into the cream cheese mixture, gently fold it in until just combined. Overmixing can lead to a dense and heavy texture.

Allow for Proper Cooling: Cooling the cheesecake slowly helps prevent cracks. After baking, let the cheesecake cool in the oven with the door slightly open before transferring it to the counter.

Refrigerate Overnight: While it may be tempting to dig in immediately, refrigerating the cheesecake overnight allows the flavors to meld together and results in a firmer texture.

Don’t Skip the Ganache: The luscious strawberry ganache adds an extra layer of flavor and presentation. Be generous with the drizzle for an eye-catching finish.

Variations and Substitutions

Looking to put your own spin on this White Chocolate Strawberry Cheesecake? Here are a few ideas to inspire your creativity:

Chocolate Lover’s Delight: Swap the white chocolate for dark or milk chocolate to satisfy your chocolate cravings.

Berry Bonanza: Experiment with different berries such as raspberries, blueberries, or blackberries. You can even mix them together for a medley of flavors.

Nutty Crunch: Add a delightful crunch by sprinkling some crushed nuts, such as toasted almonds or pecans, over the crust before pouring in the cream cheese mixture.

Healthier Alternatives: For a lighter version, use reduced-fat cream cheese and substitute the sugar with a natural sweetener like stevia or honey.

Serving Suggestions

This White Chocolate Strawberry Cheesecake is a showstopper on its own, but you can enhance the experience by serving it with complementary items:

Whipped Cream: Top each slice with a dollop of freshly whipped cream for an extra touch of indulgence.

Fresh Berries: Garnish the serving plate with a handful of fresh strawberries or your favorite berries for a pop of color.

Coffee or Tea: Pair this delightful dessert with a cup of freshly brewed coffee or a fragrant herbal tea for a delightful contrast of flavors.

FAQs

Q: Can I make this cheesecake in advance?

A: Absolutely! This cheesecake can be made 1-2 days in advance. Simply store it covered in the refrigerator until ready to serve.

Q: Can I freeze the cheesecake?

A: Yes, you can freeze this cheesecake for up to 3 months. Wrap it tightly in plastic wrap and aluminum foil before freezing. Thaw it overnight in the refrigerator before serving.

Q: Can I use frozen strawberries?

A: While fresh strawberries are recommended for the best taste and texture, you can use thawed and drained frozen strawberries if fresh ones are not available. Just make sure to pat them dry to avoid excess moisture.

Final Thoughts

Indulge in the blissful symphony of white chocolate and strawberries with this divine White Chocolate Strawberry Cheesecake recipe. With its creamy texture, vibrant flavors, and customizable options, it’s a dessert that will leave a lasting impression on your taste buds.

Whether you’re a seasoned baker or just starting your culinary journey, this recipe is approachable and rewarding. So gather your ingredients, put on your apron, and get ready to create a dessert masterpiece that will have everyone asking for seconds.

Make it for a special occasion, a family gathering, or simply to treat yourself. Your taste buds will thank you, and you’ll have a new favorite recipe in your repertoire. So go ahead, dive into the world of White Chocolate Strawberry Cheesecake and experience pure dessert bliss.

White Chocolate Strawberry Cheesecake

White Chocolate Strawberry Cheesecake

Recipe by Author

Indulge in the heavenly combination of creamy white chocolate and luscious strawberries with this exquisite White Chocolate Strawberry Cheesecake recipe. Whether you’re celebrating a special occasion or simply treating yourself to a delightful dessert, this recipe is sure to impress.

Course: Dessert Cuisine: American Difficulty: medium
4.5 from 120 votes
🍽️
Servings
8
⏱️
Prep time
30
minutes
🔥
Cooking time
50
minutes
📊
Calories
450
kcal
Cook Mode
Keep the screen of your device on

Ingredients

  • 1 1/2 cups graham cracker crumbs
  • 1/2 cup unsalted butter, melted
  • 3 cups cream cheese, softened
  • 1 cup granulated sugar
  • 1 teaspoon vanilla extract
  • 4 large eggs
  • 8 ounces white chocolate, melted and cooled
  • 1 cup fresh strawberries, sliced
  • 1/4 cup strawberry jam
  • 1/4 cup heavy cream

Directions

  1. Preheat your oven to 325°F (163°C). Grease a 9-inch springform pan and set aside.
  2. In a medium bowl, combine the graham cracker crumbs and melted butter. Press the mixture evenly into the bottom of the prepared pan to form the crust.
  3. In a large mixing bowl, beat the cream cheese, sugar, and vanilla extract until smooth and creamy. Add the eggs, one at a time, mixing well after each addition.
  4. Gently fold in the melted white chocolate until well combined. Be careful not to overmix.
  5. Pour the cream cheese mixture over the crust in the prepared pan. Smooth the top with a spatula.
  6. Bake for 50-60 minutes or until the edges are set and the center is slightly jiggly.
  7. Remove the cheesecake from the oven and let it cool in the pan for 10 minutes.
  8. Meanwhile, in a small saucepan, heat the strawberry jam and heavy cream over low heat until melted and well combined.
  9. Carefully run a knife around the edges of the pan to loosen the cheesecake. Remove the sides of the springform pan.
  10. Arrange the sliced strawberries on top of the cheesecake and generously drizzle the strawberry ganache over the strawberries.
  11. Refrigerate the cheesecake for at least 4 hours, or preferably overnight, to allow it to set.
  12. Once chilled, slice and serve the White Chocolate Strawberry Cheesecake, and savor each heavenly bite.

Nutrition Facts

Calories: 450
Fat: 28
Carbohydrates: 41
Protein: 8
Sodium: 300
Fiber: 2
Sugar: 30

Golden Potato and Carrot Soup

Introduction

Welcome to our golden potato and carrot soup recipe! This comforting and nutritious soup is perfect for cool evenings or when you’re in need of a hearty meal. The combination of potatoes and carrots creates a rich and creamy base, while the subtle flavors of herbs and spices add a delicious depth of flavor. Whether you’re a beginner in the kitchen or an experienced cook, this recipe is sure to impress. So grab your apron and let’s get cooking!

Why You’ll Love This Recipe

There are several reasons why this golden potato and carrot soup recipe is a must-try:

Firstly, it’s incredibly easy to make. With just a few simple ingredients and basic cooking techniques, you’ll have a steaming bowl of soup on the table in no time.

Secondly, this soup is not only delicious but also packed with nutrients. Potatoes and carrots are excellent sources of vitamins and minerals, making this recipe a great way to sneak in some extra veggies.

Lastly, this soup is versatile and customizable. Feel free to add your favorite herbs or spices to suit your taste preferences. You can also adjust the consistency by adding more broth or cream, depending on your desired thickness.

Ingredients

For this golden potato and carrot soup recipe, you will need the following ingredients:

– 4 medium-sized potatoes, peeled and diced

– 3 large carrots, peeled and diced

– 1 onion, chopped

– 3 cloves of garlic, minced

– 4 cups vegetable broth

– 1 cup heavy cream

– 2 tablespoons butter

– 1 teaspoon dried thyme

– 1 teaspoon dried rosemary

– Salt and pepper to taste

Step-by-Step Instructions

1. In a large pot, melt the butter over medium heat. Add the chopped onion and minced garlic, cooking until the onion becomes translucent.

2. Add the diced potatoes and carrots to the pot, followed by the dried thyme and rosemary. Stir well to coat the vegetables with the herbs.

3. Pour in the vegetable broth, ensuring that the vegetables are fully submerged. Bring the mixture to a boil, then reduce the heat to low and cover the pot. Allow the soup to simmer for about 20 minutes or until the potatoes and carrots are tender.

4. Once the vegetables are cooked, use an immersion blender to puree the soup until smooth and creamy. Alternatively, you can transfer the soup to a blender and blend in batches.

5. Return the soup to the stove over low heat. Stir in the heavy cream and season with salt and pepper to taste. Allow the soup to heat through, but avoid boiling it.

6. Once heated, remove the pot from the heat and serve the golden potato and carrot soup hot. Garnish with fresh herbs, such as parsley or chives, if desired.

Expert Tips for Success

– To enhance the flavors of the soup, you can sauté the diced potatoes and carrots for a few minutes before adding the broth. This step helps to caramelize the vegetables, resulting in a richer taste.

– If you prefer a chunkier soup, you can reserve a portion of the cooked vegetables before blending and add them back into the soup after pureeing.

– For a dairy-free version, you can substitute the heavy cream with coconut milk or almond milk. This will give the soup a slightly different flavor profile.

Variations and Substitutions

This golden potato and carrot soup recipe is quite versatile, allowing for various substitutions and additions:

– If you’re looking for a heartier soup, you can add cooked bacon or shredded chicken to the recipe.

– For a vegan version, you can replace the butter and heavy cream with olive oil and coconut cream, respectively.

– Feel free to experiment with different herbs and spices. Fresh thyme and rosemary can be used instead of dried, or you can add a pinch of paprika or cayenne pepper for a hint of heat.

Serving Suggestions

This golden potato and carrot soup pairs well with warm crusty bread or a side salad. You can also sprinkle some grated cheese on top for added richness. Serve the soup as a starter for a larger meal or as a satisfying main course on its own.

FAQs

Q: Can I make this soup in advance?

A: Yes, you can prepare the soup in advance and store it in the refrigerator for up to three days. Reheat it on the stove over low heat, stirring occasionally, until heated through.

Q: Can I freeze this soup?

A: Absolutely! This soup freezes well. Allow it to cool completely before transferring it to airtight containers or freezer bags. It will keep in the freezer for up to three months. Thaw the soup overnight in the refrigerator before reheating.

Q: Can I use different vegetables?

A: While this recipe specifically calls for potatoes and carrots, you can certainly experiment with other root vegetables, such as parsnips or sweet potatoes. Just keep in mind that the cooking time may vary depending on the vegetable you choose.

Final Thoughts

This golden potato and carrot soup recipe is a delightful blend of flavors and textures. It’s a cozy and satisfying dish that will warm both your body and soul. Whether you’re preparing it for a family dinner or a gathering with friends, this soup is sure to impress. So grab your soup pot and enjoy this comforting bowl of goodness!

Fluffy French Vanilla Soufflé:

Introduction

Welcome to the world of fluffy French vanilla soufflé! This classic French dessert is a true delight for the senses. With its light and airy texture, delicate vanilla flavor, and impressive rise, a well-made soufflé is sure to impress your family and friends. In this article, we will guide you through the process of creating your own masterpiece in the kitchen. So let’s dive in and uncover the secrets of this heavenly dessert!

Why You’ll Love This Recipe

There are countless reasons why you’ll fall in love with this French vanilla soufflé recipe. Firstly, it’s surprisingly easy to make, despite its reputation for being a challenging dessert. With a few simple ingredients and some careful attention to detail, you can achieve that perfect rise and lightness. Secondly, the taste is simply divine. The combination of creamy vanilla custard and the ethereal texture will transport your taste buds to dessert heaven. Lastly, this recipe can be easily customized to suit various dietary preferences. You can use dairy-free milk alternatives or even experiment with different flavorings to create your own unique twist on this classic dessert.

Ingredients

To create this fluffy French vanilla soufflé, you will need the following ingredients:

  • 4 large eggs, separated
  • 1/2 cup granulated sugar
  • 1/4 cup all-purpose flour
  • 1 cup milk
  • 1 teaspoon vanilla extract
  • Pinch of salt

Optional ingredient substitutions:

  • Replace granulated sugar with coconut sugar for a slightly caramelized flavor.
  • Use almond milk or soy milk instead of dairy milk for a dairy-free version.
  • Experiment with different flavorings such as almond extract or lemon zest for a unique twist.

Step-by-Step Instructions

Follow these simple steps to create a perfectly fluffy French vanilla soufflé:

  1. Preheat your oven to 375°F (190°C) and butter the inside of a soufflé dish.
  2. In a saucepan, heat the milk over medium heat until it starts to simmer. Remove from heat and set aside.
  3. In a mixing bowl, whisk together the egg yolks, sugar, flour, vanilla extract, and salt until well combined.
  4. Slowly pour the hot milk into the egg yolk mixture while continuously whisking. This will temper the eggs and prevent them from curdling.
  5. Transfer the mixture back into the saucepan and cook over medium heat, stirring constantly, until it thickens to a custard-like consistency.
  6. Remove the custard from heat and let it cool for a few minutes.
  7. In a separate bowl, beat the egg whites until stiff peaks form.
  8. Gently fold the beaten egg whites into the custard mixture until fully incorporated.
  9. Pour the mixture into the prepared soufflé dish and smooth the top with a spatula.
  10. Bake in the preheated oven for 25-30 minutes, or until the soufflé has risen and turned golden brown on top.
  11. Remove from the oven and serve immediately.

Pro tips:

  • Make sure the soufflé dish is buttered all the way to the rim to help the soufflé rise evenly.
  • When folding the beaten egg whites into the custard, use a gentle, sweeping motion to preserve the airiness.
  • Avoid opening the oven door during baking to prevent the soufflé from collapsing.

Expert Tips for Success

To ensure your French vanilla soufflé turns out perfectly every time, keep these expert tips in mind:

  • Separate the eggs carefully, making sure no traces of yolk end up in the egg whites. Even a small amount of fat can prevent the egg whites from whipping up properly.
  • Use room temperature eggs for easier separation and better volume when beating the egg whites.
  • Whisk the egg whites in a clean, grease-free bowl to achieve maximum volume.
  • Do not overmix the batter when incorporating the egg whites. A few streaks are fine and will contribute to the desired lightness.
  • Serve the soufflé immediately after baking, as it will start to deflate within minutes.

Variations and Substitutions

While the classic French vanilla soufflé is a true masterpiece on its own, you can get creative and customize the recipe to suit your preferences. Here are a few ideas:

  • Add a handful of chocolate chips to the batter for a decadent twist.
  • Swap the vanilla extract for almond extract for a subtle nutty flavor.
  • Zest a lemon or an orange and fold it into the batter for a refreshing citrusy note.

For dietary substitutions:

  • Replace all-purpose flour with gluten-free flour for a gluten-free version.
  • Use coconut milk or almond milk instead of dairy milk for a dairy-free and vegan-friendly alternative.
  • Replace granulated sugar with a natural sweetener like maple syrup or stevia for a refined sugar-free option.

Serving Suggestions

A fluffy French vanilla soufflé is a showstopper on its own, but you can enhance the experience by serving it with complementary accompaniments. Here are a few suggestions:

  • Dust the top of the soufflé with powdered sugar for an elegant touch.
  • Serve with a dollop of whipped cream or a scoop of vanilla ice cream for added indulgence.
  • Garnish with fresh berries, such as strawberries or raspberries, for a burst of color and freshness.
  • Pair with a cup of hot coffee or a glass of champagne for a truly special treat.

FAQs

Q: Can I prepare the batter in advance?
A: It’s best to bake the soufflé immediately after preparing the batter. The airiness of the soufflé depends on the beaten egg whites, which will begin to deflate if left to sit for too long.

Q: Why did my soufflé collapse?
A: A soufflé can collapse for several reasons, including opening the oven door too soon, underbeating or overbeating the egg whites, or overcooking the soufflé. Make sure to follow the instructions carefully and avoid these common pitfalls.

Final Thoughts

Creating a fluffy French vanilla soufflé is like taking a journey to the heart of French patisserie. With its delicate yet bold flavors and impressive rise, each bite is a moment of pure bliss. Don’t be intimidated by its reputation; with practice and attention to detail, you’ll master this culinary marvel. So gather your ingredients, preheat that oven, and let the magic unfold. Bon appétit!

Fluffy French Vanilla Soufflé:

Fluffy French Vanilla Soufflé:

Recipe by Author

Indulge in the heavenly delight of a fluffy French vanilla soufflé with its light and airy texture, delicate vanilla flavor, and impressive rise. This classic dessert is surprisingly easy to make and can be customized to suit various dietary preferences.

Course: Dessert Cuisine: French Difficulty: medium
4.5 from 120 votes
🍽️
Servings
4
⏱️
Prep time
30
minutes
🔥
Cooking time
30
minutes
📊
Calories
240
kcal
Cook Mode
Keep the screen of your device on

Ingredients

  • 4 large eggs, separated
  • 1/2 cup granulated sugar
  • 1/4 cup all-purpose flour
  • 1 cup milk
  • 1 teaspoon vanilla extract
  • Pinch of salt

Directions

  1. Preheat your oven to 375°F (190°C) and butter the inside of a soufflé dish.
  2. In a saucepan, heat the milk over medium heat until it starts to simmer. Remove from heat and set aside.
  3. In a mixing bowl, whisk together the egg yolks, sugar, flour, vanilla extract, and salt until well combined.
  4. Slowly pour the hot milk into the egg yolk mixture while continuously whisking. This will temper the eggs and prevent them from curdling.
  5. Transfer the mixture back into the saucepan and cook over medium heat, stirring constantly, until it thickens to a custard-like consistency.
  6. Remove the custard from heat and let it cool for a few minutes.
  7. In a separate bowl, beat the egg whites until stiff peaks form.
  8. Gently fold the beaten egg whites into the custard mixture until fully incorporated.
  9. Pour the mixture into the prepared soufflé dish and smooth the top with a spatula.
  10. Bake in the preheated oven for 25-30 minutes, or until the soufflé has risen and turned golden brown on top.
  11. Remove from the oven and serve immediately.

Nutrition Facts

Calories: 240
Fat: 7
Carbohydrates: 38
Protein: 8
Sodium: 160
Fiber: 1.2
Sugar: 30

Alain Ducasse’s Exquisite Beef Stroganoff:

Introduction

Welcome to this exquisite Beef Stroganoff recipe by renowned chef Alain Ducasse. This classic dish has been elevated to new heights with the chef’s unique touch and attention to detail. The Beef Stroganoff is a Russian-inspired dish that has gained popularity worldwide for its rich flavors and comforting qualities. In this recipe, Alain Ducasse shares his secrets to creating a truly unforgettable dining experience in the comfort of your own home.

Why You’ll Love This Recipe

There are several reasons why you’ll fall in love with Alain Ducasse’s Beef Stroganoff. Firstly, it’s incredibly easy to prepare, making it perfect for both experienced cooks and beginners. The recipe combines simple ingredients with a few expert techniques to create a dish that is full of flavor and texture. The tender beef, creamy sauce, and perfectly cooked mushrooms come together in harmony to create a truly decadent meal.

Additionally, this Beef Stroganoff can be customized to suit your dietary preferences. Whether you’re vegetarian, pescatarian, or following a gluten-free diet, Alain Ducasse provides alternative ingredient options to ensure that everyone can enjoy this delightful dish. With its versatility and adaptability, this recipe is sure to become a staple in your kitchen.

Ingredients

Here’s a list of ingredients you’ll need for Alain Ducasse’s Beef Stroganoff:

  • 1 pound beef tenderloin, thinly sliced
  • 1 onion, thinly sliced
  • 8 ounces mushrooms, sliced
  • 2 cloves garlic, minced
  • 1 cup beef broth
  • 1 cup sour cream
  • 2 tablespoons Dijon mustard
  • 2 tablespoons flour
  • 2 tablespoons butter
  • Salt and pepper, to taste
  • Fresh parsley, for garnish

Note: If you prefer, you can substitute the beef tenderloin with chicken or tofu for a different twist on this classic recipe.

Step-by-Step Instructions

Follow these simple steps to create Alain Ducasse’s Beef Stroganoff:

  1. Heat a large skillet over medium-high heat and melt the butter.
  2. Add the sliced onions and cook until they become translucent.
  3. Add the minced garlic and sliced mushrooms to the skillet and cook until the mushrooms are golden brown.
  4. Remove the onions and mushrooms from the skillet and set aside.
  5. In the same skillet, add the beef tenderloin slices and cook until they are browned on all sides.
  6. Remove the beef from the skillet and set aside.
  7. Add the flour to the skillet and stir until it forms a paste.
  8. Slowly pour in the beef broth while stirring continuously to avoid lumps.
  9. Bring the broth to a simmer and cook until it thickens.
  10. Stir in the sour cream and Dijon mustard until well combined.
  11. Return the onions, mushrooms, and beef to the skillet and cook for an additional 5 minutes, or until everything is heated through.
  12. Season with salt and pepper to taste.
  13. Garnish with fresh parsley and serve hot.

Cooking Tips: To ensure tender beef, make sure to slice it thinly against the grain. This will help to prevent chewiness and ensure a melt-in-your-mouth texture. Additionally, be sure to cook the mushrooms until they are golden brown. This will enhance their flavor and add a delightful nuttiness to the dish.

Expert Tips for Success

Follow these expert tips to achieve the best results with Alain Ducasse’s Beef Stroganoff:

– Use high-quality beef tenderloin for the best flavor and tenderness.

– Allow the beef to come to room temperature before cooking to ensure even cooking.

– Be mindful not to overcook the beef, as it can become tough and lose its juiciness.

– For a richer sauce, you can substitute half of the sour cream with heavy cream.

– Serve the Beef Stroganoff over buttered egg noodles or fluffy mashed potatoes for a complete meal.

Variations and Substitutions

While Alain Ducasse’s Beef Stroganoff is already a masterpiece on its own, you can customize it to suit your preferences:

– For a lighter version, you can substitute the sour cream with Greek yogurt.

– If you’re a fan of spicy flavors, add a pinch of cayenne pepper or red pepper flakes to the sauce.

– Experiment with different types of mushrooms, such as cremini or shiitake, to add depth to the dish.

– For a vegetarian twist, substitute the beef tenderloin with tofu or seitan.

Serving Suggestions

Alain Ducasse’s Beef Stroganoff pairs perfectly with a variety of side dishes and accompaniments:

– Serve it over a bed of buttered egg noodles or fluffy mashed potatoes for a classic combination.

– Pair it with a crisp green salad dressed in a tangy vinaigrette to add freshness to the meal.

– For a complete Russian-inspired feast, serve the Beef Stroganoff alongside traditional dishes like blini or pelmeni.

– Complement the flavors with a glass of dry red wine or a refreshing sparkling water with a squeeze of lemon.

FAQs

Q: Can I make this recipe ahead of time?

A: Absolutely! Alain Ducasse’s Beef Stroganoff can be made ahead of time and reheated when ready to serve. Simply store it in an airtight container in the refrigerator for up to 3 days, and gently reheat it on the stovetop or in the microwave.

Q: Can I freeze the leftovers?

A: Yes, you can freeze the Beef Stroganoff for future enjoyment. Allow it to cool completely, then transfer it to a freezer-safe container or zip-top bag. It can be stored in the freezer for up to 3 months. To thaw, simply place it in the refrigerator overnight and reheat as desired.

Q: Can I substitute the beef with another protein?

A: Absolutely! This recipe is versatile, and you can substitute the beef tenderloin with chicken, pork, or even shrimp for a delicious twist on the classic dish.

Final Thoughts

Alain Ducasse’s Beef Stroganoff is a culinary masterpiece that brings together tender beef, savory mushrooms, and a creamy sauce. With its rich flavors and comforting qualities, this dish is sure to become a favorite in your home. Whether you’re hosting a dinner party or simply craving a gourmet meal, this recipe is perfect for any occasion. So go ahead and channel your inner chef, and indulge in a truly exquisite dining experience.

Try Alain Ducasse’s Beef Stroganoff today and let your taste buds embark on a journey of culinary delight!

Alain Ducasse's Exquisite Beef Stroganoff:

Alain Ducasse’s Exquisite Beef Stroganoff:

Recipe by Author

Experience an exquisitely elevated Beef Stroganoff recipe by renowned chef Alain Ducasse. This classic dish is made with tender beef, savory mushrooms, and a creamy sauce, creating a harmonious blend of flavors and textures.

Course: Main Dish Cuisine: Russian Difficulty: medium
4.5 from 120 votes
🍽️
Servings
4
⏱️
Prep time
30
minutes
🔥
Cooking time
25
minutes
📊
Calories
450
kcal
Cook Mode
Keep the screen of your device on

Ingredients

  • 1 pound beef tenderloin, thinly sliced
  • 1 onion, thinly sliced
  • 8 ounces mushrooms, sliced
  • 2 cloves garlic, minced
  • 1 cup beef broth
  • 1 cup sour cream
  • 2 tablespoons Dijon mustard
  • 2 tablespoons flour
  • 2 tablespoons butter
  • Salt and pepper, to taste
  • Fresh parsley, for garnish

Directions

  1. Heat a large skillet over medium-high heat and melt the butter.
  2. Add the sliced onions and cook until they become translucent.
  3. Add the minced garlic and sliced mushrooms to the skillet and cook until the mushrooms are golden brown.
  4. Remove the onions and mushrooms from the skillet and set aside.
  5. In the same skillet, add the beef tenderloin slices and cook until they are browned on all sides.
  6. Remove the beef from the skillet and set aside.
  7. Add the flour to the skillet and stir until it forms a paste.
  8. Slowly pour in the beef broth while stirring continuously to avoid lumps.
  9. Bring the broth to a simmer and cook until it thickens.
  10. Stir in the sour cream and Dijon mustard until well combined.
  11. Return the onions, mushrooms, and beef to the skillet and cook for an additional 5 minutes, or until everything is heated through.
  12. Season with salt and pepper to taste.
  13. Garnish with fresh parsley and serve hot.

Nutrition Facts

Calories: 450
Fat: 30
Carbohydrates: 12
Protein: 35
Sodium: 750
Fiber: 2
Sugar: 5

Melt in Your Mouth Chicken

Introduction

Imagine sinking your teeth into a succulent piece of chicken so tender and flavorful that it practically melts in your mouth. The kind of chicken that leaves you craving for more and wondering how it’s possible to achieve such perfection. Well, look no further because we’re here to reveal the secrets to creating melt-in-your-mouth chicken that will have your taste buds dancing with delight. Whether you’re a seasoned chef or a beginner in the kitchen, this recipe is sure to impress and satisfy.

Why You’ll Love This Recipe

There are countless reasons why this melt-in-your-mouth chicken recipe deserves a spot on your dinner menu. First and foremost, it is incredibly easy to make, requiring just a few simple ingredients and minimal effort. You don’t need any fancy cooking techniques or equipment to achieve outstanding results. Secondly, the end result is a chicken dish that is incredibly tender and moist, with flavors that are perfectly balanced and irresistibly delicious. It’s the kind of recipe that will make you feel like a culinary genius, even if you’re a novice in the kitchen.

Additionally, this recipe is versatile and can be easily customized to suit your preferences or dietary needs. Whether you prefer a touch of spice or want to add a hint of sweetness, you can easily adapt this recipe to create a chicken dish that is uniquely yours. Furthermore, this melt-in-your-mouth chicken is not only a crowd-pleaser but also a healthier alternative to fried chicken. By using cooking techniques that retain moisture and flavor, you can enjoy a guilt-free and wholesome meal without sacrificing taste.

Ingredients

To create this melt-in-your-mouth chicken masterpiece, you will need the following ingredients:

– 4 boneless, skinless chicken breasts

– 1/2 cup plain Greek yogurt

– 2 tablespoons olive oil

– 2 cloves of garlic, minced

– 1 teaspoon paprika

– 1 teaspoon dried thyme

– 1 teaspoon salt

– 1/2 teaspoon black pepper

– Juice of 1 lemon

– Fresh parsley, for garnish (optional)

Step-by-Step Instructions

Follow these simple steps to create melt-in-your-mouth chicken:

  1. Preheat your oven to 375°F (190°C).
  2. In a bowl, combine the Greek yogurt, olive oil, minced garlic, paprika, dried thyme, salt, black pepper, and lemon juice. Mix well until all the ingredients are thoroughly combined.
  3. Place the chicken breasts in a baking dish and pour the yogurt mixture over them, ensuring that each piece is evenly coated.
  4. Cover the baking dish with aluminum foil and bake for 25-30 minutes or until the chicken is cooked through and tender.
  5. Remove the foil and broil the chicken for an additional 2-3 minutes to achieve a golden brown, slightly crispy exterior.
  6. Once cooked, remove the chicken from the oven and let it rest for a few minutes before serving. Garnish with fresh parsley if desired.

Pro tip: For an extra burst of flavor, marinate the chicken in the yogurt mixture for at least 30 minutes before baking. This will help to tenderize the meat and infuse it with even more deliciousness.

Expert Tips for Success

Here are some expert tips to ensure your melt-in-your-mouth chicken turns out perfectly every time:

– Use high-quality chicken breasts that are fresh and free from any added hormones or antibiotics.

– Don’t overcook the chicken. Follow the recommended cooking time and check for doneness by inserting a meat thermometer into the thickest part of the chicken. It should read 165°F (74°C).

– Allow the chicken to rest after cooking. This allows the juices to redistribute, resulting in a more tender and flavorful final dish.

– Experiment with different herbs and spices to customize the flavor profile of your chicken. Consider adding cayenne pepper for a spicy kick or smoked paprika for a smoky twist.

Variations and Substitutions

While this melt-in-your-mouth chicken recipe is already a winner, feel free to get creative and customize it to your liking. Here are a few variations and substitutions you can try:

– Swap out the Greek yogurt for buttermilk or sour cream for a tangier flavor.

– Add a tablespoon of honey or maple syrup to the yogurt mixture for a touch of sweetness.

– Sprinkle grated Parmesan cheese or breadcrumbs on top of the chicken before broiling for an extra crispy crust.

– For a Mediterranean twist, add chopped olives, sun-dried tomatoes, and feta cheese to the yogurt mixture.

Serving Suggestions

Now that you’ve mastered the art of creating melt-in-your-mouth chicken, it’s time to think about how to serve this delectable dish. Here are a few serving suggestions to take your meal to the next level:

– Serve the chicken over a bed of fluffy mashed potatoes or creamy polenta for a comforting and satisfying meal.

– Pair it with a refreshing salad dressed in a light vinaigrette to balance out the richness of the chicken.

– Serve alongside steamed vegetables such as broccoli, green beans, or roasted carrots for a nutritious and well-rounded meal.

– Don’t forget to squeeze some fresh lemon juice over the chicken right before serving to enhance the flavors even more.

FAQs

Q: Can I use bone-in chicken for this recipe?

A: Absolutely! Bone-in chicken thighs or drumsticks work just as well and can result in even juicier and more flavorful chicken.

Q: Can I grill the chicken instead of baking it?

A: Certainly! Grilling the chicken will add a smoky flavor and beautiful grill marks. Just be sure to adjust the cooking time accordingly.

Q: Can I make this recipe ahead of time?

A: While the chicken is best enjoyed immediately after cooking, you can prepare the yogurt mixture and marinate the chicken in advance to save time. Simply cover and refrigerate until ready to bake.

Final Thoughts

Creating melt-in-your-mouth chicken is easier than you think, and this recipe is the ultimate guide to achieving poultry perfection. With its tender, juicy texture and well-balanced flavors, this chicken dish will become a family favorite in no time. Customize it to suit your taste buds, experiment with different variations, and enjoy the satisfaction of creating a restaurant-quality meal in the comfort of your own kitchen. So go ahead, give this recipe a try, and prepare to be amazed by the melt-in-your-mouth goodness that awaits you.

Melt in Your Mouth Chicken

Melt in Your Mouth Chicken

Recipe by Author

Learn the secrets to creating melt-in-your-mouth chicken that is tender, flavorful, and sure to impress. This easy recipe requires minimal effort and simple ingredients to achieve outstanding results.

Course: Main Course Cuisine: Global Difficulty: easy
4.5 from 120 votes
🍽️
Servings
4
⏱️
Prep time
15
minutes
🔥
Cooking time
30
minutes
📊
Calories
280
kcal
Cook Mode
Keep the screen of your device on

Ingredients

  • 4 boneless, skinless chicken breasts
  • 1/2 cup plain Greek yogurt
  • 2 tablespoons olive oil
  • 2 cloves of garlic, minced
  • 1 teaspoon paprika
  • 1 teaspoon dried thyme
  • 1 teaspoon salt
  • 1/2 teaspoon black pepper
  • Juice of 1 lemon
  • Fresh parsley, for garnish (optional)

Directions

  1. Preheat your oven to 375°F (190°C).
  2. In a bowl, combine the Greek yogurt, olive oil, minced garlic, paprika, dried thyme, salt, black pepper, and lemon juice. Mix well until all the ingredients are thoroughly combined.
  3. Place the chicken breasts in a baking dish and pour the yogurt mixture over them, ensuring that each piece is evenly coated.
  4. Cover the baking dish with aluminum foil and bake for 25-30 minutes or until the chicken is cooked through and tender.
  5. Remove the foil and broil the chicken for an additional 2-3 minutes to achieve a golden brown, slightly crispy exterior.
  6. Once cooked, remove the chicken from the oven and let it rest for a few minutes before serving. Garnish with fresh parsley if desired.

Nutrition Facts

Calories: 280
Fat: 10
Carbohydrates: 5
Protein: 40
Sodium: 600
Fiber: 1
Sugar: 2