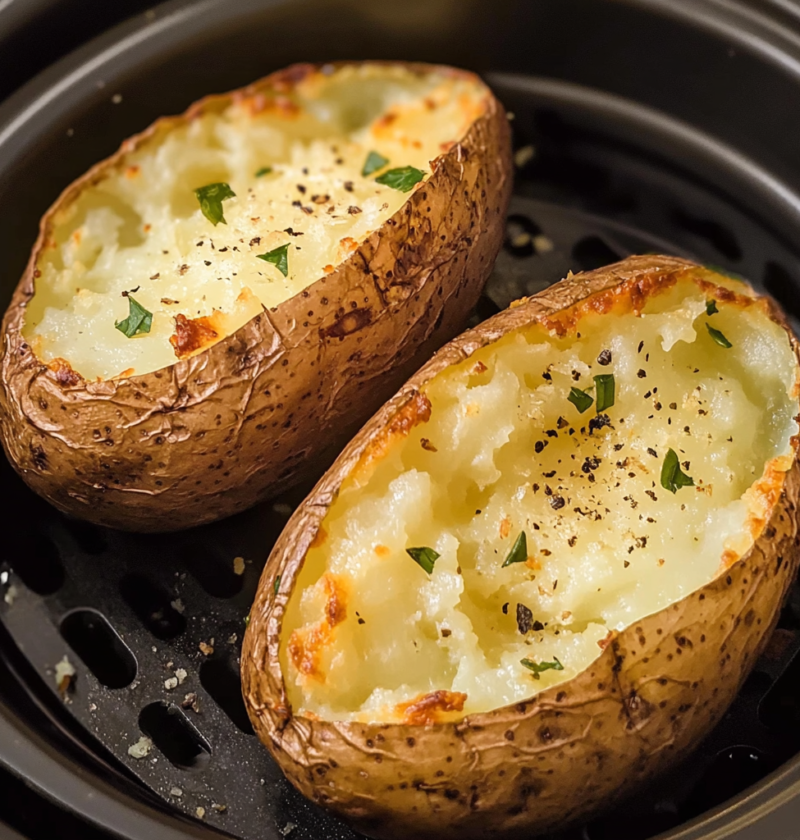
Flaky and Time-Honored: grandma pie recipe

Introduction

There’s nothing quite like the taste of a homemade pie, especially when it’s a recipe passed down through generations. In this article, we’ll delve into the delightful world of grandma pies and explore a timeless recipe that will transport you back to simpler times. This flaky and time-honored grandma pie recipe is a true gem, combining a buttery crust with a luscious filling that will leave your taste buds craving more. So, put on your apron and get ready to embark on a delicious journey!

Why You’ll Love This Recipe

This grandma pie recipe is a favorite for many reasons. Firstly, it’s incredibly easy to make, even for beginners in the kitchen. With just a few simple ingredients and some basic baking skills, you’ll have a pie that rivals those from the best bakeries. Secondly, the crust is unbelievably flaky, thanks to the perfect ratio of butter and flour. Lastly, the filling is versatile, allowing you to experiment with different fruits and flavors. Whether you prefer classic apple or want to try something more adventurous like mixed berries, this recipe has got you covered.

Ingredients

Here are the ingredients you’ll need to make this delectable grandma pie:

– 2 ½ cups all-purpose flour

– 1 teaspoon salt

– 1 cup unsalted butter, cold and cubed

– ½ cup ice water

– 6 cups your choice of fruit (e.g., apples, peaches, berries)

– 1 cup granulated sugar

– ¼ cup cornstarch

– 1 tablespoon lemon juice

– 1 teaspoon vanilla extract

Step-by-Step Instructions

Follow these simple steps to create your own grandma pie:

1. In a large mixing bowl, combine the flour and salt. Add the cold, cubed butter and use a pastry cutter or your fingers to cut the butter into the flour until the mixture resembles coarse crumbs.

2. Gradually add the ice water, a tablespoon at a time, mixing with a fork until the dough starts to come together. Be careful not to overmix.

3. Divide the dough into two equal portions and shape each into a disk. Wrap them in plastic wrap and refrigerate for at least 1 hour.

4. Preheat your oven to 375°F (190°C). In a separate bowl, combine the fruit, sugar, cornstarch, lemon juice, and vanilla extract. Toss gently until the fruit is evenly coated.

5. Roll out one of the dough disks on a lightly floured surface until it’s about 12 inches in diameter. Carefully transfer the dough to a 9-inch pie dish, gently pressing it into the bottom and sides.

6. Pour the fruit mixture into the pie crust and spread it out evenly. Roll out the second dough disk and place it on top of the fruit filling. Trim any excess dough and crimp the edges to seal.

7. Cut a few slits on the top crust to allow steam to escape. Place the pie on a baking sheet to catch any drips and bake for 45-50 minutes, or until the crust is golden brown and the filling is bubbling.

8. Remove the pie from the oven and let it cool for at least 2 hours before slicing and serving. This allows the filling to set and ensures clean slices.

Expert Tips for Success

Here are some tips to help you achieve pie perfection:

– Make sure your butter is cold. This will help create a flaky crust.

– Don’t overmix the dough. Mix until it just comes together to avoid developing gluten, which can make the crust tough.

– Use a variety of apples for the filling to add complexity and depth of flavor.

– Serve the pie warm with a scoop of vanilla ice cream for an extra special treat.

Variations and Substitutions

While this grandma pie recipe is delicious as is, feel free to get creative and customize it to your liking. Here are some ideas:

– Add a sprinkle of cinnamon or nutmeg to the fruit filling for a warm and cozy flavor.

– Experiment with different crust designs, such as a lattice or decorative cutouts.

– Substitute the all-purpose flour with whole wheat flour for a slightly nutty taste.

– For a gluten-free version, use a gluten-free flour blend and make sure your other ingredients are also gluten-free.

Serving Suggestions

This grandma pie is a delightful dessert on its own, but you can take it to the next level with these serving suggestions:

– Serve warm with a dollop of freshly whipped cream or a scoop of your favorite ice cream.

– Drizzle caramel sauce or chocolate ganache over the top for an indulgent twist.

– Pair with a hot cup of coffee or a glass of cold milk for a satisfying treat.

FAQs

Here are some common questions readers have about grandma pie:

Q: Can I make the pie crust ahead of time?

A: Absolutely! The pie crust can be made up to 3 days in advance. Just wrap it tightly in plastic wrap and store it in the refrigerator until you’re ready to use it.

Q: Can I freeze the pie?

A: Yes, you can freeze the assembled but unbaked pie. Wrap it tightly in plastic wrap and aluminum foil before placing it in the freezer. When you’re ready to bake it, simply remove the wrapping and bake from frozen, adding a few extra minutes to the baking time.

Q: Can I use frozen fruit instead of fresh?

A: Yes, frozen fruit can be used, but make sure to thaw and drain it before using. Excess liquid from frozen fruit can make the pie filling too watery.

Final Thoughts

Grandma pies hold a special place in our hearts, reminding us of cherished family traditions and the love baked into every bite. This flaky and time-honored grandma pie recipe captures the essence of homemade goodness and offers endless possibilities for personalization. So, gather your loved ones, roll up your sleeves, and create a pie that will create new memories to be passed down for generations. Happy baking!

Flaky and Time-Honored:  grandma pie recipe

Flaky and Time-Honored: grandma pie recipe

Recipe by Author

A delightful grandma pie recipe passed down through generations, featuring a buttery crust and a luscious fruit filling that is versatile and perfect for any occasion.

Course: Dessert Cuisine: American Difficulty: medium
4.5 from 130 votes
🍽️
Servings
8
⏱️
Prep time
30
minutes
🔥
Cooking time
50
minutes
📊
Calories
320
kcal
Cook Mode
Keep the screen of your device on

Ingredients

  • 2 ½ cups all-purpose flour
  • 1 teaspoon salt
  • 1 cup unsalted butter, cold and cubed
  • ½ cup ice water
  • 6 cups fruit (e.g., apples, peaches, berries)
  • 1 cup granulated sugar
  • ¼ cup cornstarch
  • 1 tablespoon lemon juice
  • 1 teaspoon vanilla extract

Directions

  1. In a large mixing bowl, combine the flour and salt. Add the cold, cubed butter and use a pastry cutter or your fingers to cut the butter into the flour until the mixture resembles coarse crumbs.
  2. Gradually add the ice water, a tablespoon at a time, mixing with a fork until the dough starts to come together. Be careful not to overmix.
  3. Divide the dough into two equal portions and shape each into a disk. Wrap them in plastic wrap and refrigerate for at least 1 hour.
  4. Preheat your oven to 375°F (190°C). In a separate bowl, combine the fruit, sugar, cornstarch, lemon juice, and vanilla extract. Toss gently until the fruit is evenly coated.
  5. Roll out one of the dough disks on a lightly floured surface until it's about 12 inches in diameter. Carefully transfer the dough to a 9-inch pie dish, gently pressing it into the bottom and sides.
  6. Pour the fruit mixture into the pie crust and spread it out evenly. Roll out the second dough disk and place it on top of the fruit filling. Trim any excess dough and crimp the edges to seal.
  7. Cut a few slits on the top crust to allow steam to escape. Place the pie on a baking sheet to catch any drips and bake for 45-50 minutes, or until the crust is golden brown and the filling is bubbling.
  8. Remove the pie from the oven and let it cool for at least 2 hours before slicing and serving. This allows the filling to set and ensures clean slices.

Nutrition Facts

Calories: 320
Fat: 16
Carbohydrates: 42
Protein: 3
Sodium: 230
Fiber: 2
Sugar: 22

Decadent Reese’s Peanut Butter Chocolate Chip Cookie Bites

Introduction

Have you ever craved a sweet treat that combines the irresistible flavors of peanut butter and chocolate? Look no further than Decadent Reese’s Peanut Butter Chocolate Chip Cookie Bites. These bite-sized delights are the perfect balance of creamy peanut butter, rich chocolate chips, and soft cookie dough. Whether you’re a fan of Reese’s Peanut Butter Cups or simply love the classic combination of peanut butter and chocolate, these cookie bites will satisfy your sweet tooth and leave you wanting more.

Why You’ll Love This Recipe

There are several reasons why you’ll fall in love with these Decadent Reese’s Peanut Butter Chocolate Chip Cookie Bites:

1. Easy to make: This recipe requires simple ingredients and basic baking techniques, making it accessible for both beginner and experienced bakers.

2. Irresistible flavor: The combination of peanut butter and chocolate is a match made in dessert heaven. Each bite is bursting with rich and creamy flavors.

3. Bite-sized indulgence: These cookie bites are the perfect size for snacking or serving at parties. They offer a satisfying treat without overwhelming your taste buds.

4. Versatile: You can enjoy these cookie bites on their own or pair them with your favorite ice cream, hot fudge, or a glass of milk.

Ingredients

To make Decadent Reese’s Peanut Butter Chocolate Chip Cookie Bites, you will need the following ingredients:

– 1 cup of creamy peanut butter

– 1/2 cup of unsalted butter, softened

– 1/2 cup of granulated sugar

– 1/2 cup of packed brown sugar

– 1 large egg

– 1 teaspoon of vanilla extract

– 1 and 1/2 cups of all-purpose flour

– 1/2 teaspoon of baking soda

– 1/4 teaspoon of salt

– 1 cup of chocolate chips

– Optional: additional chocolate chips for topping

Step-by-Step Instructions

Follow these simple steps to create your own Decadent Reese’s Peanut Butter Chocolate Chip Cookie Bites:

1. Preheat your oven to 350°F (175°C) and line a baking sheet with parchment paper.

2. In a large mixing bowl, cream together the peanut butter, softened butter, granulated sugar, and brown sugar until smooth and well combined.

3. Add the egg and vanilla extract to the peanut butter mixture and mix until fully incorporated.

4. In a separate bowl, whisk together the all-purpose flour, baking soda, and salt.

5. Gradually add the dry ingredients to the peanut butter mixture, mixing until just combined.

6. Fold in the chocolate chips, ensuring they are evenly distributed throughout the dough.

7. Using a cookie scoop or tablespoon, portion out the dough onto the prepared baking sheet, leaving some space between each cookie bite.

8. Optional: Gently press a few additional chocolate chips onto the top of each cookie bite for extra chocolatey goodness.

9. Bake in the preheated oven for 10-12 minutes, or until the edges are golden brown.

10. Remove from the oven and allow the cookie bites to cool on the baking sheet for a few minutes before transferring them to a wire rack to cool completely.

Expert Tips for Success

Follow these expert tips to ensure your Decadent Reese’s Peanut Butter Chocolate Chip Cookie Bites turn out perfectly:

– Use creamy peanut butter: Creamy peanut butter provides a smooth and consistent texture throughout the cookie bites.

– Soften the butter: Make sure the butter is softened to room temperature before creaming it with the other ingredients. This will ensure a smooth and well-incorporated dough.

– Do not overmix the dough: Overmixing the dough can result in dense and tough cookie bites. Mix until just combined to maintain a soft and tender texture.

– Use parchment paper: Lining your baking sheet with parchment paper will prevent the cookie bites from sticking and make cleanup a breeze.

– Allow for cooling time: Let the cookie bites cool on the baking sheet for a few minutes before transferring them to a wire rack. This will help them set and maintain their shape.

Variations and Substitutions

Feel free to get creative and customize your Decadent Reese’s Peanut Butter Chocolate Chip Cookie Bites:

– Nut-free option: If you have a nut allergy or prefer to avoid peanuts, you can substitute the peanut butter with almond butter or sunflower seed butter.

– Gluten-free option: To make these cookie bites gluten-free, use a gluten-free all-purpose flour blend instead of regular all-purpose flour.

– Extra mix-ins: Add chopped nuts, shredded coconut, or dried fruit to the dough for additional flavor and texture.

Serving Suggestions

Decadent Reese’s Peanut Butter Chocolate Chip Cookie Bites are delicious on their own, but you can take your enjoyment to the next level with these serving suggestions:

– Ice cream sandwich: Place a scoop of your favorite ice cream between two cookie bites for a delightful ice cream sandwich.

– Warm and gooey: Microwave a cookie bite for a few seconds to enjoy a warm and gooey treat.

– Pair with milk: Dip these cookie bites in a glass of cold milk for a classic and comforting combination.

FAQs

Q: Can I freeze the dough?

A: Yes, you can freeze the dough for later use. Shape the dough into balls and place them on a baking sheet lined with parchment paper. Freeze until solid, then transfer the dough balls to a freezer-safe bag or container. When ready to bake, simply place the frozen dough balls on a baking sheet and bake as directed, adding a few extra minutes to the baking time.

Q: How long do these cookie bites stay fresh?

A: These cookie bites can be stored in an airtight container at room temperature for up to 5 days. For longer storage, you can keep them in the refrigerator for up to 1 week or freeze them for up to 3 months.

Q: Can I use chunky peanut butter?

A: Chunky peanut butter can be used if you prefer the added crunch of peanut pieces in your cookie bites. However, keep in mind that it will slightly alter the texture of the final result.

Final Thoughts

Decadent Reese’s Peanut Butter Chocolate Chip Cookie Bites are the ultimate treat for peanut butter and chocolate lovers. With their irresistible flavors, bite-sized indulgence, and easy preparation, they are sure to become a favorite in your household. Whether you enjoy them on their own or get creative with serving suggestions, these cookie bites will satisfy your cravings and leave you with a smile. Give this recipe a try and share your delightful experiences with friends and family. Happy baking!

Decadent Reese's Peanut Butter Chocolate Chip Cookie Bites

Decadent Reese’s Peanut Butter Chocolate Chip Cookie Bites

Recipe by Author

Bite-sized delights that combine creamy peanut butter, rich chocolate chips, and soft cookie dough to create the perfect balance of flavors. Whether you’re a fan of Reese’s Peanut Butter Cups or simply love the classic combination of peanut butter and chocolate, these cookie bites will satisfy your sweet tooth and leave you wanting more.

Course: Dessert Cuisine: American Difficulty: easy
4.5 from 120 votes
🍽️
Servings
24
⏱️
Prep time
20
minutes
🔥
Cooking time
10
minutes
📊
Calories
180
kcal
Cook Mode
Keep the screen of your device on

Ingredients

  • 1 cup creamy peanut butter
  • 1/2 cup unsalted butter, softened
  • 1/2 cup granulated sugar
  • 1/2 cup packed brown sugar
  • 1 large egg
  • 1 teaspoon vanilla extract
  • 1 and 1/2 cups all-purpose flour
  • 1/2 teaspoon baking soda
  • 1/4 teaspoon salt
  • 1 cup chocolate chips
  • Optional: additional chocolate chips for topping

Directions

  1. Preheat oven to 350°F (175°C) and line a baking sheet with parchment paper.
  2. Cream together peanut butter, softened butter, granulated sugar, and brown sugar in a large mixing bowl until smooth and well combined.
  3. Add egg and vanilla extract to the peanut butter mixture and mix until fully incorporated.
  4. Whisk together all-purpose flour, baking soda, and salt in a separate bowl.
  5. Gradually add the dry ingredients to the peanut butter mixture, mixing until just combined.
  6. Fold in chocolate chips, ensuring they are evenly distributed throughout the dough.
  7. Portion out the dough onto the prepared baking sheet using a cookie scoop or tablespoon, leaving space between each cookie bite.
  8. Optional: Press a few additional chocolate chips onto the top of each cookie bite.
  9. Bake in the preheated oven for 10-12 minutes, or until edges are golden brown.
  10. Allow the cookie bites to cool on the baking sheet for a few minutes before transferring them to a wire rack to cool completely.

Nutrition Facts

Calories: 180
Fat: 10
Carbohydrates: 20
Protein: 4
Sodium: 120
Fiber: 1
Sugar: 14

Indulge in Love: Sun-Dried Tomato Parmesan Chicken Pasta

Introduction

Welcome to a culinary adventure that will transport you to the sun-drenched hills of Italy. Indulge in the irresistible flavors of our Sun-Dried Tomato Parmesan Chicken Pasta recipe. This dish combines tender chicken, al dente pasta, and a luscious sun-dried tomato Parmesan sauce that will tantalize your taste buds. Whether you’re a seasoned chef or a novice in the kitchen, this recipe is sure to impress.

Why You’ll Love This Recipe

There are countless reasons why this Sun-Dried Tomato Parmesan Chicken Pasta recipe is a must-try. Firstly, it’s incredibly easy to make, perfect for those busy weeknights when time is of the essence. Secondly, it’s bursting with flavor, thanks to the combination of sun-dried tomatoes and Parmesan cheese. And lastly, it’s a versatile dish that can be enjoyed by both meat lovers and vegetarians alike.

Ingredients

To create this mouthwatering dish, you’ll need the following ingredients:

– 8 ounces of penne pasta

– 2 boneless, skinless chicken breasts

– 1 tablespoon of olive oil

– 3 cloves of garlic, minced

– 1 cup of heavy cream

– 1/2 cup of grated Parmesan cheese

– 1/4 cup of sun-dried tomatoes, thinly sliced

– Salt and pepper to taste

Step-by-Step Instructions

Follow these simple steps to create a culinary masterpiece:

  1. Cook the penne pasta according to the package instructions. Drain and set aside.
  2. In a large skillet, heat the olive oil over medium heat. Season the chicken breasts with salt and pepper, then add them to the skillet. Cook for 6-8 minutes per side, or until cooked through. Remove the chicken from the skillet and set aside to rest.
  3. In the same skillet, add the minced garlic and sauté for 1 minute, until fragrant.
  4. Pour in the heavy cream and bring to a simmer. Cook for 2-3 minutes, stirring constantly.
  5. Add the grated Parmesan cheese and stir until melted and smooth.
  6. Stir in the sun-dried tomatoes and cook for an additional minute.
  7. Slice the cooked chicken breasts into thin strips.
  8. Add the cooked penne pasta and sliced chicken to the skillet. Toss until well coated in the sauce.
  9. Season with additional salt and pepper, if desired.
  10. Serve hot and enjoy!

Expert Tips for Success

Here are some helpful tips to ensure your Sun-Dried Tomato Parmesan Chicken Pasta turns out perfectly:

  • Use freshly grated Parmesan cheese for the best flavor.
  • For a lighter version, you can substitute half-and-half or milk for the heavy cream.
  • Feel free to add some crushed red pepper flakes for a little kick of heat.
  • If you prefer a creamier sauce, you can add an extra splash of heavy cream.

Variations and Substitutions

While our Sun-Dried Tomato Parmesan Chicken Pasta recipe is already delicious as is, you can easily customize it to suit your taste preferences. Here are some variations and substitutions you can try:

  • Swap the penne pasta for your favorite pasta shape, such as farfalle or rigatoni.
  • Add some fresh spinach or arugula to the sauce for an extra dose of greens.
  • Replace the chicken with sautéed shrimp or grilled vegetables for a vegetarian option.
  • If you’re not a fan of sun-dried tomatoes, you can use cherry tomatoes instead.

Serving Suggestions

To truly indulge in the flavors of this dish, we recommend serving it with a side of garlic bread or a crisp green salad. A glass of chilled white wine or a refreshing lemonade would also pair beautifully with the rich and creamy flavors of the Sun-Dried Tomato Parmesan Chicken Pasta.

FAQs

Q: Can I make this recipe ahead of time?

A: While this dish is best enjoyed fresh, you can prepare the sauce and cook the chicken in advance. Simply reheat the sauce and chicken, cook the pasta, and then combine everything together when you’re ready to serve.

Q: Can I freeze the leftovers?

A: Yes, you can freeze any leftovers in an airtight container for up to 3 months. To reheat, simply thaw in the refrigerator overnight and then warm it up in the microwave or on the stovetop.

Final Thoughts

Indulge in the flavors of Italy with our irresistible Sun-Dried Tomato Parmesan Chicken Pasta recipe. With its creamy sauce, tender chicken, and al dente pasta, this dish is a true crowd-pleaser. Whether you’re cooking for yourself, your family, or hosting a dinner party, this recipe is sure to impress. So grab your apron, gather the ingredients, and get ready to embark on a culinary journey that will delight your taste buds and transport you to the heart of Italy.

Indulge in Love: Sun-Dried Tomato Parmesan Chicken Pasta

Indulge in Love: Sun-Dried Tomato Parmesan Chicken Pasta

Recipe by Author

Indulge in the irresistible flavors of Sun-Dried Tomato Parmesan Chicken Pasta, a dish that combines tender chicken, al dente pasta, and a luscious sun-dried tomato Parmesan sauce. Perfect for busy weeknights, bursting with flavor, and enjoyed by both meat lovers and vegetarians.

Course: Main Dish Cuisine: Italian Difficulty: Medium
4.5 from 120 votes
🍽️
Servings
4
⏱️
Prep time
15
minutes
🔥
Cooking time
30
minutes
📊
Calories
650
kcal
Cook Mode
Keep the screen of your device on

Ingredients

  • 8 ounces penne pasta
  • 2 boneless, skinless chicken breasts
  • 1 tablespoon olive oil
  • 3 cloves garlic, minced
  • 1 cup heavy cream
  • 1/2 cup grated Parmesan cheese
  • 1/4 cup sun-dried tomatoes, thinly sliced
  • Salt and pepper to taste

Directions

  1. Cook the penne pasta according to the package instructions. Drain and set aside.
  2. In a large skillet, heat the olive oil over medium heat. Season the chicken breasts with salt and pepper, then add them to the skillet. Cook for 6-8 minutes per side. Remove the chicken from the skillet and set aside.
  3. In the same skillet, add the minced garlic and sauté for 1 minute.
  4. Pour in the heavy cream and bring to a simmer. Cook for 2-3 minutes, stirring constantly.
  5. Add the grated Parmesan cheese and stir until melted and smooth.
  6. Stir in the sun-dried tomatoes and cook for an additional minute.
  7. Slice the cooked chicken breasts into thin strips.
  8. Add the cooked penne pasta and sliced chicken to the skillet. Toss until well coated in the sauce.
  9. Season with additional salt and pepper if desired.
  10. Serve hot and enjoy!

Nutrition Facts

Calories: 650
Fat: 38
Carbohydrates: 45
Protein: 28
Sodium: 720
Fiber: 3
Sugar: 4

Million Dollar Lasagna with Rich Meat Sauce and Creamy Cheese

Introduction

Are you ready for a mouthwatering and indulgent dish that will leave you craving for more? Look no further than the Million Dollar Lasagna with Rich Meat Sauce and Creamy Cheese. This recipe takes the classic lasagna to a whole new level, combining layers of perfectly cooked pasta, a flavorful meat sauce, and a creamy cheese filling. Whether you’re hosting a dinner party or simply treating yourself to a special meal, this Million Dollar Lasagna is sure to impress.

Why You’ll Love This Recipe

There are countless reasons why this Million Dollar Lasagna recipe is a must-try. Firstly, it’s surprisingly easy to make, despite its impressive appearance. With just a few simple steps, you’ll have a gourmet-worthy lasagna that will wow your taste buds. Secondly, the combination of the rich meat sauce and creamy cheese filling creates a symphony of flavors that are out of this world. Lastly, this lasagna is incredibly versatile and can be enjoyed by both meat lovers and vegetarians. By replacing the meat sauce with a flavorful vegetable sauce, you can easily cater to different dietary preferences.

Ingredients

To create this delectable Million Dollar Lasagna, you’ll need the following ingredients:

  • 1 pound ground beef
  • 1 onion, chopped
  • 3 cloves garlic, minced
  • 1 can crushed tomatoes
  • 2 tablespoons tomato paste
  • 1 teaspoon dried oregano
  • 1 teaspoon dried basil
  • Salt and pepper to taste
  • 12 lasagna noodles
  • 2 cups ricotta cheese
  • 1 cup grated Parmesan cheese
  • 2 cups shredded mozzarella cheese
  • Fresh basil leaves for garnish

Note: Feel free to customize the recipe by adding your favorite vegetables or substituting the ground beef with ground turkey or plant-based alternatives.

Step-by-Step Instructions

  1. In a large skillet, cook the ground beef over medium heat until browned. Add the chopped onion and minced garlic, and cook until the onion is translucent.
  2. Add the crushed tomatoes, tomato paste, dried oregano, dried basil, salt, and pepper to the skillet. Stir well to combine and simmer for 20 minutes, allowing the flavors to meld together.
  3. Meanwhile, cook the lasagna noodles according to the package instructions. Drain and set aside.
  4. In a mixing bowl, combine the ricotta cheese and grated Parmesan cheese. Mix well until smooth and creamy.
  5. Preheat your oven to 375°F (190°C).
  6. To assemble the lasagna, spread a thin layer of the meat sauce on the bottom of a baking dish. Place a layer of cooked lasagna noodles on top, followed by a layer of the ricotta cheese mixture. Repeat these layers until all the ingredients are used, finishing with a layer of meat sauce on top.
  7. Sprinkle the shredded mozzarella cheese evenly over the top layer of meat sauce.
  8. Cover the baking dish with aluminum foil and bake for 25 minutes.
  9. Remove the foil and bake for an additional 10-15 minutes, or until the cheese is bubbly and golden.
  10. Remove the lasagna from the oven and let it cool for a few minutes before serving.
  11. Garnish with fresh basil leaves and serve hot.

Expert Tips for Success

Here are a few expert tips to ensure your Million Dollar Lasagna turns out perfectly every time:

  • Use oven-ready lasagna noodles to save time and avoid the hassle of pre-cooking the noodles.
  • Allow the lasagna to rest for 10-15 minutes after removing it from the oven. This will make it easier to slice and serve.
  • Feel free to add extra vegetables to the meat sauce for added flavor and nutritional value. Chopped bell peppers, mushrooms, or spinach work wonderfully.
  • For a crispy top layer, broil the lasagna on low for a few minutes after baking. Keep a close eye on it to prevent burning.

Variations and Substitutions

This Million Dollar Lasagna recipe is highly customizable to suit your taste preferences and dietary needs. Here are a few variations and substitutions you can try:

  • Vegetarian Lasagna: Swap the ground beef for a combination of sautéed vegetables such as zucchini, bell peppers, and mushrooms. Add extra spices or a splash of balsamic vinegar for added depth of flavor.
  • Seafood Lasagna: Replace the ground beef with cooked shrimp, crab, or a combination of seafood. Be sure to season the seafood with your favorite seafood seasoning.
  • Gluten-Free Lasagna: Use gluten-free lasagna noodles and double-check that all other ingredients, such as tomato paste and spices, are gluten-free.

Serving Suggestions

This Million Dollar Lasagna is a substantial and satisfying dish on its own, but you can elevate the meal by serving it with a few complementary sides. Here are some serving suggestions:

  • Garlic Bread: Serve warm garlic bread on the side to soak up the delicious meat sauce.
  • Green Salad: Pair the lasagna with a crisp green salad dressed with a tangy vinaigrette. The freshness of the salad will balance out the richness of the lasagna.
  • Red Wine: Enjoy a glass of your favorite red wine, such as a Chianti or Sangiovese, which pairs beautifully with the flavors of the lasagna.

FAQs

Q: Can I make this lasagna ahead of time?

A: Absolutely! You can assemble the lasagna ahead of time and refrigerate it for up to 24 hours before baking. This is a great option if you want to prepare the lasagna in advance for a special occasion or simply save time on the day of cooking.

Q: Can I freeze the leftovers?

A: Yes, you can freeze the leftovers for later enjoyment. Simply divide the lasagna into individual portions, wrap them tightly in plastic wrap and aluminum foil, and store them in the freezer for up to 3 months. When ready to eat, thaw the lasagna overnight in the refrigerator and reheat in the oven until heated through.

Q: Can I use a different type of cheese?

A: Absolutely! While the traditional recipe calls for mozzarella, you can experiment with different types of cheese to add your own twist. Try using a combination of cheddar and Gruyère for a richer flavor, or sprinkle some crumbled feta cheese on top for a tangy kick.

Final Thoughts

Indulge your taste buds and impress your loved ones with this Million Dollar Lasagna with Rich Meat Sauce and Creamy Cheese. With its layers of perfectly cooked pasta, flavorful meat sauce, and creamy cheese filling, this dish is a showstopper. Whether you’re a seasoned chef or a beginner in the kitchen, this recipe is accessible and sure to be a hit. So gather your ingredients, follow the step-by-step instructions, and get ready to savor every bite of this luxurious lasagna. Bon appétit!

Ultimate Baked Macaroni and Cheese:

Ultimate Baked Macaroni and Cheese

Introduction

Imagine digging into a piping hot dish of creamy, cheesy macaroni and feeling pure comfort flood your senses. The ultimate baked macaroni and cheese is a classic dish that brings back childhood memories for many. Whether it’s a cozy weeknight dinner or a crowd-pleasing potluck dish, this recipe is sure to satisfy your cravings. In this article, we’ll take you step-by-step through the process of creating the ultimate baked macaroni and cheese that will leave everyone asking for seconds.

Why You’ll Love This Recipe

There are countless reasons why this macaroni and cheese recipe is a crowd favorite. First and foremost, it’s incredibly easy to make, even for novice cooks. With just a few simple ingredients and minimal prep time, you can have a delicious homemade mac and cheese on the table in no time.

What sets this recipe apart is the perfect balance of flavors and textures. The combination of creamy cheese sauce and al dente pasta creates a heavenly experience for your taste buds. The cheesy topping adds a delightful crunch, making each bite a sensory delight. Plus, you can customize it with your favorite cheese or add mix-ins like bacon or jalapenos for an extra kick.

Ingredients

Here’s what you’ll need to make the ultimate baked macaroni and cheese:

  • 8 ounces elbow macaroni
  • 4 tablespoons unsalted butter
  • 1/4 cup all-purpose flour
  • 2 cups whole milk
  • 2 cups shredded cheddar cheese
  • 1 cup shredded mozzarella cheese
  • 1/2 teaspoon salt
  • 1/4 teaspoon black pepper
  • 1/4 teaspoon paprika
  • 1/4 teaspoon garlic powder

Optional: Add your favorite mix-ins such as cooked bacon, sautéed onions, or diced jalapenos for extra flavor.

Step-by-Step Instructions

Follow these simple steps to create the ultimate baked macaroni and cheese:

  1. Preheat your oven to 350°F (175°C) and grease a 9×13-inch baking dish.
  2. Cook the macaroni according to the package instructions until al dente. Drain and set aside.
  3. In a large saucepan, melt the butter over medium heat. Add the flour and whisk continuously for about 1 minute to create a roux.
  4. Slowly pour in the milk while whisking constantly to avoid lumps. Continue cooking and whisking until the sauce thickens, about 5 minutes.
  5. Remove the saucepan from heat and stir in the shredded cheddar and mozzarella cheese until melted and smooth.
  6. Season the cheese sauce with salt, black pepper, paprika, and garlic powder. Taste and adjust the seasonings if needed.
  7. Add the cooked macaroni to the sauce and stir until well coated.
  8. Transfer the macaroni and cheese mixture to the greased baking dish and spread it evenly.
  9. Sprinkle additional shredded cheese on top for a cheesy crust, if desired.
  10. Bake in the preheated oven for 25-30 minutes, or until the top is golden and bubbling.
  11. Let it cool for a few minutes before serving.

Expert Tips for Success

Follow these expert tips to ensure your ultimate baked macaroni and cheese turns out perfectly:

  • Use a combination of cheddar and mozzarella cheese for the best flavor and texture.
  • For an extra creamy sauce, use whole milk instead of low-fat alternatives.
  • Don’t overcook the pasta. It should be al dente as it will continue cooking in the oven.
  • Feel free to experiment with different cheese combinations to suit your taste.
  • If you like a crispy topping, broil the macaroni and cheese for a couple of minutes after baking.

Variations and Substitutions

While the classic baked macaroni and cheese is already delicious on its own, you can get creative and customize the recipe to suit your preferences:

1. Add mix-ins: Stir in cooked bacon, sautéed onions, or diced jalapenos for an extra flavor boost.

2. Swap the cheese: Experiment with different cheeses like Gruyere, Monterey Jack, or Swiss to create unique flavor profiles.

3. Make it gluten-free: Use gluten-free macaroni and substitute the all-purpose flour with a gluten-free flour blend.

4. Add a breadcrumb topping: Mix breadcrumbs with melted butter and sprinkle it over the macaroni and cheese before baking for a crispy crust.

Serving Suggestions

The ultimate baked macaroni and cheese is a versatile dish that can be enjoyed on its own or paired with complementary sides. Here are a few serving suggestions:

  • Serve it as a main course with a side salad or steamed vegetables.
  • Pair it with a bowl of tomato soup for a comforting and satisfying meal.
  • Serve it as a side dish alongside roasted chicken or grilled steak.
  • Garnish with fresh herbs like parsley or chives for a pop of color and freshness.
  • Accompany it with a glass of chilled white wine or a refreshing iced tea.

FAQs

Q: Can I make this recipe ahead of time?

A: Yes, you can assemble the macaroni and cheese ahead of time and refrigerate it until you’re ready to bake. Just make sure to increase the baking time by a few minutes.

Q: Can I freeze the leftovers?

A: Absolutely! Let the macaroni and cheese cool completely, then transfer it to an airtight container or freezer-safe dish. It can be frozen for up to 3 months. Thaw in the refrigerator overnight before reheating.

Q: Can I use different pasta shapes?

A: Yes, you can use other short pasta shapes like penne, rigatoni, or shells. Just adjust the cooking time according to the package instructions.

Final Thoughts

The ultimate baked macaroni and cheese is a timeless classic that never fails to bring joy and comfort to the table. With its rich and creamy cheese sauce, perfectly cooked pasta, and golden crispy topping, it’s a dish that will become a family favorite. Whether you’re hosting a gathering or simply craving some comfort food, this recipe is sure to impress. So grab your apron, gather your ingredients, and get ready to indulge in the ultimate mac and cheese experience!

We hope you enjoy making and savoring this delicious dish. Don’t forget to share your macaroni and cheese adventures with us in the comments below. Happy cooking!

Ultimate Baked Macaroni and Cheese:

Ultimate Baked Macaroni and Cheese:

Recipe by Author

Experience the ultimate comfort food with this classic baked macaroni and cheese recipe. Creamy, cheesy, and satisfying, this dish is perfect for cozy dinners or potluck gatherings.

Course: Main Dish Cuisine: American Difficulty: easy
4.5 from 120 votes
🍽️
Servings
6
⏱️
Prep time
15
minutes
🔥
Cooking time
30
minutes
📊
Calories
450
kcal
Cook Mode
Keep the screen of your device on

Ingredients

  • 8 ounces elbow macaroni
  • 4 tablespoons unsalted butter
  • 1/4 cup all-purpose flour
  • 2 cups whole milk
  • 2 cups shredded cheddar cheese
  • 1 cup shredded mozzarella cheese
  • 1/2 teaspoon salt
  • 1/4 teaspoon black pepper
  • 1/4 teaspoon paprika
  • 1/4 teaspoon garlic powder

Directions

  1. Preheat your oven to 350°F (175°C) and grease a 9×13-inch baking dish.
  2. Cook the macaroni according to the package instructions until al dente. Drain and set aside.
  3. In a large saucepan, melt the butter over medium heat. Add the flour and whisk continuously for about 1 minute to create a roux.
  4. Slowly pour in the milk while whisking constantly to avoid lumps. Continue cooking and whisking until the sauce thickens, about 5 minutes.
  5. Remove the saucepan from heat and stir in the shredded cheddar and mozzarella cheese until melted and smooth.
  6. Season the cheese sauce with salt, black pepper, paprika, and garlic powder. Taste and adjust the seasonings if needed.
  7. Add the cooked macaroni to the sauce and stir until well coated.
  8. Transfer the macaroni and cheese mixture to the greased baking dish and spread it evenly.
  9. Sprinkle additional shredded cheese on top for a cheesy crust, if desired.
  10. Bake in the preheated oven for 25-30 minutes, or until the top is golden and bubbling.
  11. Let it cool for a few minutes before serving.

Nutrition Facts

Calories: 450
Fat: 25
Carbohydrates: 35
Protein: 20
Sodium: 600
Fiber: 2
Sugar: 5

Juicy and Flavorful Glazed Meatloaf:

Juicy and Flavorful Glazed Meatloaf

Introduction

Imagine sinking your teeth into a tender, juicy meatloaf that’s bursting with mouthwatering flavors. This glazed meatloaf recipe is a true delight for meat lovers and comfort food enthusiasts. Whether you’re hosting a family gathering or simply craving a hearty meal, this recipe is sure to satisfy your taste buds. In this article, we’ll walk you through the step-by-step instructions for creating this delicious dish. So, roll up your sleeves and let’s dive into the world of juicy and flavorful glazed meatloaf!

Why You’ll Love This Recipe

There are several reasons why this glazed meatloaf recipe stands out from the crowd:

  • The perfect balance of flavors: This recipe combines savory, sweet, and tangy flavors, creating a mouthwatering taste experience.
  • Tender and moist texture: The secret to achieving a juicy meatloaf lies in the combination of ingredients and cooking techniques used in this recipe.
  • Quick and easy preparation: With simple ingredients and straightforward instructions, this recipe is accessible to both experienced and novice cooks.
  • Customizable to your preferences: You can easily adjust the seasonings and glaze to suit your personal taste.

Ingredients

To create this delightful glazed meatloaf, you will need the following ingredients:

  • 1 ½ pounds ground beef
  • 1 cup breadcrumbs
  • 1 onion, finely chopped
  • 2 cloves of garlic, minced
  • 1 carrot, grated
  • 1 celery stalk, finely chopped
  • 1/4 cup ketchup
  • 2 tablespoons Worcestershire sauce
  • 2 tablespoons fresh parsley, chopped
  • 1 teaspoon dried thyme
  • 1 teaspoon salt
  • 1/2 teaspoon black pepper

Optional glaze ingredients:

  • 1/4 cup ketchup
  • 2 tablespoons brown sugar
  • 1 tablespoon Dijon mustard

Step-by-Step Instructions

Follow these simple steps to create your own glazed meatloaf:

  1. In a large mixing bowl, combine the ground beef, breadcrumbs, onion, garlic, carrot, celery, ketchup, Worcestershire sauce, parsley, thyme, salt, and black pepper. Mix well until all the ingredients are evenly incorporated.
  2. Transfer the mixture to a greased baking dish and shape it into a loaf shape.
  3. If desired, prepare the glaze by mixing together the ketchup, brown sugar, and Dijon mustard in a small bowl. Spread the glaze evenly over the meatloaf.
  4. Preheat your oven to 375°F (190°C).
  5. Bake the meatloaf in the preheated oven for approximately 1 hour, or until the internal temperature reaches 160°F (71°C) using a meat thermometer.
  6. Once cooked, remove the meatloaf from the oven and let it rest for a few minutes before slicing.
  7. Serve slices of the glazed meatloaf with your favorite sides and enjoy!

Expert Tips for Success

Follow these expert tips to ensure your glazed meatloaf turns out perfectly:

  • Use a combination of ground beef and pork for added flavor and moisture.
  • Don’t overmix the meatloaf mixture, as it can result in a denser texture.
  • Let the meatloaf rest for about 10 minutes after baking to allow the juices to redistribute.
  • For a caramelized glaze, broil the meatloaf for an additional 2-3 minutes after baking.
  • Experiment with different seasonings and spices to personalize the flavor profile.

Variations and Substitutions

Feel free to get creative with your glazed meatloaf by trying these variations and substitutions:

  • Swap the ground beef for ground turkey or chicken for a lighter option.
  • Add diced bell peppers or jalapeños for an extra kick of flavor.
  • Replace the breadcrumbs with crushed crackers or oats for a gluten-free version.
  • Try different glaze variations, such as a barbecue glaze or a sweet and spicy glaze.

Serving Suggestions

Here are some serving suggestions to complement your glazed meatloaf:

  • Pair it with creamy mashed potatoes and steamed vegetables for a classic comfort food combination.
  • Serve it alongside a fresh green salad and crusty bread for a lighter meal.
  • Enjoy it in a sandwich with some tangy pickles and melted cheese.

FAQs

Q: Can I make the meatloaf ahead of time?

A: Absolutely! You can prepare the meatloaf mixture in advance and refrigerate it overnight. When ready to cook, shape it into a loaf, apply the glaze, and bake as directed.

Q: Can I freeze the leftovers?

A: Yes, you can freeze the glazed meatloaf. Wrap individual slices or the whole loaf tightly in plastic wrap and place it in an airtight container. It can be stored in the freezer for up to 3 months. Thaw in the refrigerator overnight before reheating.

Final Thoughts

Indulge in the irresistible flavors of this juicy and flavorful glazed meatloaf. With its perfect blend of seasonings and a delightful glaze, this recipe is bound to become a family favorite. Don’t hesitate to make it your own by adding your personal touch. Give it a try, and let the savory aromas fill your kitchen as you create a memorable meal for your loved ones. Share your experiences and any variations you’ve tried in the comments below. Happy cooking!

Juicy and Flavorful Glazed Meatloaf:

Juicy and Flavorful Glazed Meatloaf:

Recipe by Author

Indulge in juicy and flavorful glazed meatloaf that combines savory, sweet, and tangy flavors for a mouthwatering taste experience. This recipe is quick, easy to prepare, and customizable to suit your preferences.

Course: Main Dish Cuisine: American Difficulty: medium
4.5 from 120 votes
🍽️
Servings
8
⏱️
Prep time
15
minutes
🔥
Cooking time
60
minutes
📊
Calories
380
kcal
Cook Mode
Keep the screen of your device on

Ingredients

  • 1 ½ pounds ground beef
  • 1 cup breadcrumbs
  • 1 onion, finely chopped
  • 2 cloves of garlic, minced
  • 1 carrot, grated
  • 1 celery stalk, finely chopped
  • 1/4 cup ketchup
  • 2 tablespoons Worcestershire sauce
  • 2 tablespoons fresh parsley, chopped
  • 1 teaspoon dried thyme
  • 1 teaspoon salt
  • 1/2 teaspoon black pepper
  • 1/4 cup ketchup (for optional glaze)
  • 2 tablespoons brown sugar (for optional glaze)
  • 1 tablespoon Dijon mustard (for optional glaze)

Directions

  1. In a large mixing bowl, combine ground beef, breadcrumbs, onion, garlic, carrot, celery, ketchup, Worcestershire sauce, parsley, thyme, salt, and black pepper. Mix well.
  2. Transfer the mixture to a greased baking dish and shape it into a loaf.
  3. If desired, prepare the glaze by mixing together ketchup, brown sugar, and Dijon mustard in a small bowl. Spread the glaze evenly over the meatloaf.
  4. Preheat the oven to 375°F (190°C).
  5. Bake the meatloaf in the preheated oven for approximately 1 hour, or until the internal temperature reaches 160°F (71°C) using a meat thermometer.
  6. Let the meatloaf rest for a few minutes before slicing.
  7. Serve slices of glazed meatloaf with favorite sides.

Nutrition Facts

Calories: 380
Fat: 18
Carbohydrates: 21
Protein: 29
Sodium: 820
Fiber: 2
Sugar: 7

Homemade Chick-fil-A Chicken Nuggets That Rival the Original!

Introduction

If you’re a fan of Chick-fil-A’s famous chicken nuggets, then get ready to be blown away by this homemade version that rivals the original! These crispy, flavorful chicken nuggets are surprisingly easy to make and will have your taste buds dancing with delight. Whether you’re looking to recreate a fast-food favorite or simply want to enjoy a delicious homemade snack, this recipe is a must-try.

Why You’ll Love This Recipe

There are several reasons why you’ll fall head over heels for these homemade Chick-fil-A chicken nuggets:

1. Easy and Quick: With just a few simple ingredients and straightforward steps, you can whip up a batch of these nuggets in no time.

2. Crispy and Flavorful: The combination of a perfectly seasoned coating and tender chicken creates a nugget that is irresistibly crispy on the outside and juicy on the inside.

3. Homemade Goodness: Making these nuggets from scratch allows you to control the quality of the ingredients and customize the flavor to your liking.

Ingredients

To make these delicious homemade Chick-fil-A chicken nuggets, you’ll need the following ingredients:

– Boneless, skinless chicken breasts

– Pickle juice

– Milk

– Egg

– All-purpose flour

– Powdered sugar

– Paprika

– Salt

– Black pepper

– Garlic powder

– Peanut oil, for frying

Step-by-Step Instructions

Follow these simple steps to create your own homemade Chick-fil-A chicken nuggets:

1. Cut the chicken breasts into bite-sized pieces and place them in a bowl.

2. Pour pickle juice over the chicken, making sure each piece is coated. Let it marinate for at least 30 minutes in the refrigerator.

3. In a separate bowl, whisk together milk and egg.

4. In another bowl, combine flour, powdered sugar, paprika, salt, black pepper, and garlic powder.

5. Take each marinated chicken piece, dip it in the milk and egg mixture, then coat it thoroughly with the flour mixture.

6. Heat peanut oil in a deep fryer or large pot to 350°F (175°C).

7. Carefully place the coated chicken nuggets into the hot oil and fry until golden brown and cooked through, about 4-6 minutes.

8. Remove the nuggets from the oil and let them drain on a paper towel-lined plate to remove excess oil.

9. Repeat the frying process until all the chicken nuggets are cooked.

10. Serve the homemade Chick-fil-A chicken nuggets hot with your favorite dipping sauce.

Expert Tips for Success

To ensure your homemade Chick-fil-A chicken nuggets turn out perfectly every time, keep these expert tips in mind:

– Use peanut oil for frying to achieve the best flavor and crispiness.

– Letting the chicken marinate in pickle juice adds a unique tangy flavor and helps tenderize the meat.

– Make sure the oil is at the correct temperature before frying to prevent the nuggets from becoming greasy.

– Don’t overcrowd the fryer or pot, as this can cause the nuggets to cook unevenly.

Variations and Substitutions

While these homemade Chick-fil-A chicken nuggets are fantastic on their own, you can also get creative and customize the recipe to suit your preferences:

– Spicy Version: Add a pinch of cayenne pepper or hot sauce to the flour mixture for a kick of heat.

– Gluten-Free: Substitute the all-purpose flour with a gluten-free flour blend.

– Baked Option: If you prefer a healthier alternative, you can bake the nuggets in a preheated oven at 400°F (200°C) for about 15-20 minutes, turning them halfway through.

Serving Suggestions

These homemade Chick-fil-A chicken nuggets are incredibly versatile and can be enjoyed in various ways:

– Classic Meal: Serve the nuggets with some waffle fries, coleslaw, and a refreshing glass of lemonade for a classic Chick-fil-A-inspired meal.

– Salad Topping: Slice the nuggets and use them as a protein-packed topping for your favorite salad.

– Game Day Snack: These nuggets make a fantastic finger food for game day gatherings. Serve them with an array of dipping sauces for everyone to enjoy.

FAQs

Q: Can I make these chicken nuggets ahead of time?

A: While these nuggets are best enjoyed fresh, you can prepare the coated chicken pieces ahead of time and refrigerate them until ready to fry.

Q: Can I freeze the leftover chicken nuggets?

A: Yes, you can freeze the cooked nuggets in an airtight container for up to 3 months. To reheat, bake them in a preheated oven at 375°F (190°C) for about 10-15 minutes.

Final Thoughts

Homemade Chick-fil-A chicken nuggets are a game-changer when it comes to recreating the beloved fast-food classic at home. With their irresistible crispiness and juicy flavor, these nuggets are sure to impress family and friends. So, roll up your sleeves, gather your ingredients, and get ready to enjoy a batch of homemade nuggets that rival the original!

We can’t wait to hear about your experience making these delicious homemade Chick-fil-A chicken nuggets. Don’t forget to share your thoughts and tag us on social media!

Homemade Chick-fil-A Chicken Nuggets That Rival the Original!

Homemade Chick-fil-A Chicken Nuggets That Rival the Original!

Recipe by Author

Crispy, flavorful chicken nuggets that rival the original Chick-fil-A version. Easy to make and irresistibly delicious, these homemade nuggets will have your taste buds dancing with delight.

Course: Appetizer Cuisine: American Difficulty: medium
4.5 from 120 votes
🍽️
Servings
4
⏱️
Prep time
30
minutes
🔥
Cooking time
4
minutes
📊
Calories
320
kcal
Cook Mode
Keep the screen of your device on

Ingredients

  • 2 boneless, skinless chicken breasts
  • 1/2 cup pickle juice
  • 1/4 cup milk
  • 1 egg
  • 1 cup all-purpose flour
  • 2 tablespoons powdered sugar
  • 1 teaspoon paprika
  • 1 teaspoon salt
  • 1/2 teaspoon black pepper
  • 1/2 teaspoon garlic powder
  • Peanut oil, for frying

Directions

  1. Cut the chicken breasts into bite-sized pieces and place them in a bowl.
  2. Pour pickle juice over the chicken, ensuring each piece is coated. Marinate for at least 30 minutes.
  3. Whisk together milk and egg in a separate bowl.
  4. In another bowl, combine flour, powdered sugar, paprika, salt, black pepper, and garlic powder.
  5. Dip each marinated chicken piece in the milk and egg mixture, then coat with the flour mixture.
  6. Heat peanut oil to 350°F (175°C) in a deep fryer or pot.
  7. Fry the coated chicken nuggets until golden brown and cooked through, about 4-6 minutes.
  8. Remove nuggets from oil and let them drain on a paper towel-lined plate.
  9. Repeat frying process until all nuggets are cooked.
  10. Serve hot with your favorite dipping sauce.

Nutrition Facts

Calories: 320
Fat: 12
Carbohydrates: 24
Protein: 28
Sodium: 680
Fiber: 1
Sugar: 3

Southern Comfort: Creamy and Smoky Copycat Popeye’s Red Beans and Rice Recipe

Introduction

Welcome to our Southern Comfort recipe series, where we bring you classic and beloved dishes from the heart of the South. In today’s recipe, we’re going to show you how to recreate the creamy and smoky goodness of Popeye’s famous Red Beans and Rice right in your own kitchen. This copycat recipe captures all the flavors that make this dish a true Southern comfort food. So, put on your apron and get ready for a delicious culinary adventure!

Why You’ll Love This Recipe

There’s a reason why Popeye’s Red Beans and Rice has become a staple in Southern cuisine. This recipe offers a combination of flavors and textures that are simply irresistible. Here’s why you’ll love it:

1. Easy to make: With simple ingredients and straightforward instructions, this recipe is perfect for both beginner and experienced cooks.

2. Budget-friendly: Red beans and rice are humble ingredients that won’t break the bank, making this recipe a great option for feeding a crowd or meal prepping.

3. Creamy and smoky: The creamy texture of the beans pairs perfectly with the smoky flavors of the sausage, creating a comforting and satisfying dish.

4. Versatile: This recipe can be easily customized to suit your taste preferences. Add some heat with hot sauce or jazz it up with your favorite spices.

Ingredients

To recreate Popeye’s Red Beans and Rice, you’ll need the following ingredients:

– 1 pound dried red kidney beans

– 1 tablespoon vegetable oil

– 1 onion, finely chopped

– 1 green bell pepper, finely chopped

– 2 celery stalks, finely chopped

– 3 cloves garlic, minced

– 1 pound smoked sausage, sliced

– 2 bay leaves

– 1 teaspoon dried thyme

– 1 teaspoon smoked paprika

– 1/2 teaspoon cayenne pepper

– Salt and black pepper to taste

– Cooked white rice for serving

– Chopped green onions for garnish

Step-by-Step Instructions

Follow these simple steps to recreate the creamy and smoky goodness of Popeye’s Red Beans and Rice:

1. Start by rinsing the dried red kidney beans under cold water. Then, place them in a large bowl and cover with water. Let them soak overnight.

2. In a large pot, heat the vegetable oil over medium heat. Add the chopped onion, green bell pepper, celery, and minced garlic. Sauté until the vegetables are soft and fragrant.

3. Push the sautéed vegetables to one side of the pot and add the sliced smoked sausage. Cook until the sausage is browned and slightly crispy.

4. Drain the soaked kidney beans and add them to the pot with the sausage and vegetables. Stir well to combine.

5. Add the bay leaves, dried thyme, smoked paprika, cayenne pepper, salt, and black pepper to the pot. Give everything a good stir.

6. Pour enough water into the pot to cover the beans and sausage. Bring the mixture to a boil, then reduce the heat to low and let it simmer for about 2 hours, or until the beans are tender and the flavors have melded together.

7. While the beans are simmering, prepare the white rice according to the package instructions.

8. Once the beans are cooked to perfection, remove the bay leaves and use a wooden spoon to slightly mash some of the beans against the side of the pot. This will help thicken the sauce.

9. Serve the red beans over a bed of fluffy white rice. Garnish with chopped green onions for a pop of freshness.

Expert Tips for Success

– Soaking the kidney beans overnight helps to reduce their cooking time and ensures a creamier texture.

– If you’re short on time, you can use canned kidney beans instead. Just be sure to drain and rinse them before adding them to the pot.

– Don’t be afraid to adjust the seasonings to suit your taste. Add more cayenne pepper for extra heat or increase the smoked paprika for a deeper smoky flavor.

– For an extra layer of flavor, consider adding a ham hock or some bacon to the pot while the beans are simmering.

Variations and Substitutions

This recipe is incredibly versatile and can be customized to suit your preferences. Here are a few variations and substitutions you can try:

– Vegetarian option: Skip the smoked sausage and instead use a combination of smoked paprika, liquid smoke, and your favorite vegetables for a delicious vegetarian version.

– Meat lovers’ delight: Feel free to add other meats like ham, bacon, or even leftover roast chicken to the pot for a heartier dish.

– Spice it up: If you love spicy food, add some diced jalapeños or a few dashes of hot sauce to give your red beans and rice a fiery kick.

Serving Suggestions

Popeye’s Red Beans and Rice is a meal on its own, but you can elevate the experience by serving it with some tasty accompaniments. Here are a few serving suggestions:

– Cornbread: Nothing complements a Southern-style dish like a slice of homemade cornbread. The slightly sweet and crumbly texture pairs perfectly with the creamy beans.

– Collard greens: Add some vibrant greens to your plate with a side of tender collard greens. Sauté them with garlic and a splash of vinegar for a tangy twist.

– Sweet tea: Quench your thirst with a refreshing glass of sweet tea. The combination of the sweet tea and savory beans creates a perfect balance of flavors.

FAQs

Q: Can I freeze the leftovers?

A: Absolutely! Red Beans and Rice freezes well and makes for a convenient and comforting meal on busy days. Just portion it into airtight containers and freeze for up to 3 months. Thaw in the refrigerator overnight and reheat on the stovetop or in the microwave.

Q: Can I use a different type of bean?

A: While red kidney beans are traditional for this recipe, you can experiment with other types of beans like pinto beans or black beans. Keep in mind that the cooking time may vary.

Q: What can I do if my beans are too salty?

A: If your beans turn out too salty, don’t worry! You can balance the saltiness by adding a splash of vinegar or a squeeze of lemon juice to the dish.

Final Thoughts

Recreating Popeye’s Red Beans and Rice at home is a delicious way to bring a taste of the South to your kitchen. This creamy and smoky dish is the epitome of Southern comfort food. Whether you’re hosting a gathering or simply craving some comfort on a weeknight, this recipe is sure to satisfy. So, grab your apron, gather your ingredients, and get ready to enjoy a bowl of soul-warming goodness. Don’t forget to share your cooking adventures with us!

Southern Comfort: Creamy and Smoky Copycat Popeye's Red Beans and Rice Recipe

Southern Comfort: Creamy and Smoky Copycat Popeye’s Red Beans and Rice Recipe

Recipe by Author

Recreate the creamy and smoky goodness of Popeye’s famous Red Beans and Rice right in your own kitchen with this Southern comfort food recipe. Creamy red kidney beans, smoked sausage, and a blend of flavorful spices come together to create a satisfying dish that is perfect for any day of the week.

Course: Main Dish Cuisine: Southern Difficulty: medium
4.5 from 60 votes
🍽️
Servings
6
⏱️
Prep time
30
minutes
🔥
Cooking time
120
minutes
📊
Calories
380
kcal
Cook Mode
Keep the screen of your device on

Ingredients

  • 1 pound dried red kidney beans
  • 1 tablespoon vegetable oil
  • 1 onion, finely chopped
  • 1 green bell pepper, finely chopped
  • 2 celery stalks, finely chopped
  • 3 cloves garlic, minced
  • 1 pound smoked sausage, sliced
  • 2 bay leaves
  • 1 teaspoon dried thyme
  • 1 teaspoon smoked paprika
  • 1/2 teaspoon cayenne pepper
  • Salt and black pepper to taste
  • Cooked white rice for serving
  • Chopped green onions for garnish

Directions

  1. Start by rinsing the dried red kidney beans under cold water. Place them in a large bowl, cover with water, and let them soak overnight.
  2. In a large pot, heat vegetable oil over medium heat. Sauté onion, green bell pepper, celery, and garlic until soft and fragrant.
  3. Push the sautéed vegetables to one side of the pot and add the sliced smoked sausage. Cook until browned and slightly crispy.
  4. Drain the soaked kidney beans and add them to the pot with the sausage and vegetables. Stir well to combine.
  5. Add bay leaves, dried thyme, smoked paprika, cayenne pepper, salt, and black pepper to the pot. Stir.
  6. Pour enough water into the pot to cover the beans and sausage. Bring to a boil, then simmer for about 2 hours, until beans are tender and flavors meld.
  7. Prepare the white rice according to package instructions while the beans are simmering.
  8. Once the beans are cooked, remove bay leaves and slightly mash some beans. Serve the red beans over white rice and garnish with chopped green onions.

Nutrition Facts

Calories: 380
Fat: 18
Carbohydrates: 42
Protein: 15
Sodium: 750
Fiber: 10
Sugar: 5

Decadent Chocolate-Cherry Brownie Bombs:

Introduction

Indulge in the heavenly combination of rich, decadent chocolate and luscious cherries with our mouthwatering Chocolate-Cherry Brownie Bombs. These delightful treats are a perfect fusion of fudgy brownies and sweet-tart cherries, creating a dessert that will satisfy even the most discerning sweet tooth. Whether you’re a chocolate lover, a cherry enthusiast, or simply someone who appreciates a delectable dessert, these brownie bombs are sure to become a new favorite in your recipe repertoire.

Why You’ll Love This Recipe

These Chocolate-Cherry Brownie Bombs offer a delightful combination of flavors and textures that will leave you craving for more. Here’s why you’ll absolutely adore this recipe:

  • The perfect balance of rich chocolate and tangy cherries
  • Fudgy and moist brownie center
  • A crispy and slightly chewy outer layer
  • Easy and straightforward preparation
  • Impressive presentation for special occasions

Ingredients

To create these decadent Chocolate-Cherry Brownie Bombs, you’ll need the following ingredients:

  • 1 cup of dark chocolate, chopped
  • 1/2 cup of unsalted butter
  • 1 cup of granulated sugar
  • 3 large eggs
  • 1 teaspoon of vanilla extract
  • 3/4 cup of all-purpose flour
  • 1/4 cup of cocoa powder
  • 1/4 teaspoon of salt
  • 1 cup of fresh cherries, pitted
  • Optional: powdered sugar for dusting

Step-by-Step Instructions

Follow these simple steps to create your own Chocolate-Cherry Brownie Bombs:

  1. Preheat your oven to 350°F (175°C) and line a baking sheet with parchment paper.
  2. In a microwave-safe bowl, melt the dark chocolate and butter together in 30-second intervals, stirring until smooth.
  3. In a separate bowl, whisk together the sugar, eggs, and vanilla extract until well combined.
  4. Pour the melted chocolate mixture into the sugar and egg mixture, stirring until fully incorporated.
  5. In another bowl, sift together the flour, cocoa powder, and salt.
  6. Add the dry ingredients to the wet ingredients, mixing until just combined.
  7. Gently fold in the pitted cherries, being careful not to overmix.
  8. Using a cookie scoop or spoon, portion the brownie batter onto the prepared baking sheet, spacing them apart.
  9. Bake for 12-15 minutes, or until the edges are set and the centers are slightly soft.
  10. Remove from the oven and allow the brownie bombs to cool on the baking sheet for a few minutes before transferring them to a wire rack to cool completely.
  11. If desired, dust the Chocolate-Cherry Brownie Bombs with powdered sugar before serving.

Expert Tips for Success

Follow these expert tips to ensure your Chocolate-Cherry Brownie Bombs turn out perfectly:

  • Use high-quality dark chocolate for a rich and intense flavor.
  • Don’t overmix the brownie batter after adding the dry ingredients to avoid a tough texture.
  • Use a cookie scoop or spoon to portion the batter for evenly sized brownie bombs.
  • Allow the brownie bombs to cool slightly before removing them from the baking sheet to prevent them from falling apart.

Variations and Substitutions

Feel free to get creative and customize your Chocolate-Cherry Brownie Bombs with these variations and substitutions:

  • Try using white chocolate instead of dark chocolate for a sweeter flavor.
  • Swap out the cherries for other fruits like raspberries or strawberries.
  • Add a sprinkle of chopped nuts, such as almonds or walnuts, for extra crunch.
  • For a gluten-free version, use a gluten-free flour blend in place of all-purpose flour.

Serving Suggestions

These Chocolate-Cherry Brownie Bombs are a delightful treat on their own, but you can elevate the experience by serving them with a few accompaniments:

  • Top with a scoop of vanilla ice cream for a decadent dessert.
  • Drizzle warm chocolate sauce over the brownie bombs for an extra touch of indulgence.
  • Serve alongside a cup of hot coffee or a glass of cold milk.

FAQs

Here are some common questions about Chocolate-Cherry Brownie Bombs:

Can I make these brownie bombs ahead of time?

Yes, you can prepare the brownie bombs in advance and store them in an airtight container at room temperature for up to 3 days.

Can I freeze the brownie bombs?

Absolutely! Once cooled, place the brownie bombs in a freezer-safe container or bag and freeze for up to 2 months. Thaw them at room temperature before serving.

Can I use frozen cherries instead of fresh?

Yes, you can use frozen cherries in this recipe. Thaw them first and pat them dry before folding them into the brownie batter.

Final Thoughts

Indulge in the irresistible combination of chocolate and cherries with our decadent Chocolate-Cherry Brownie Bombs. These delightful treats are perfect for any occasion, whether you’re hosting a dinner party or simply want to treat yourself to something sweet. With their fudgy center, crispy exterior, and bursts of tangy cherries, these brownie bombs are sure to impress your taste buds. Give this recipe a try and let us know how it turns out for you. Enjoy!

Decadent Chocolate-Cherry Brownie Bombs:

Decadent Chocolate-Cherry Brownie Bombs:

Recipe by Author

Indulge in the heavenly combination of rich, decadent chocolate and luscious cherries with these mouthwatering Chocolate-Cherry Brownie Bombs. The perfect fusion of fudgy brownies and sweet-tart cherries results in a dessert that satisfies even the most discerning sweet tooth.

Course: Dessert Cuisine: American Difficulty: medium
4.5 from 120 votes
🍽️
Servings
12
⏱️
Prep time
30
minutes
🔥
Cooking time
15
minutes
📊
Calories
280
kcal
Cook Mode
Keep the screen of your device on

Ingredients

  • 1 cup dark chocolate, chopped
  • 1/2 cup unsalted butter
  • 1 cup granulated sugar
  • 3 large eggs
  • 1 teaspoon vanilla extract
  • 3/4 cup all-purpose flour
  • 1/4 cup cocoa powder
  • 1/4 teaspoon salt
  • 1 cup fresh cherries, pitted
  • Optional: powdered sugar for dusting

Directions

  1. Preheat your oven to 350°F (175°C) and line a baking sheet with parchment paper.
  2. In a microwave-safe bowl, melt the dark chocolate and butter together in 30-second intervals, stirring until smooth.
  3. In a separate bowl, whisk together the sugar, eggs, and vanilla extract until well combined.
  4. Pour the melted chocolate mixture into the sugar and egg mixture, stirring until fully incorporated.
  5. In another bowl, sift together the flour, cocoa powder, and salt.
  6. Add the dry ingredients to the wet ingredients, mixing until just combined.
  7. Gently fold in the pitted cherries, being careful not to overmix.
  8. Using a cookie scoop or spoon, portion the brownie batter onto the prepared baking sheet, spacing them apart.
  9. Bake for 12-15 minutes, or until the edges are set and the centers are slightly soft.
  10. Remove from the oven and allow the brownie bombs to cool on the baking sheet for a few minutes before transferring them to a wire rack to cool completely.
  11. If desired, dust the Chocolate-Cherry Brownie Bombs with powdered sugar before serving.

Nutrition Facts

Calories: 280
Fat: 14
Carbohydrates: 36
Protein: 4
Sodium: 75
Fiber: 2
Sugar: 24

Creamy Sweet Heat:

Introduction

Welcome to our flavorful and indulgent recipe for Creamy Sweet Heat! If you’re a fan of dishes that strike the perfect balance between creamy and spicy, then you’re in for a treat. This recipe combines rich and smooth ingredients with a touch of heat to create a dish that will tantalize your taste buds. Whether you’re a spice lover or just looking to add a little kick to your meal, this recipe is sure to satisfy your cravings.

Why You’ll Love This Recipe

There are several reasons why this Creamy Sweet Heat recipe is a must-try. Firstly, it’s incredibly easy to make, requiring just a few simple ingredients that you probably already have in your pantry. Secondly, the combination of creamy and spicy flavors is simply irresistible, creating a taste sensation that will leave you wanting more. Lastly, this dish can be customized to suit your personal preferences, making it a versatile option for any occasion.

Ingredients

Here’s what you’ll need to make this delectable Creamy Sweet Heat:

  • 1 cup of heavy cream
  • 1 tablespoon of butter
  • 2 cloves of garlic, minced
  • 1 teaspoon of chili powder
  • 1/2 teaspoon of cayenne pepper
  • 1/4 teaspoon of salt
  • 1/4 teaspoon of black pepper
  • 1/4 cup of grated Parmesan cheese
  • 1/4 cup of chopped fresh cilantro

Feel free to adjust the spice levels according to your taste. If you prefer a milder heat, reduce the amount of chili powder and cayenne pepper. Likewise, if you’re a heat-seeker, you can increase the spices for an extra kick.

Step-by-Step Instructions

  1. In a large skillet, melt the butter over medium heat.
  2. Add the minced garlic to the skillet and sauté for 1-2 minutes, until fragrant.
  3. Sprinkle in the chili powder, cayenne pepper, salt, and black pepper. Stir well to combine the spices with the butter and garlic.
  4. Pour in the heavy cream and bring to a simmer. Cook for 5 minutes, stirring occasionally.
  5. Reduce the heat to low and gradually add the grated Parmesan cheese. Stir until the cheese is fully melted and the sauce is smooth.
  6. Remove from heat and garnish with fresh cilantro.

And there you have it! A creamy and spicy sauce that will elevate any dish. This Creamy Sweet Heat is perfect for drizzling over grilled chicken, roasted vegetables, or even pasta. The possibilities are endless!

Expert Tips for Success

To ensure the best results with this recipe, here are a few expert tips:

  • Use high-quality Parmesan cheese for the best flavor and texture.
  • For a creamier sauce, you can substitute half-and-half or whole milk for the heavy cream.
  • If you prefer a smoother sauce, you can strain it after adding the Parmesan cheese.
  • Feel free to customize this recipe by adding your favorite herbs or spices.
  • If the sauce becomes too thick, simply add a splash of milk or cream to thin it out.

Variations and Substitutions

While this Creamy Sweet Heat recipe is already a winner on its own, you can get creative and make some delicious variations:

– For a smoky twist, add a teaspoon of smoked paprika to the sauce.

– If you’re not a fan of cilantro, you can substitute it with fresh parsley or basil.

– For a vegetarian version, swap the butter with olive oil and use vegetable broth instead of chicken broth.

– If you prefer a dairy-free option, replace the heavy cream and Parmesan cheese with coconut milk and nutritional yeast.

Don’t be afraid to experiment and make this recipe your own!

Serving Suggestions

This Creamy Sweet Heat sauce is incredibly versatile and can be served in a variety of ways:

– Drizzle it over grilled chicken or steak for a burst of flavor.

– Toss it with cooked pasta for a quick and delicious weeknight meal.

– Use it as a dipping sauce for crispy chicken tenders or roasted vegetables.

– Spread it on sandwiches or wraps for an extra kick.

However you choose to enjoy it, this Creamy Sweet Heat sauce is sure to take your dish to the next level.

FAQs

Q: Can I make this sauce ahead of time?

A: Absolutely! You can prepare the sauce in advance and store it in an airtight container in the refrigerator for up to 3 days. When ready to use, gently reheat the sauce on the stovetop or in the microwave.

Q: How spicy is this sauce?

A: The heat level of this sauce can be adjusted according to your preference. The combination of chili powder and cayenne pepper gives it a medium spice level. If you prefer a milder sauce, simply reduce the amount of spices.

Q: Can I freeze the sauce?

A: While it’s best to enjoy this sauce fresh, you can freeze it for future use. Allow the sauce to cool completely, then transfer it to a freezer-safe container or zip-top bag. It can be stored in the freezer for up to 3 months. Thaw the sauce in the refrigerator overnight and reheat before serving.

Final Thoughts

Indulge in the creamy richness and spicy kick of our Creamy Sweet Heat recipe. Whether you’re hosting a gathering or simply treating yourself to a special meal, this versatile sauce is a game-changer. With its easy preparation and endless serving possibilities, it’s no wonder this recipe has become a favorite among food enthusiasts. So go ahead, give it a try, and let your taste buds dance with delight!

Creamy Sweet Heat:

Creamy Sweet Heat:

Recipe by Author

Indulge in the creamy richness and spicy kick of this versatile sauce that combines rich and smooth ingredients with a touch of heat to tantalize your taste buds. Perfect for drizzling over grilled chicken, roasted vegetables, or pasta.

Course: Main Dish Cuisine: Global Difficulty: easy
4.5 from 50 votes
🍽️
Servings
4
⏱️
Prep time
10
minutes
🔥
Cooking time
10
minutes
📊
Calories
298
kcal
Cook Mode
Keep the screen of your device on

Ingredients

  • 1 cup heavy cream
  • 1 tablespoon butter
  • 2 cloves garlic, minced
  • 1 teaspoon chili powder
  • 1/2 teaspoon cayenne pepper
  • 1/4 teaspoon salt
  • 1/4 teaspoon black pepper
  • 1/4 cup grated Parmesan cheese
  • 1/4 cup chopped fresh cilantro

Directions

  1. In a large skillet, melt the butter over medium heat.
  2. Add the minced garlic and sauté for 1-2 minutes until fragrant.
  3. Sprinkle in the chili powder, cayenne pepper, salt, and black pepper. Stir well to combine.
  4. Pour in the heavy cream and bring to a simmer. Cook for 5 minutes, stirring occasionally.
  5. Reduce the heat to low and gradually add the grated Parmesan cheese. Stir until the cheese is melted and the sauce is smooth.
  6. Remove from heat and garnish with fresh cilantro.

Nutrition Facts

Calories: 298
Fat: 28
Carbohydrates: 6
Protein: 6
Sodium: 236
Fiber: 0.5
Sugar: 2